A Good Looking Blonde

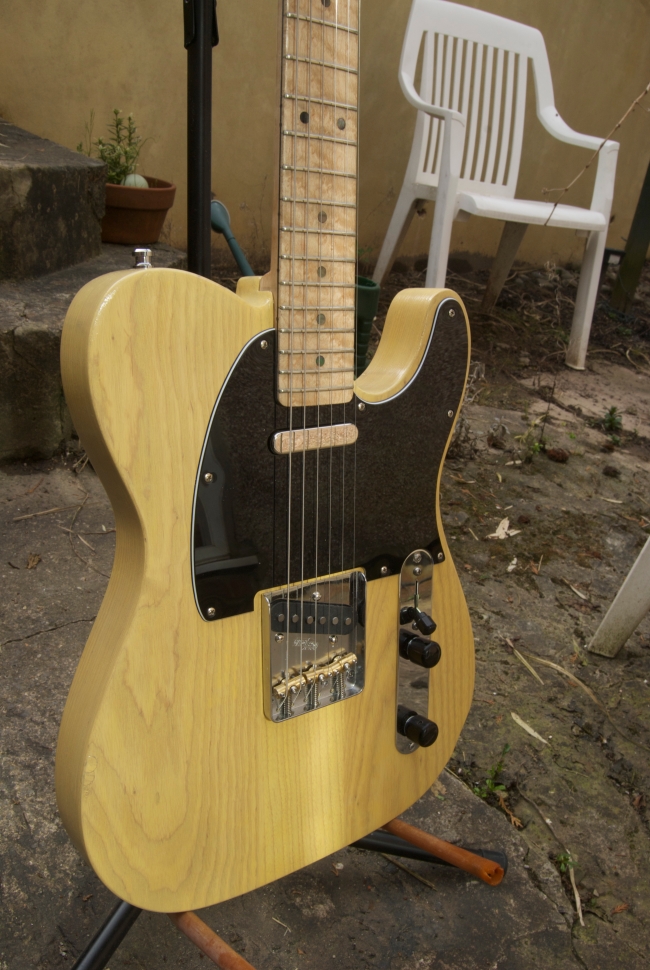
After almost exactly 2 years (including a lengthy, wedding related, hiatus) the Telecaster build is now done. I need to do a final set up including tweaking the playing action and truss rod, but that can wait for another day.

Image


Yesterday, having waited for the cure time on the body lacquer to finish, I assembled the guitar.

Some of the hardware already had holes drilled from the trial stringing back in November, so for the neck and bridge installation was simply a case of screwing everything in. For the pick guard, control plate, and strap buttons however I first marked out the position of the screws using my Blue Spruce brad awl, and then drilled pilot holes using a Dremel. I appreciate that using anything battery powered is a departure from my hand tool only approach, but for some tasks a Dremel just can’t be beat, and the numerous small (2.5mm diameter) pilot holes I needed for the hardware was one of these tasks. Once the pilot holes were drilled, I then used a 10mm diameter counter sink bit in my egg beater hand drill to gently counterbore the tops of the pilot holes, so that the screw threads would not lift wood fibres.

Fitting the hardware to the body was a bit of a jigsaw. The position of the bridge was fixed by virtue of the scale length of the strings, and also the route for the bridge pickup. The control plate and pickguard however still had some room for movement, and it was important that they lined up with each other. My approach was to fix the pickguard first by reference to the neck and the bridge, and then slide the control plate in next to it.

The string ferrules on the back of the guitar were press fit, with the holes drilled just large enough to accept them prior to applying the lacquer. With the body lacquered, the holes were slightly too small for the ferrules to fit. This was intentional, as it ensured that there was no bare wood or gap around the edge of the ferrules. To fit them, each ferrule was placed over the appropriate hole, and then heated with the tip of a soldering iron just enough to allow the lacquer to melt and the ferrule to slide into the hole, before being wiped down with a damp rag to stop the wood scorching.

The final job was to solder and fit the electronics. It’s been a long time since I’ve wielded a soldering iron in anger, and despite being a relatively simple circuit, this was the longest part of the job. The electronics were soldered outside of the body, as there is very little room in the control cavity, before being hooked up to the pickups and the control plate screwed in place. For this guitar I opted for a 4 position selector switch (instead of the usual 3 position switch found on genuine Telecasters) with the 4th position placing both pickups in series, for a quasi-humbucking tone.

After all that, I got to play her. And despite needing that final set up, she sounds great. The Bare Knuckle Pickups really twang (this is a mid-50’s spec blackguard, after all) and the chunky boat neck profile feels surprisingly comfortable. I’m looking forward to getting to know this guitar better.

A full photo shoot will follow in the next entry.

The end is nigh

Image

Don’t worry, I’m not prophesying the coming apocalypse. But the Telecaster is now within a week of being finished. I flattened the lacquer on the neck last week and buffed it to a high gloss, and the colour work on the body is now done. Once the lacquer on the body has cured I will install the hardware, do the final set up, and finally after 2 years work, play her for the first time.

Today I spent a couple of hours preparing for the final assembly and set up next week, the main task of which was refitting the neck to the body. Prior to spraying the lacquer, the neck was a perfect fit for the neck pocket, with very little wriggle room. Which is as it should be, but meant that the build up of lacquer, particularly in the two corners, meant that the neck no longer fit as it should. This did not given me any cause for concern – photos of vintage Fender guitars show paint dribbles in the neck pockets, and I had anticipated needing to spend a little time cleaning the pocket up. Half an hour of easing out the build up of lacquer from the walls of the neck pocket with 320 grit paper soon had everything fitting nice and snug once again.  I suppose that I could mask off the walls of the neck pocket in future, although you do want some lacquer on the top corner of the neck pocket so as not to have an abrupt transition to bare wood, and so some sanding to remove the worst of the lacquer build up is always going to be necessary.

Having got the neck fitting snuggly, I re-drilled the body stringing holes and screw holes for mounting the bridge, to clear them of lacquer so as not to foul the screw threads.

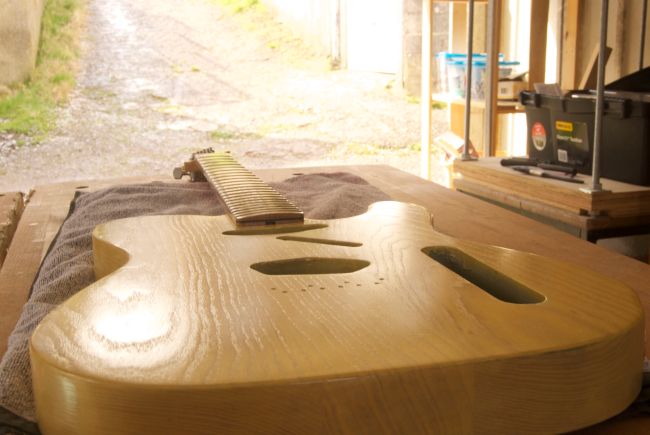
I will write more fully about the finishing process (and some lessons learnt on this build) separately. But for now I’ll leave you, dear reader, with a picture showing the lovely grain on the swamp ash body showing through the butterscotch blonde lacquer.

Image

Year of the R.A.T

Thus far, I have mainly written about woodworking and music on this blog, and that is where the primary focus of this blog will stay. But this evening, I want to write about my third passion; martial arts.

At first blush, the world of martial arts may seem far removed from the workshop and from the cafe’s and local clubs where I play live music. But I think all three worlds share common and complementary themes. All contain physical and mental components – relying on the joining of mind and body to play a song, plane a board, or execute that perfect hip throw. All three are based on the use of simple movements or processes which build towards the whole. And I think that all three are at some level concerned with the refining of skills towards achieving a state of perfection (what I believe the Japanese term kaizen).  For me, one of the most crucial aspects of all three, and one which really tickles the pleasure centres, is the mental and physical discipline, the focus, required to engage in the activity properly, and to develop and hone new skills.

My martial arts background is in Shorinji Kan Jiu-Jitsu, and I have been lucky to train under some very very good instructors in both Yorkshire and the West Midlands (particularly at York Town Jitsu Club, where I trained under the tutelage of Sensei Stephen Millard for four years – someone I am lucky to count as both an instructor and a close friend). Back in 2009 I also started training in Defendo with Clive Elliott. Clive is one of the most talented, knowledgable, and humble martial artists I have met, and he was kind enough to teach a four hour Defendo session as part of my stag party last year. When Clive announced that he was teaching his first R.A.T course in five years this February, I couldn’t pass up the opportunity to train with him again, and to learn a new skill set.

Rapid Assault Tactics, or “the R.A.T”, is a combative system originally developed by Paul Vunak for Navy SEALs team 6. Yes, you read that right – US Navy SEALs team 6. This is a serious system. Based on Jeet Kune Do concepts, the R.A.T is a road map which takes you from the start of a fight, to exit, in a few very simple steps. The obvious benefits of such a system is that the next stage of the system is always obvious, and having as few moving parts as possible means that there is less to forget or to go wrong. The down side of the R.A.T (and one which Clive emphasised repeatedly throughout the course of the day) is that it is a loaded gun system which should be used only when no other option is available – the end technique has the same pressure per square inch as a bowling ball dropped on your opponents head from a second storey window. The outcome of which is, very obviously, death. This is a really serious system.

The R.A.T road map has two starting points based on determining the range of the attack, with an emphasis on protecting high-line and low-line attacks as you close in on your opponent. Coming from a traditional Japanese style of Jiu Jitsu, the blocks in response to both punches and kicks felt a little uncomfortable at first – I am used to moving off the centre line to parry and collect the attack, before redirecting the incoming energy for a throw or joint manipulation. Instead, with the R.A.T, blocks are made from the centreline with only a subtle amount of movement, the intention being that the block itself will destroy the attacking hand or leg. That being said, once I had got the hang of not moving as much as my inner jitsuka wanted, the subtle movement to place the block felt very straight forward. And I can attest to how effective these destructions are; even with an 18oz boxing glove, and thai boxing shin guard, placing the punches and kicks (rather than wailing in full pelt) left a very definite sense of pain and all momentum going out of the attack. If the block connects properly on a fully committed attach I can imagine that the effect on your opponent would be devastating.

Having successfully blocked the incoming attack, closing the distance involved a Wing Chun style chain punch, albeit with a great deal more forward movement, with the objective being to overwhelm the attacker and get to his (or her) head. I won’t detail as to what follows, but needless to say it is nasty stuff, and definitely effective. There were two things I found interesting about the straight blast. Firstly, as your opponents posture breaks down, it could sometimes be hard to stop the chain punch in order to take control of the head and finish the R.A.T, rather than continuing with the straight blast and drilling them solidly into the floor. That I think comes with practice, and also remembering what the objective is. Secondly, although we drilled the R.A.T with boxing gloves and motorcycle helmets, receiving the straight blast was still incredibly disorientating and painful (my neck and shoulders were none too happy the next day), and the thought of receiving this without protection is definitely not something I would relish. Again, this is a serious system.

In terms of the course itself, Clive taught us the R.A.T over the course of eight hours, firstly focusing on each of the component steps, building up to drilling the R.A.T on individual opponents, and culminating in an escape scenario of 5 on one, then 7 on 2 (which is total chaos). Being such a simple system meant that after only three hours we had covered the R.A.T from start to exit, and could then focus on building up the flow and intensity. Clive is one of the best instructors I have had the pleasure of training under, and not only did he present the R.A.T in an accessible and straight forward way (peppered with appropriate anecdotes), but also set the flow and the rhythm of the seminar so that the eight hours felt manageable and didn’t suffer from the oh-will-this-never-end lull that can so often set in mid-afternoon. I would unreservedly recommend Clive’s classes to anyone who wants to learn functional martial arts.