In which maple boards achieve their destiny

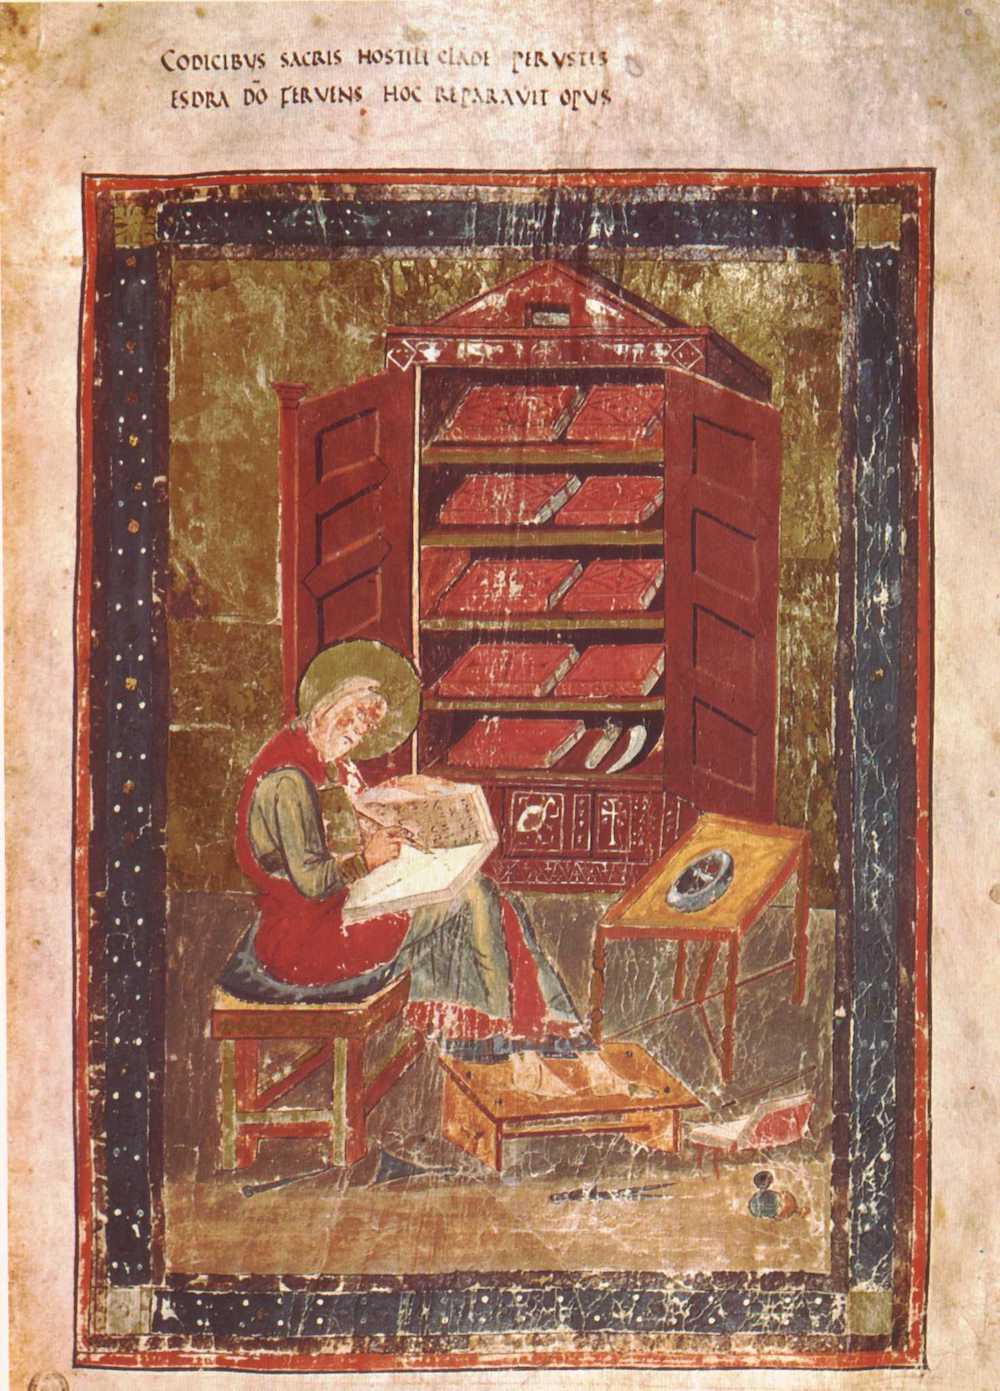
And with that, the bookcase is assembled. Well, now quite just like “that“. And there is still the matter of the top rail, kick, and backboards to fit. But the main glue-up is now concluded and what was a collection of five boards now starts to look like a piece of furniture. So that’s a good step in the right direction.

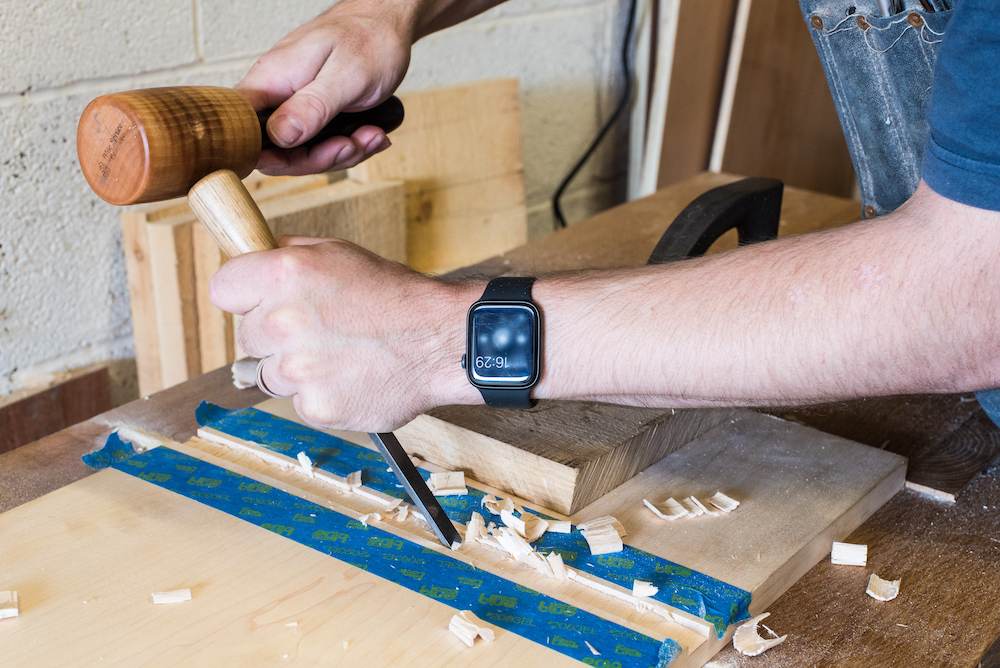
I never like to rush into a glue-up – that is the path down which catastrophe lies. So today’s session at the workbench was spent working at a steady but leisurely pace, with the focus being on working towards a smooth and incident free glue-up. Maple can be a beautiful timber, but tends to discolour and pick-up workshop grime very quickly. So the first step in my glue-up preparation was to lightly dress the interior faces of the components to remove any workshop rash and discolouration, using the Holtey 985 (it will break my heart whe I need to return this plane to Karl in a month or so). I was aiming to remove as little material as possible as I didn’t want to introduce any slop into the joinery, but just remove grime and dings and return the surface finish to straight-off-the-plane fresh.

The next step was to preserve that fresh and clear surface finish with a coat of blonde shellac. I mixed up a fresh 2lb cut batch of blonde tiger flakes (from Tools for Working Wood) yesterday, which also provided an opportunity to give a science and polishing lesson to the Apprentice. The magnetic mixer mixed the shellac perfectly with none of the residue at the bottom of the jar that I normally get, no matter how diligently I stir by hand. Is it an essential workshop purchase? Probably not, but for a very small outlay it made mixing up shellac very easy. The other benefit of pre-finishing the components with shellac is that it makes cleaning up glue squeeze-out very easy, as the glue won’t adhere to shellac.

Of course, I don’t want shellac on the surfaces which do need to be glued, including the ends of the shelves and the rear 1/2″ strip of the sides (which will be glued to the backboards). To protect these, I laid down a strip of blue tape and then used a sharp making gauge to cut the tape to the right width, before peeling off the excess. This is easier and faster than trying to lay the tape down to a precise line. With the glue surfaces taped up, I applied three coats of shellac, using a cotton pad stuffed with wadding. The shellac cures very quickly, so I was able to apply one coat to each component and then go round for a second, then a third time, without pausing. Blonde shellac does not add too much colour to maple, but does bring out the figure, and is the same finish I applied to my staked desk (which the bookcase will stand next to).

The final preparatory step was to cut clamping cauls for each dado, set up the clamps, and warm up the glue to ensure it would flow nicely in the autumnal chill. Assembling the bookcase is not as straight forward a task as you would expect – the lack of mechanical fixings in the joinery mean that until all three shelves are in and the clamps are tightened, the structure is pretty unstable. This is contrast to a dovetailed chest (for example) which is effectively self clamping if you’ve done a decent job of cutting the joinery. Fortunately Dr Moss was on hand to provide able assistance, and thanks to our dry-run last week and today’s preparation, it went together smoothly and with only minimal bleeding on the casework – the good news is that blood wipes off shellac easily too! With the casework assembled I cleaned up squeeze-out with a toothbrush and plenty of warm water. Once the glue has cured I’ll remove the clamps and dress the outer surface of the sides before applying shellac and installing the nails which will provide both decoration and a mechanical element to the joinery.

Last of the summer joinery

It has been challenging to get any real shop time since late August. First the workshop door (an “up and over” garage type) failed and I was locked out for two weeks while I waited for an engineer to instal new parts and service the mechanism. As soon as that was done, work pressures at the day job meant that I was chained firmly to my desk for a couple of weeks. But ggainst all odds, the joinery for the boarded bookcase is now cut and I did a dry assembly of the casework today.

The final elements of joinery were the rabbets for kick and top rail. These require a slightly different approach to the dados for the shelves, partly because of grain direction (rabbets run along the grain, dados run across it) and because the rabbets do not run the length of the workpiece. The rabbet for the kick runs into the bottom dado, but the rabbet for the kick is stopped, which brings with it a few challenges for the handtool worker.

I cut the rabbet for the kick first, as this is easier than the stopped groove for the rail. Because the rabbet for the kick runs into the shelf dado I was able to prepare a first class cut and gently saw the walls, being careful not to overcut the workpiece, or to kink my saw on the opposite wall of the dados. I warmed up by sawing the inside wall of the rabbet, which won’t be seen once the kick is installed, and then cut the show edge second. With the walls cut I then weakened the waste by chiselling across the grain, and then popped it out with a half inch chisel working bevel up. Once I was close to the final depth I moved to the router plane to clean the bottom of the rabbet.

There are several ways to cut a stopped rabbet. Where the end of the rabbet will be hidden then sawing the walls can be very quick. However I did not want to leave signs of overcutting on the bookcase as the end of the rabbet will be visible. So the approach I took was similar to chopping a mortise. After scoring deep layout lines with a marking gauge to define a clean edge for the rabbet, I chopped across the grain with my 1/2″ chisel, followed by gently paring the edges with a 2″ wide chisel. Paring the edges is delicate work, as hitting the chisel hard can cause the grain to split. But after a few rounds of chopping across the grain, paring the side walls and popping out the waste in between, the rabbet was ready for the router plane to bring to final depth.

With all of the joinery cut I tested the fit of each shelf individually, and used a large shoulder plane to adjust the fit of the shelves where needed. Then it was time to do a dry assembly of the maim casework. After processing stock since April, this was the first time that I had seen the components come together and indicate how the finished piece will look like. The dry run also helps to identify any potential difficulties for glue-up.

Next weekend I will clean up the interior surfaces of the bookcase and then glue up the main assembly.

The Book Book: A Year On The Path

CodxAmiatinusFolio5rEzra

This portrait of Ezra from an 8th century bible may be one of the first illustrations of what we would recognise as a bookcase

I suppose it was inevitable that bookcases would eventually be the subject of my attention as a woodworker. I’ve always been a voracious reader and my book buying habit was only reinforced by studying history at undergraduate and graduate level, habits which were amplified by my wife’s profession (she is a lecturer in history at the University of Northampton) and appetite for reading. When Dr Moss and I moved in together, one of our first acts was to buy seven Billy bookcases to house our combined literature and history library. At that time, I was setting up my first workshop having studied lutherie at the Totnes School of Guitarmaking, and furniture building seemed like a different world to building guitars. So, a trip to IKEA and carrying seven flatpack bookcases up the torturous steps to our house it was. Six of those Billies survived two house moves and eight years of constant overloading, but their days are numbered and I now make more furniture than I do guitars. It is time to replace the Billies and to liberate the several boxes of books that have languished for years on my study floor.

Why should any of this matter? Well, because for as long as I can remember, I’ve viewed bookcases as a storage solution for the question of “where do I put all these books?” But I’ve not stopped to think about the bookcases themselves all that much. That’s how most folk think about bookcases; even the librarians in charge of historic collections tend to look at the contents of the shelves instead of the casework. Book storage is largely ignored until you don’t have enough of it.

But when you look beyond the books, and start to tease of the “why” and the “how” of book storage, things get interesting. Chris first talked to me about his idea for “The Book Book” in the autumn of 2017, and I was hooked. Not only was this a chance to replace those Billies, but also to piece together why bookcases developed into the form we now recognise. That is a path we’ve been on in earnest for a year now, and it is a fascinating opportunity to jump down many rabbit holes and to ask questions that might seem obvious, but for which no easy answers are available.

Oxford_Library_of_Christ_Church

Construction of the library at Christ Church, Oxford spanned a period of 63 years

One of the few books on this subject is “The Book on the Bookcase” by Henry Petroski – a fine book, but which focuses more on the “how” than the “why”. And the “why” is where the real action is. Book technology is a recognised field of historic research, but one that is concerned more with the making and use of books rather than how book storage developed, but it can tell inadvertently tell us plenty about the factors that shaped bookcase development. Bookcases have developed to house books, so understanding why books are the sizes and shapes they are, the customs of book usage, and value and importance placed on books, all tell us something about why bookcases developed how they did.

Oh, that’s easy” you might think. The development of the Gutenberg press encouraged standardised paper sizes which then determined shelf spacing. Well, possibly, but why those sizes and height-to-width ratios? Book storage pre-dates the printing press by hundreds of years – as soon as the first book was created, storage space was needed. And so, “The Book Book” becomes a wonderful opportunity to challenge preconceptions about book usage and production. It is a winding path from a monk fraudulently putting his name to a book in the 8th century, through court rolls, the medieval practices of producing books by scribes (both professional and amateur), the development of the printing press and early modern book production, the unchaining of libraries in the 16th century, 17th century diarist Samuel Pepys, campaign furniture, Thomas Jefferson, William Morris, to Danish minimalism and beyond. And breathe. Do you want to know what the earliest documented instance of adjustable shelving in bookcases occurred? So do we.

IMG_5386

Lincoln College, Oxford houses striking 18th century bookcases

When woodworkers ask me what sort of book “The Book Book” will be, the closest example I can think of is “Ingenious Mechanicks.” Like that book, we will present a rigorously researched history (in this case of the development of the bookcase) alongside practical woodwork. As well as combing through texts on book technology, and scouring art history for examples of bookcases (the earliest example I can find dates from the 8th century), I’ve been researching the furniture record. In particular, historic bookcases still in use at Oxford University, some of which are over 500 years old, and the Pepys Library at Cambridge University. Historic bookcases give us key information on three key questions – what book storage was needed at the time of construction, how the bookcases were constructed, and then how they have been altered while in use due to changing needs.

DSC_2920

We will also be building notable historic bookcases, and covering techniques and practical considerations for designing and building bookcases. All you need to know to build your own book storage; the information I wished I’d had when I stood at that IKEA checkout with my mountain of Billy bookcases eight years ago.

I’ll be blogging about the research process and the breadcrumbs we have discovered, both here and on the Lost Art Press blog. I hope you will join us on this path.