Utility Dovetails – Nancy Hiller on furniture in the wild

IMG_8006

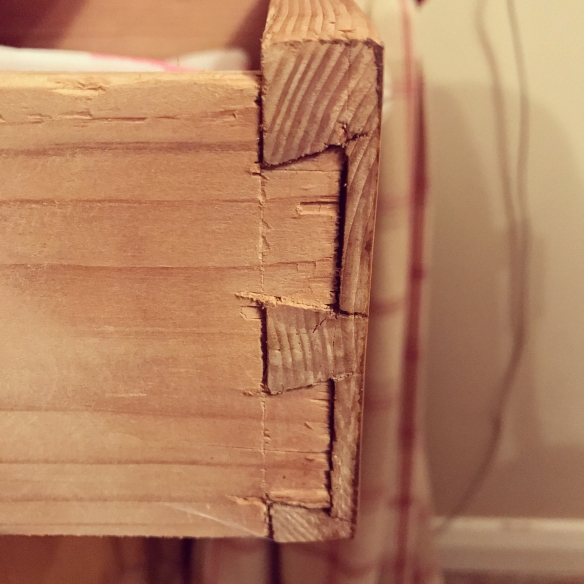
These dovetails (which Jim McConnell joked may have been cut with an axe) are rough in the extreme, but the drawer still moves smoothly after many decades in use.

Whenever we stay in holiday cottages I find myself drawn to the old pieces of furniture you usually find in these places. I open the drawes to check for fit and look at the dovetails, peek inside casework to look at joinery and for evidence of whether the maker processed their stock by hand. As I’ve written about before, such pieces can be a useful education in furniture that was made for daily use by ordinary folk, I have found that such exploration can be really useful to illustrate, and ground, the principles that Joshua and the team write about in Mortise & Tenon. The Cotswolds cottage we stayed in earlier this month was stuffed with furniture that had clearly been made by hand, for daily use rather than for a high-end market. Two pieces in particular caught my eye – a small dresser in the dining room, and a desk in the lounge. The draws of the dresser still moved smoothly and without wracking, which pointed to solid construction. But on examination the dovetails of those draws were quite rough (to say the least). Thinking that others may find this real world example to be interesting, I uploaded a photo to Instagram, and what followed was a fascinating conversation about “utility dovetails” and furniture in the wild. 

IMG_8035

The desk in our cottage. At some point in time someone had decided to fit this brass drawer pull, preventing the lock from being used. I wonder why they did not patch in the lock hole, or place the pull a little higher to completely hide the lock?

Now, I can wax lyrical about my thoughts on utility dovetails till the cows come home. But what I thought would be more interesting would be to offer some insight from a woodworker at the top of their craft. And so, in a very first for Over the Wireless what follows is a guest post, and I am honoured to welcome Nancy Hiller to the blog. As well as being a professional furniture maker, Nancy is one of my favourite woodwork writers – her latest book “Making Things Work: Tales from a Cabinetmaker’s Life” is essential reading for woodworkers and non-woodworkers alike, and her blog is full of thought provoking insights. So dear reader, please read on. 


IMG_2624

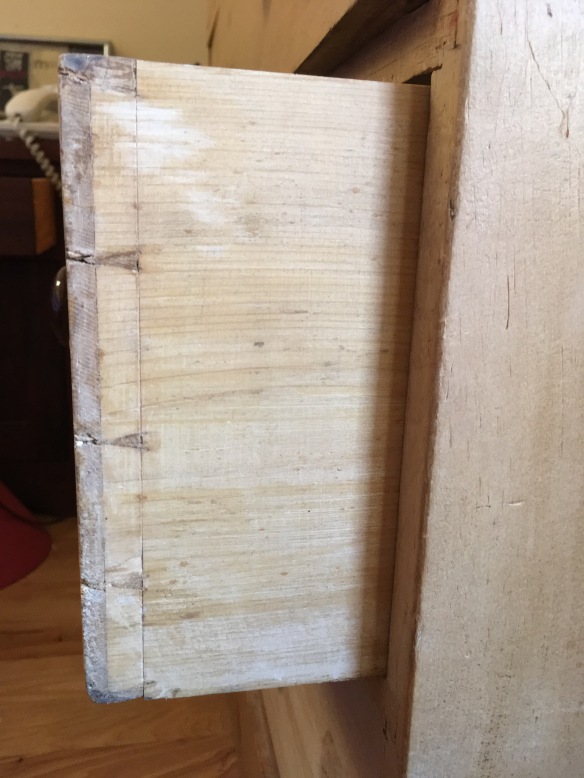
Nancy’s chest of drawers

A training in craft is a lesson in dissatisfaction. As craftspersons we are taught to internalize the message that we could, and should, always do better. Never mind the pots with minor defects in their glaze, the chairs whose turned finials are not a perfect match. However eagerly you long to exclaim “I made a chair!” you’re taught that these things are but means to an end: that great day when you will produce a Flawless Specimen, presumably the first of many in your career. For now, you must hold your head high as you hurl these personal indictments onto the bonfire.

***

One of my favorite pieces of furniture is a chest of drawers I bought at an antiques store in Reading (the English town, not its Pennsylvanian equivalent) circa 1984. At least a century old by now, it’s made of deal, a nondescript softwood, with knots and other characteristics usually considered defects. It was originally painted; traces of finish still linger in the cracks. By the time I came across it, a dealer had dipped it in methylene chloride stripper, which did the joints no favors. And yet it has held together over its three decades in my possession.

I love this chest of drawers, not least because it’s a mass of contradictions. It was made from defect-riddled paint-grade wood, but aside from the top, which is attached with nails, it was built with traditional joints cut by hand. Sliding dovetails hold the drawer rails in place. Stub tenons support the runners. The drawers themselves are dovetailed front and back; their bottoms, along with the cabinet’s back, are also solid. Altogether it’s a strange meeting of coarse and fine, at least by our own day’s standards.

What endears the piece to me most is the dovetails’ imperfection. They taper to a fine point, a mere saw kerf wide–typically considered a mark of high craft. Yet the gauge lines were left in place. What’s more, many of the kerfs go well beyond those lines; and some of the joints have gaps. If I produced a set of dovetails similar to these, I would feel obliged to consider tossing the drawer into my version of a bonfire, the woodstove that heats our house.

IMG_2621

Utility dovetails in the chest of drawers

These dovetails, which were clearly made by an accomplished craftsman intent on getting the job done, remind me that in the universe of making things, utility is no less worthy a goal than fine craft. Amidst the relentless drive to do better, it’s easy to lose sight of the grace that characterizes our very ability to make things, however imperfectly, not to mention the blessings offered by even the most basic material artifacts. Yes, the things we make reflect who we are, at least to a degree; and who wants to be defined by radical imperfection? But there’s a conceit in being so wrapped up in the tightness and proportions of a joint that we lose sight of the bigger picture, which includes those who will use the things we make.

***

I often find I can’t look at a piece of my own work without focusing on the parts that should have been done better. Even as I tell myself it’s alright to be less than perfect, I feel a pang of self-loathing. Sometimes I get a chance to visit a customer’s home years after I’ve completed a job. I see a table or a set of built-in cabinetry serving its purpose in its intended setting. And I am able to appreciate my work separate from its reflection of its decidedly flawed maker. It’s a valuable corrective, revealing my self-flagellation as a form of vanity.

This is one of the wonders of making. In the end, it’s not about perfection. While craft entails much character-building struggle, it’s also a practice of learning to accept our failings and appreciate our role as makers who bring useful objects into the world.


The Policeman Calls…


Issue 265 of Furniture & Cabinetmaking is now in print. Along with the usual compliment of articles on design, technique, and tool reviews, is a project article for The Policeman’s Boot Bench. This is the first major project article I’ve had published, and seeing the beautifully presented construction drawings (which were much nicer than the plans I drew before I built the piece) was a real thrill.

If The Policeman’s Boot Bench isn’t enough to tempt you, issue 265 includes more tricks of the trade by Ramon Valdez, an introduction to chip carving, an explanation on how to make 18th century cross-grain moulding, and a collector’s guide to gimlets.

The drawer component breakdown

I’ve been fighting off an unpleasant winter virus this week, which has had an impact on my productivity in the workshop. I did however manage to breakdown the stock for the desk drawer so that those parts can acclimatise before I start working on them.

_DPP4036

This little Lie-Nielsen No.101 block plane is one of the prettiest tools in my chest.

Breaking down stock for smaller components is a little different to working with timber that just needs to be cut to length for large casework or parts (for instance the top of the staked worktable), so I thought it was worth covering this process in a blog post.

IMG_8149

A couple of swipes with the plane removes the sealing paint and reveals the grain of the board

I had a 2″ thick maple board reserved for the drawer components, which will also yield some spare material for the staked chair. Before laying out the drawer components on the board I used a small block plane to remove the timber yard sealing paint from the end grain of the board in order to reveal the grain structure. Ideally for a drawer I would want quartersawn material, and while this wasn’t the case with this board, by carefully laying out the components I decided that I would be able to harvest material that was dimensionally stable. The drawer sides are the most critical part of the drawer assembly in terms of dimensional stability, as sides that exhibit too much seasonal movement will cause the drawer to rack and bind on its runners. I therefore laid out the sides to get the closest to quartersawn grain possible, with the back of the drawer getting the most flatsawn grain as this is the least critical component. By using material that is quite thick, I can also plane the sides at an angle to get closer to quartersawn grain.

_DPP4038

Laying out the oversized components with a pencil marking gauge

With that decision made, I laid out all of the components with a pencil marking gauge, being sure to leave them a little oversized in case cutting them out of the board results in any significant movement or unexpected checks. Although there should not be too much risk of this, I prefer to use slightly more material than necessary at this stage of a build and to err on the side of caution. While I use blade based marking gauges for most of my layout, a pencil line is much easier to see on rough timber, and this cam-lock gauge by Bern Billsberry is quickly becoming invaluable.

_DPP4039

The Skelton panel saw made short work of crosscutting the board into sections

By laying out the components in a way that made efficient use of the material, I effectively divided the board into three sections – one which remained unused, and two which had groups of drawer parts. My first step was therefore to crosscut the board into those three sections, using my Skelton panel saw. This resulted in two pieces which were easier to handle on the saw benches.

_DPP4041

The riup cuts were made with my Dissotn D8 – 117 years old and still going strong.

I then ripped the draw parts out of the two smaller boards using my Disston D8 rip saw. Normally I prefer to make long rip cuts at the workbench using an overhand ripping grip, as this is much easier on the back. Since I built the staked saw benches last autumn I have been focusing on improving the accuracy of my rip cuts using a traditional kneeling technique at the saw benches, and this is how I broke the boards down to the individual drawer components.

_DPP4044

The components are still in pairs, and I need to crosscut the parts, but I will do that in a week or so when the boards have had chance to rest.

The drawer parts are now lying in stick in the study, and in a couple of weeks time I’ll bring them closer to final dimension and allow them to acclimatise a little more before I build the drawer. I have not decided what to use for the drawer bottom yet. I have plenty of maple left over, or I might use plywood (which does have significant benefits in terms of seasonal stability). If I use plywood, then I am tempted to line the drawer with suede, which would also stop the contents rattling around.

_DPP4050

Two legs octagonalised, two legs tapered. Look at the light play on those facets.

I also octagonalised the second leg, using the same process as I wrote about last week. The remaining two legs are down to tapered square profiles, and awaiting octagonalisation. So I should be able to polish them off over the coming week.

Octagonalisation – a way of life, not a process

We’re just back from a wonderful, and much needed, week long break to the Cotswolds and so progress on the staked worktable has temporarily slowed. That being said, before we escaped for our trip I managed to octagonalise the first of the legs for the table, and I managed to steal time away in the workshop as soon as we returned home to continue work on the remaining legs.

IMG_8089

The consistent square profiled leg (l), tapered square leg (m) and tapered octagonal leg (r)

Octagonalising the legs is the stage of the build I’ve been most looking forward to. Taking leg from a consistent square cross section to a tapered octagon is a fun process, and as I’ve written about before, I really like the aethestic benefits – the increased facets and a significant reduction of the visual weight of the leg without reducing the structural integrity. Actually planing in the octagonal cross section for the work table legs is very much as for the staked saw benches I built last year, although there are a couple of important differences between these legs and the saw bench legs. Firstly, the legs taper in the opposite direction for the work table, with the narrowest point at the floor rather than at the tenon shoulder. Secondly, the tenons for the work table are shaped while the leg is still at a consistent square cross-section, while the saw bench legs were tenoned once they had been octagonalised. What this means in practice is that the process of laying out the octagons is a little different, as I could not rely on the same geometry techniques at the tenon shoulder as I did for the saw benches.

IMG_7959

Laying out the octagons with dividers

Chris suggests laying out the octagons by stepping off facets on each face of the tapered square leg with dividers, and so this was the approach I took. At the foot end I still used the same geometry technique as I had for the saw benches as a fail safe. The additional length and amount of taper on the work table legs does require a touch more accuracy when planing the octagons. On the saw benches I was happy to eyeball the consistency of the octagonal facets when planing, as this was plenty accurate for legs of that length and extent of taper. The taper is much more pronounced on the work table legs, and the legs are much longer, and so rather than rely on just eyeball acuracy I marked out the edge of each facet along the length of the legs, and worked to those lines.

IMG_7964

Planing the tapered square leg down to a tapered octagon

I also knocked up a pair of v-blocks to hold the legs while octagonalising. Nothing fancy – just some scrap blocks of poplar, into which a 90 degree “V” was cut with a cross-cut back saw (I used the Bad Axe Bayonet) which took a total of 5 minutes to prepare. These blocks support the leg, which would otherwise need to balance on the tip of a corner while planing the facets. To stop the leg shooting out the end of the blocks, I used a bench dog as a planing stop. This worked well enough, but really it emphasised how much I would benefit from a traditional toothed planing stop to hold work in place – yet another reason why I need to start looking into sourcing a slab of green oak for my Roubo bench.

IMG_7970

A pair of v-blocks, and a bench dog, hold the legs in place for octagonalising. On my next bench I will use a toothed planing stop instead of a bench dog.

With the facets laid out, and the leg held in place by the two v-blocks and a well placed bench dog, planing the octagons was very straight forward. I removed the majority of the waste with the No.5  set to a rank cut, and then refined each facet with the No.8 set to a fine cut to ensure the new faces were straight and square. When planing to joint, or to a precise line such a here, I constantly look at the mouth of the plane. Seeing exactly where the plane starts to bite the workpiece, and which part of the iron is producing the shaving, gives a huge amount of feedback and allows for very precise adjustments to plane position and pressure distribution for an accurate cut.

IMG_8088

Comparing the tapered octagonal leg to the tapered square profile, and the consistent square profile, shows just how much material has been removed.

Comparing the octagonalised leg to the original untapered profile, and even to the tapered square profile, it is striking just how much material has been removed and how much more elegant the finished leg is. The maple works really well for octagonalising as it holds details clearly, giving sharp corners between each facet. These legs, when installed, will have a really strong silhouette and an almost architectural quality.

Any Way You Slice It

For my birthday in May, Dr Moss booked me onto a bread making course at the Harborne Food School. The Food School opened a year or so ago right next to our favourite coffee shop, and the course list offers a wide variety of classes for all ability levels and areas of interest. And so it was inevitable that we would eventually start taking classes there. Despite baking quite a bit (at least before The Apprentice was born – there hasn’t been a huge amount of free time since) I’ve never made bread by hand. Given family history (more of which further down in this blog post) this is an omission I’ve long wanted to address, but haven’t really had the opportunity. The bread making class took place in July, and was a wonderful (and educational) evening in which the processes and mechanics of making high quality bread by hand were laid bare in an accessible and very enjoyable format. Which is all very well and good you say, but what exactly does this have to do with woodwork? At first blush not a great deal, but this class set some ideas in motion which have been slowly coalescing and bouncing round my mind ever since. 


But first, the class itself. Over the course of three hours we were instructed in how to make white and wholemeal loaves entirely by hand. Two batches of white dough were turned into a plaited loaf and batch rolls, while the wholemeal was baked into a loaf for slicing. As a final task we made pizza dough for cooking an in-class dinner, chatting about cooking and the best kept secrets of Birmingham’s restaurant scene while eating pizza we’d made ourselves and waiting for our bread to cool from the oven. The camaraderie and shared passion for food created a wonderful atmosphere, and instructor Charlotte gave very clear instructions and explations for the techniques and methods demonstrated. When it comes to traditional crafts there really is no substitute for hands on learning, and this was the perfect introduction to something I’ve wanted to try my hand at for as long as I can remember. I’m now on the waiting list for Advanced Breadmaking (focaccia and ciabatta ahoy!), and one of the very first things I did after the course was to book the Good Doctor onto a sushi making class for later this month. I fully expect that we’ll both be taking many more classes at the Harborne Food School over the coming years.

At some point during the class, as kneading the dough created a hypnotic rhythm, I started to reflect on the similar threads that link breadmaking to woodwork. It is, unsurprisingly, all about heritage. Heritage in terms of both skills and family history. 

Maple, not dough. But the  process of taking a gossamer full-width saving is surprisingly similar to that for kneading delicious bread.

Kneading that dough by hand, shaping it, and then baking until properly cooked, reminded me a lot of the time I spend at my workbench. The proximity you gain to your material by working by hand, without machines acting as intermediaries, gives rise to an understanding of how the material is being worked, and when it is ready. Touch and feel tell you as much (sometimes more) than your eyes, and the process becomes one of thinking with your fingers as well as your mind. The more time I spend at my workbench the more I think that this state is where I am most truly content – working with a combination of both hand and mind to arrive at something useful that I have fashioned myself out of basic raw materials. There is also a sense of self-reliance common to both woodwork and cooking. Sure, you can buy bread readily and cheaply. But the act of choosing to make it yourself out of good quality ingredients (free from the multitude of artificial elements found in commercial bread) speaks, I believe, to the same sense of aesthetic anarchism that motivates many of us to build the furniture we need. A small act of refusing to be someone else’s consumer, and to make the things we need. Maybe I’m over-playing this a little, but I still get the delicious bread at the end of it, so either way I win something.


Using those same traditional techniques to knead and bake the bread I found also brought me one step closer to my grandfather, and to the heritage of his chosen craft. I’ve written about my grandfather before (also here). When I was growing up he was the main woodworking example I had to look up to. But he was also a third generation master baker. If you read local history books about Birmingham in the nineteenth and twentieth century, many of them will mention T Mountford and Son, a bake house found on the Lichfield Road at the junction with Sutherland Street. That was the bakery started by my great-great-grandfather, at which three generations worked. My grandfather had left school at 14 to work in the bake house, and continued to do so until the shop closed in the 70’s (due, I believe to a compulsory purchase order by the council to widen the Lichfield Road). Even in his 80s, my grandfather had the strongest hands of anyone I’ve ever known, from a lifetime of kneading dough. And so during that hypnotic slap-stretch-roll of kneading the dough at the Harborne Food School, I found a wonderful sense of peace, and feeling that I was working as my grandfather had, not to mention the earlier and generations I’d never known, very much as I do when I’m at my workbench. 


Although traditional bread making doesn’t really translate to how I approach my workbench, that sense of self reliance and continuation of traditional skills in order to create things of use, is incredibly powerful. And it is a mindset that influences an increasing amount of my life.