The Life & Work of John Brown

img_3751

I doubt I have any readers who don’t already read Chris’ blog over at Lost Art Press. But just in case anyone somehow missed his post yesterday, I’m pleased to announce that I have signed up to co-author a book for Lost Art Press about the influential and radical chair maker John Brown. We agreed and signed contracts for the book a couple of months ago, and have been waiting for the last pieces to fall into place before announcing the book. Co-authoring the book will be Chris Williams, who built chairs alongside John for many years. Given his personal hisory with John Brown, working wih Chris Williams is about as close to the source of Welsh Stick Chairs as it is possible to get. And those chairs are simply gorgeous.

John Brown’s work is incredible, and it is an honour to be involved in a project which will (if we do our jobs properly) give John the legacy he deserves.  There’s plenty of hard graft ahead on this project, and I can’t wait to start work with Chris Williams and the team at Lost Art Press.

A Very Victorian Apprenticeship

IMG_3574

The following is based on an article first published in issue 251 of Furniture & Cabinet Making.

We all have different ways of learning new woodwork skills and refreshing our grasp of the basics, but how many of us have undertaken a Victorian apprenticeship in order to improve their woodwork? Well, that is exactly what I spent the summer doing, all from the comfort of my own workshop thanks to a nineteenth century text that has been republished by Lost Art Press.

A Very Traditional Apprenticeship

First published in 1839, The Joiner & Cabinet Maker takes the form of a story following the apprenticeship of a young lad called Thomas. We see Thomas at the very start of his apprenticeship when he builds a packing box for a customer to transport books, at the middle of his training when he builds a small dovetailed chest for a customer to take to school, and finally at the end of his apprenticeship when he builds a chest of drawers. Although the identity of the author is unknown, they were clearly either a woodworker or very familiar with woodwork, as the projects and tools are described with great detail and clarity.

_dpp2345

Processing rough stock by hand is just one of the core skills taught in The Joiner & Cabinet Maker

But more than just being a historical curio, by describing in detail three projects of increasingly complexity the book offers an opportunity to develop solid hand-tool techniques, and build up a compact handwork-focused tool kit, in a systematic fashion. As a consequence, I would argue that The Joiner & Cabinet Maker is an excellent introduction to hand tool work for the novice woodworker, and also a valuable refresher for more experienced folk.

Becoming the Joiner’s Apprentice

Over the summer I built the packing box and school box projects, and now have just the chest of drawers left before I complete my virtual Victorian apprenticeship – you can read my detailed build notes and experiences working on these projects by clicking on the “Joiner & Cabinet Maker” tab to the right of the page.

_dpp2315

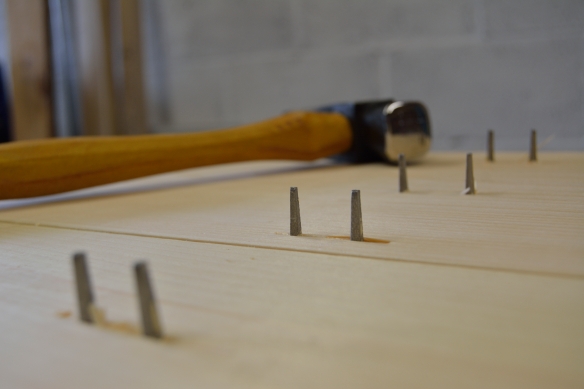
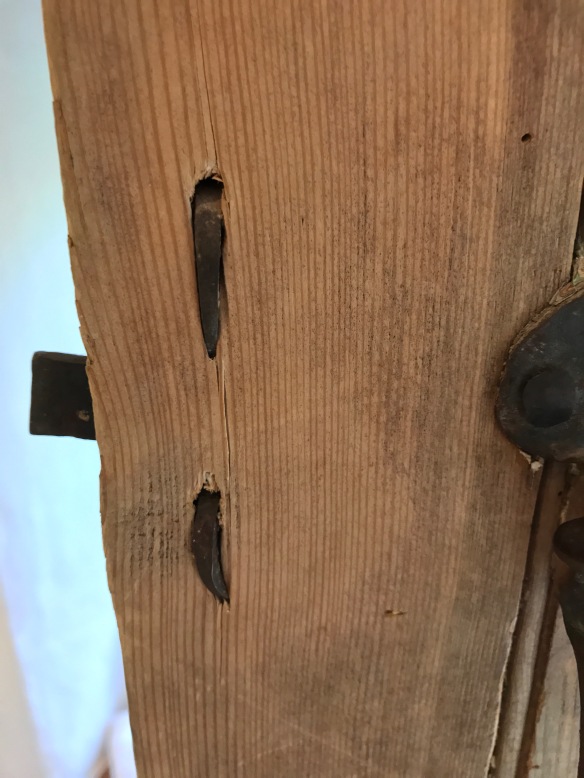
Cut nails waiting to be clenched

The first project, the packing box, is held together entirely by nails – battens are clinched to the top and bottom of the box, while the sides are secured with nailed butt joints. As this is the first project Thomas undertakes in his apprenticeship his tool kit is limited to ruler, chalk line, jack plane, smoothing plane, square, marking gauge, rip and cross cut saws, hammer, and either a brad awl or drill. The simple construction methods and limited tool kit therefore make the packing box a very accessible project to the beginner, and is a useful reminder that it does not take an endless list of tools to build furniture. For added excitement, Thomas is only given 5 hours to build the packing box, so there is the option to race the clock with this build if you choose!

_dpp2316

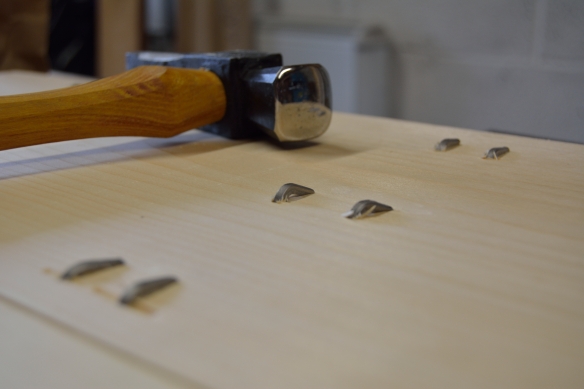
Nail clenching is an often overlooked, but very valuable, joinery technique

The individual projects are fun to build, but work through them in sequence, using only the tools and techniques described in the text, and deeper lessons become apparent. I’m not just talking about how to cut a good dovetail, although the text tells you how to achieve that, but more fundamental skills which are invaluable to successful woodwork. For the packing box, Thomas has a single board (12’ 3” long and 9” wide) with which to build a box to the customer’s dimensions. To achieve this accurate layout and efficient use of stock is essential, particularly to harvest the battens that hold the top and bottom of the box together. The School Box builds on these themes while also introducing the key skill of processing rough stock with hand planes, as well as fitting locks and hinges, and making mitred moulding runs.

The projects are nicely paced so that techniques and tools are introduced at a rate that makes them easily accessible to the beginner, and the first two projects are simple enough that results can be seen rapidly, which makes them very achievable. What is more, by working through the projects in sequence you can start with a very small tool kit that is slowly built up. The complete tool kit Thomas finishes the book with is still quite modest compared to that of many modern workers. The cost and number of tools needed for furniture building can often be seen as prohibitive, and giving new woodworkers a shorter shopping list can only encourage new entrants to the wood crafts.

_dpp2437

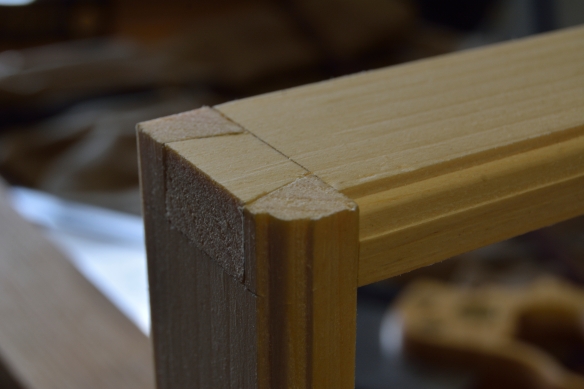
Dovetailed base moulding for the School Box – as well as dovetailing this project also introduces making short runs of moulding

The lessons offered by The Joiner and Cabinet Maker are not just for beginners. The projects also offer a valuable refresher, and new perspective, for more experienced woodworkers. One of my favourite moments from the packing box was squaring up stock in a bench vice with a smoothing plane rather than using a shooting board as I would normally do. This sounds like a hard way to work, but actually it works really well and doesn’t take too long. Yes a shooting board makes things easier (especially on wide boards) but the realisation that you don’t actually need a shooting board can be quite liberating!

_dpp2454

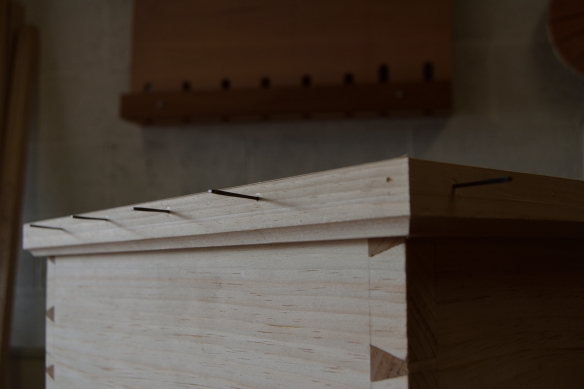
Cut nails hold moulding in place and allow for seasonal movement of the lid

A New Generation of Apprentices?

Working through the projects in The Joiner and Cabinet Maker has provided an entertaining and rigorous way to further develop my furniture building skills, and I highly recommend this book to anyone who wants to delve deeper into hand tool furniture making. My daughter is a little young to have her own tool chest just yet, but when she is old enough to join me in the workshop I can’t think of a better way to start her off than with young Thomas’ packing box build.

_dpp2479

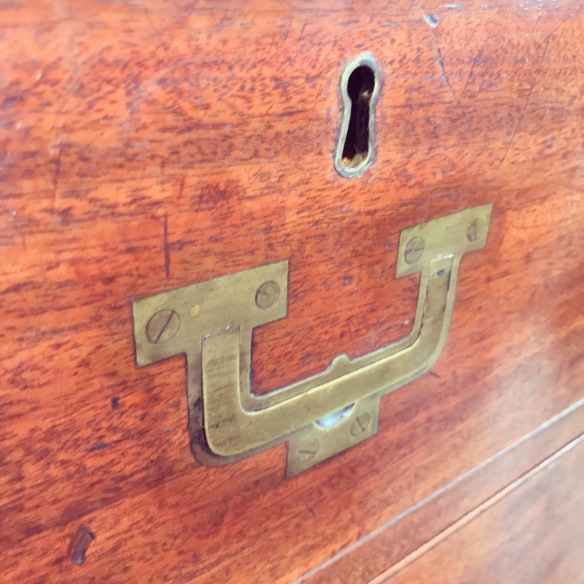
Cutting the keyhole for the School Box

Furniture in the wild

img_4102

I can’t seem to escape staked furniture – this small bench was in our cottage, and the Apprentice enjoyed toting it around with her.

In early November every year we head down to the Cotswolds for a long weekend. It is mainly an opportunity to break up that long, dreary expanse of autumn, and to have some family time away from the pressures of everyday life. One of the highlights of these trips, for me at least, is looking at the furniture in the period cottages we stay in, as well as in the local pubs and eateries. I always find the moments reflecting on the furniture surrounding us on our Cotswold breaks to be instructive. I don’t have much time to look at furniture in antique stores, historic buildings, or any of the other places that you’d go to look at handmade furniture in the wild, so most of my interaction with non-mass produced furniture is through woodwork texts or the internet. Which is fine up to a point, but something is lost when you are left engaging with a tactile subject such as furniture at a distance. The other advantage of engaging with the furniture pieces when we travel is that very few of them are museum quality pieces – by virtue of staying in holiday cottages all of the furniture is there to be used, and there can be a pleasing variety on display. And finally, living with a piece for a few days gives you much more opportunity to become accustomed with it than a brief encounter in an antique store or lunchtime google search. These trips have therefore come to play an important role in my on-going quest to pry open my design eye.

This year’s trip away bought a bumper crop of furniture experiences, all of which seemed to highlight the unusual and unorthodox. It seems I can’t escape staked furniture at the moment, as the first piece I enountered was the little staked bench pictured above. This low bench was perfect for the Apprentice to use, being about 10″ high and featuring octagonal legs back-wedged with dirty great 1″ tenons through a 1.5″ top. Either the tenons have shrunk a little, or whoever made the bench wasn’t too concerned about flushing up the wedges as these were all quite proud of the top. But the bench was stable and solid, and the Apprentice loved pulling it round with her and sitting on it. The proportions of this bench are quite different to the staked benches currently on my workbench, particularly the thin top compared to the large tenons and wedges. But the beauty of seeing pieces in the wild is how they can vary from accepted norms of design and still provide good use.

img_4108

Clinched door latch

The other great find in our cottage was the bathroom door, the tongue and groove boards for which had been secured by nail clinched battens. Even the latch was clinched in place. I confess that this is the first real world example of clinching I’ve encountered – previously it was a technique confined to the pages of The Joiner & Cabinet Maker, the Packing Crate project from that book, and also a blog post by Richard McGuire. So to unexpectedly stumble upon an entirely clinched door was a wonderful reminder that these furniture forms and techniques are not historical curios or academic exercises – they are genuine techniques that craftsmen have relied upon for generations.

img_4079

The final memorable piece was a little more highend. Whenever we go to the Cotswolds I always steal and hour or two to browse the inventry of Christopher Clarke Antiques in Stow on the Wold – one of the leading experts in campaign furniture. Amongst the usual collection of gorgeous secretaries, folding bookcases, and campaign chairs, was this lovely chest of drawers. Two things set this piece apart from any other example of campaign furniture I’ve seen in print or at Christopher Clarke. Firstly, the dimensions are significantly smaller than most other pieces – this chest of drawers was roughly 3/4″ of the usual size. Secondly, this is the first example of campaign furniture I’ve seen which has used two primary woods; the casework is ash but the drawer fronts are quartersawn oak. This combination of timber is really striking, and with the smaller dimensions makes for a wonderfully compact yet stylish piece which has a very different feel to many of its campaign brothers and sisters. I always find a trip to Chrispher Clarke Antiques to be inspiring, and there are several items of campaign furniture on my “to build” list. But this unusual chest of drawers has opened up other possibilities for the form, and provoked synapses into firing. Not for the first time, I am amazed at how changing a couple of simple design decisions can dramatically alter the impact of a piece.

img_4110

No trip to Christopher Clarke is complete without a close up shot of some campaign brass. The skeletonised draw pulls are by far my favourite, and the lack of clocked screws on this example is the icing on the cake.

Carnival of Sorts

img_4135

When I was 14 I fell entirely in love with R.E.M. Not the big hits (“Man on the Moon“, “Everybody Hurts“, or “Losing My Religion“) although those would come later, but the southern gothic of their earlier work on the I.R.S label. I still count “Reckoning” as one of my all time favourite albums. Peter Buck is one of the main reasons I first picked up a guitar, which means that R.E.M are one of the reasons I build guitars and furniture today. It is, I think, no coincidence that the first guitar I ever built was a 12 string. I never realised at the time that this would be the destination the path lead to. I’m not sure that 14 year old me had ever considered any form of woodwork, let alone building guitars. And listening to “Murmur” on loop is probably not the obvious starting point to building staked furniture or hanging out in Karl Holtey’s workshop. But this is where it all began.

Because ever since I first heard the opening chords to “Carnival of Sorts” my dream guitar has always been a Rickenbacker 360, just like Peter Buck plays. Then I saw footage of Jeff Buckley playing “Vancouver” on a Ricky during the Mystery White Boy tour, and and James Iha playing Ricky for “1979“, and of course Lydia Loveless toting a blue Ricky for that incendiary live performance of “Really Wanna See You“. And the deal was well and truly sealed. Sometimes you just have to listen to the universe when it speaks to you.

img_4138

Last week, 20 years after I first fell in love with R.E.M, this Rickenbacker 360 arrived. In the 2007 “colour of the year” limited edition blue burst – my favourite Rickenbacker finish, and also one of the rarest. I spent the weekend jamming through R.E.M song after R.E.M song, breaking off only to play my way through my favourite tracks of “Grace” by Jeff Buckley. Simply put, this is one of the finest guitars I’ve ever played. The level of perfection achieved by the luthiers at Rickenbacker (and unlike many production manufacturers, Rickenbacker still make their guitars largely by hand) is staggering. Yet the guitar retains a lot of soul – this doesn’t feel sterile like some high end instruments can. I now know what I’m chasing with each of my guitar builds.

But more importantly, this guitar represents an important link. It connects the 14 year old who spent countless hours trying to decipher those early R.E.M records with only the cover art and liner notes to help (this was pre-internet, after all) with the craft I pursue today. The instrument currently before me represents everything that made me take the first step onto the path of building things with my own hands, and also the future. What can I create with the Ricky, and how can it inspire me when I’m at my workbench? These are questions that I can’t wait to answer.

img_4137

Skinning the tapered tenon cat

img_4174

One finished tenon

The advantage of building several of the same project is that with each successive build you can take what works, learn from mistakes, and also try new approaches to the key processes to see if there are more efficient, or precise, ways of working. With the second staked saw bench I’ve been focusing on consolidating the skills developed with the first build, but also approaching some of the key stages of the build a little differently.

When it comes to cutting the tapered tenons I’m specifically interested in removing the bulk of the waste as rapidly as possible, and getting as close as possible to the finished tenon shape before I reach for the tenon cutter. My approach for the second batch of legs has been largely as I described for the first saw bench, with one significant exception. In The Anarchist’s Design Book Chris suggests that the tenon could be shaped with a coarse rasp in the absence of a tenon cutter or lathe. Although I’m still using the tenon cutter to reach the final shape, with these legs I thought I’d try rasping the tenon.

img_4178

Using a coarse Auriou rasp to quickly remove the waste

It turns out this approach has a number of significant advantages over rough shaping with a spokeshave (as I did on the first set of legs). Firstly, the rasp will reach right down to the shoulder of the tenon, while a spokeshave invariably bellies the tenon because the shoulder catches on the sole of the shave. Secondly, thanks to the left-to-right movement of a rasp, you can work round the tenon and cover more ground before you have to rotate the leg in the vise, which means more time is spent shapring and less adjusting the workholding – a much more efficient process!

Finally, the rasp can work very specific localised areas which is useful if splitting off the waste has left bumps which would foul the tenon cutter and which the spokeshave cannot reach, and also allows you to slightly hollow the middle of the tenon prior to introducing it to the cutter. What is the advantage of hollowing the tenon? Well. If a tenon is slightly oversized the lower portion of the cutter will start to bite first, and will continue to cut until the tenon is shaved to final dimensions. This causes uneven wear on the cutter as the lower part of the blade is constantly working, and will become dull long before the rest of the blade. Uneven wear necessitate sharpening more often, which is far less fun than making shavings. To encourage more even wear along the length of cutter (and hopefully less frequent sharpening), a slightly hollowed tenon should in theory allow the top and bottom of the cutter to bite just before the middle section – and by “early” I mean no more than one or two turns before the middle part of the cutter bites. I certainly needed fewer turns of the cutter in order to bring my rasped tenons to size, which suggests that I’ll need to sharpen the cutter less often in the long term.

img_4181

Paring the waste to the shoulder of the tenon

So my process for these tenons has been to split the waste off with a 1″ chisel and 16oz mallet, after which I’ve cleaned up the tenon to cylinder with a spokeshave, followed by rasping to a tapered tenon using a 10″ 9 grain Auriou rasp. For small adjustments I’ve also been reaching for a 7″ 13 grain Auriou rasp.

The cutter invariably bottoms out on the tenon shoulder before the lower section of the tenon is at final shape. However by that point there is not much material left to remove from the bottom of the tenon, and what little there is can easily be identified by the faint ledge left by the edge of the cutter blade. To true up this part of the tenon I’ve been using a 3/4″ chisel, held tight against the finished part of the tenon as a reference surface. Although paring towards the shoulder involved working against the grain, with a sharp chisel taking only very light cuts there isn’t any real danger of tearout, and for particularly gnarly grain a sideways slicing movement can be used to remove the waste without tearing the grain.

img_4182

Four completed tenons, ready to be set into the bench top.

In praise of the humble octagon

img_4063

The key stages of planing a tapered octagon (r-l) – square cross secton, tapered square, octagon.

I’ve been octagonalising the legs for the second saw bench, in preparation for carving the tapered tenons. There’s not much to say about the process itself – I followed exactly the same steps as I did for the legs on the first saw bench. Repeating a task is one of the best ways to consolidate the processes, and after working up eight legs now octagonalisation is feeling very much like second nature. As you work the leg from square to tapered to an octagon, the process sinks into your muscle memory, and your movements become that much more efficient. The second set of legs definitely took less time than the first. The risk of course is that complacency creeps in, and stupid mistakes can be made – a little muscle memory can be a dangerous thing after all, and it’s important not to switch off at times like these. The balancing act is to allow the muscle memory to develop and lead the way, but to stay focused. So far these legs are looking rather nice and I’ve maintained my focus.

The ash is lovely to work, and the way the grain patterns bend around the facets of the octagon is very pleasing. I’ve been threatening to make a pair of Roorkee chairs for a while now (another reason to get the lathe up and running this winter) and at this point I’m pretty much set on making them out of ash, with burgandy leatherwork from Texas Heritage. That will be a sweet combination.

img_4038

Part way through octagonalising one of the legs

Those winding grain patterns got all manner of synapses firing. I’ve written previously about how The Anarchist’s Design Book democratises the woodcrafts by demonstrating how a very modest tool kit and limited (but effective) set of techniques can be used to furnish an entire home. But there is another striking element to all of this which has been playing on my mind a lot this week, and that is the asthetics of the furniture Chris presented in the book. All of the furniture in The Anarchist’s Design Book is very attractive, but to my eye at least it looks quite unusual. The staked chair, for example, is instantly recognisable as a chair – it has all constituent parts (seat, legs, back, spindles) but for some reason the lines of the piece tickled my frontal lobe as being a little unusual. These designs feel as old as the hills (they have been informed by medieval artwork after all) but also fresh and modern. I think in part this has to do with the combination of straight and curved lines, the subtle saddling of the seat, and also the octagonal legs.

img_4057

A completed set of legs for the second saw bench, ready to have the tapered tenons carved

Something clicked for me when I finished the first of my saw benches – the slab top and octagonal legs in front of me suddenly made sense, stopped looking quite so alien, and started to feel more familiar. The octagons are a wonderful shape for legs – all those facets mean that as you move around the piece the light catches and dances across the planed wood, and the grain patterns move in ways you just don’t get with flat work or even square profiled legs. And now I can’t stop thinking about how octagons could be used for other pieces. How about for the legs of a Welsh stick chair? Or even a Windsor chair in place of the more usual bamboo turnings? Or perhaps for the legs of a cabinet stand? And that is all when you have an octagon of equal proportions – how about alternating two sizes of facet as you move round the circumference of the leg instead of facets of an equal size?

img_4051

The first of my pair of staked saw benches

This has opened up a new world of design for me, and has really emphasised that making small changes can have a tremendous impact on the overall feel of a piece. There is, after all, no reason why legs should be square or cylindrical, even if those are the most common shapes. And an octagon is hardly an exotic shape. Am I blowing the significance of the humble octagon out of proportion? Well, possibly. But the design possibilites offered by moving away from the more conventional square or cylindrical leg profiles are quite exciting, even if it seems like a less than radical design choice. The other attraction is that  octagonal legs can be a very striking, yet the process to create them is wonderfully simple and requires nothing more than jack and jointer planes (although you could get away with just a jack plane at a pinch). Sometimes the most profound changes to a design can also be the simplest, and that is a worthwhile lesson to hold on to.

I suppose that the other lesson from all of this is that while reading about furniture can help develop your design vocabulary, nothing quite beats building something to really pry open your design eye and to prompt new ideas.