Campaign Stools in Action

DSC_2929

The newly completed stool

Long time readers may remember that a few years ago I turned three sets of legs for folding campaign stools from Chris’ Campaign Furniture Book. At the time I had only ordered one leather seat from Texas Heritage, but I ordered a second seat a few months ago, which arrived recently.

DSC_2926

Maple with black leather, and sapele with burgandy leather

I fitted the seat to the stool legs the same day it arrived, and we’ve had several opportunities to use the pair of completed stools. This form is simple (it is an excellent introduction to spindle turning) and very functional – the stools fold up into a very small light bundle, yet they are strong enough to comfortably seat an adult. The Apprentice loves both seats, which is an added bonus.

F7E7AD72-A043-44C5-AB90-2E71AACD149A

When only the most elegant picnics will do

I’ll be ordering the third seat soon to complete my trio of campaign stools. Of course, no stool is complete without a matching Roorkee chair, so it looks like I’ll be making some Roorkee chairs in the near future too.

Dados for Days

DSC_2905

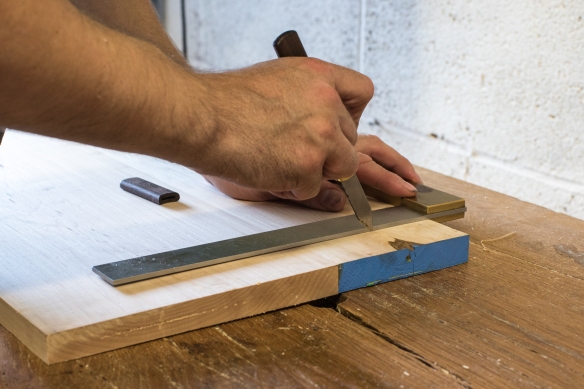
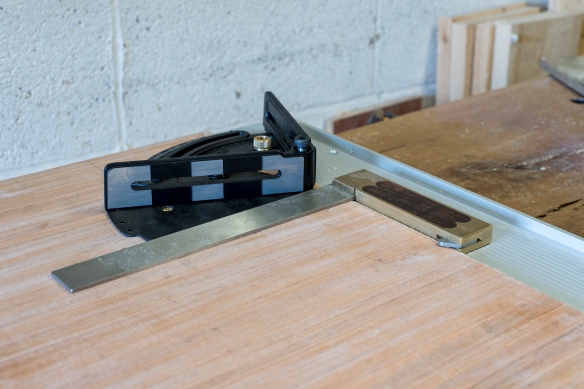
Marking the rebates with the Veritas mortise gauge

I like dados for fitting shelves to casework – its an easy joint to cut, and especially when paired with cut nails, makes for very solid joint. The boarded bookcase calls for three pairs of dados to house the shelves, and a rebate for the top rail. Because I use dados quite frequently I keep thinking about picking up a 3/4″ HNT Gordon rebate plane, but cutting dados the way I describe in this post is quick (each dados takes less than 20 minutes) and fun, so a dedicated plane feels like an extravagance, no matter how pretty they are.

DSC_2908

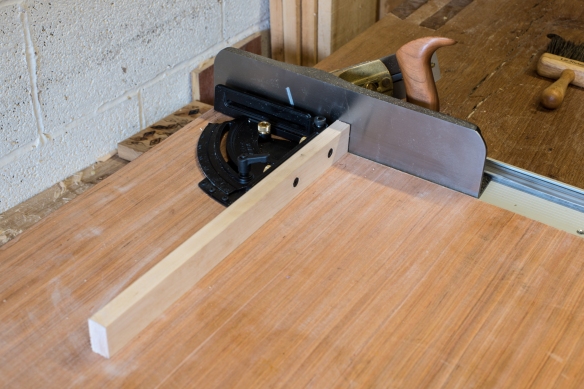
Setting a marking gauge from a chisel provides a quick and repeatable setting

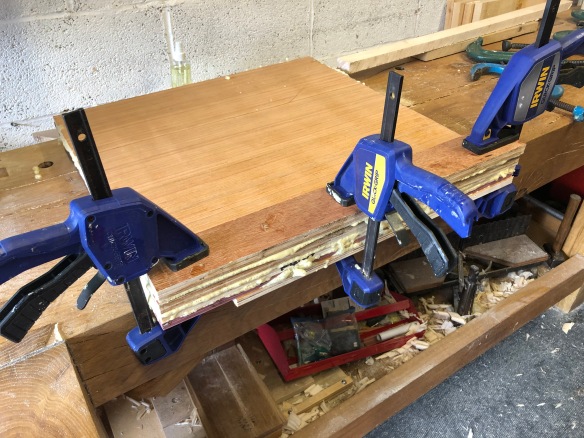
I started by laying out the dados on both side pieces, ensuring that all layout was done from the reference edges. Once the shelf dados were layed out I placed the two sides against each other to check that each layout line was in precisely the same place on both pieces – this prevents layout errors and wonky shelves at a later date. The top rail is set 1/2″ in from the rear edge of the sides, and instead of using two marking gauges (one for each side of the rebate) I used the Veritas mortise gauge, with the two beams set to define the edges of the rebate at the appropriate distance from the edge of the side. The casework also features a kick underneath the lowest shelf. I don’t think Chris fixes this into a rebate when he builds the bookcase, but while I was in a grooving mood I decided to layout a rebate for this element too.

DSC_2909

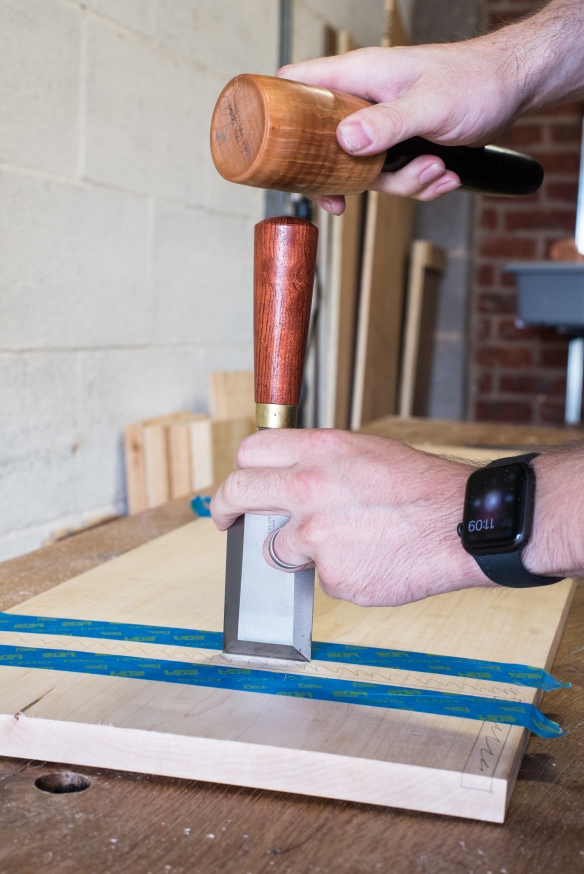
Deepening the layout lines

Once I was happy with the layout on the inner faces of the sides, I transfered the dados onto the front and rear edges so that the depth could be marked out. Where possible I like to set my marking gauges by reference to an object of known thickness rather than trying to line up the cutter with graduations on a ruler – this can be a component of casework, or in this instance a chisel of the right width. This reduces the opportunity for error, and makes for a repeatable setting.

DSC_2910

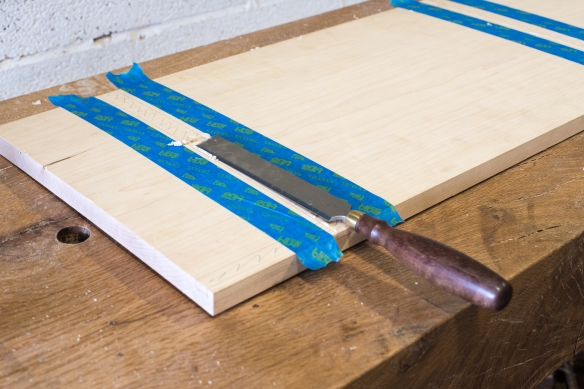
Preparing the first class cut

To cut the dados I use my Bad Axe Bayonet saw, filed hybrid. This saw has been specifically designed for cutting joinery, and the 14″ saw plate and fine kerf make it ideal for dados and other fine joinery. You can read a more detailed review here. Reaching straight for the saw might work, but you may also find the saw plate wandering across the workpiece and marring the surface, which is less than ideal. In the Anarchist’s Design Book, Chris describes using a batten and push stick as a guide for dead nuts straight dados, which is a nice approach. I go about it slightly differently, which shouldn’t be a surprise as there’s at least 17 different and effective ways to undertake any single woodwork operation.

DSC_2913

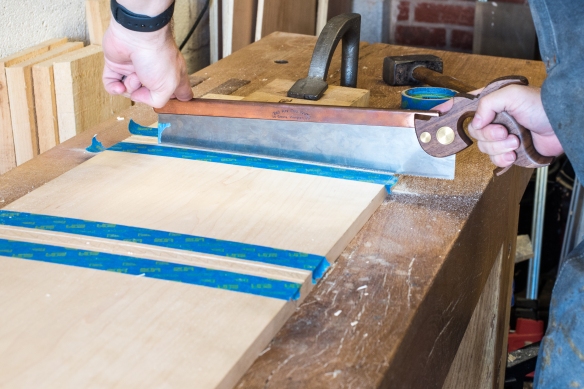
Cutting the walls of the dado with the Bad Axe Bayonet

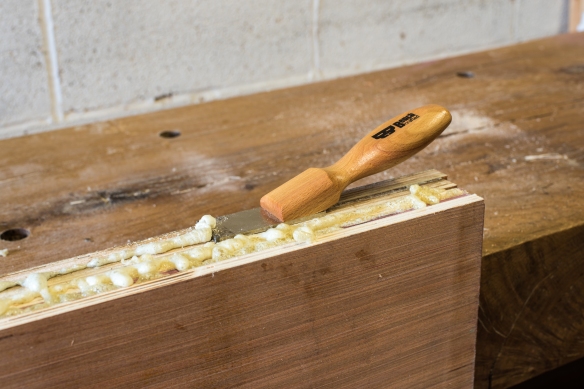
I use a typical approach for a “first class cut”. First I deepen the knife line with a gentle tap from a mallet on a wide chisel – I keep a 2″ butt chisel precisely for this sort of work and for paring tasks. With the line deepened, a long paring chisel can then cut a trench on the waste side of the line – the aim is to remove a small amount of waste with the layout line providing one wall of a “v” shaped trench. The trench guides the saw, keeping it running true. The first few strokes are gentle, and I keep two fingers of my off hand on the toe of the saw to prevent it from jumping out of the cut. Some lubrication on the saw plate helps too, particularly when the saw is cutting along the full width of the workpiece. A piece of blue tape on the saw plate helps to mark the full depth of the dado.

DSC_2917

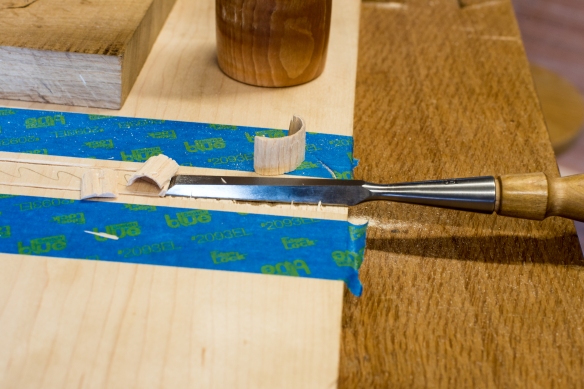
The majority of the waste can be removed with the chisel bevel-up

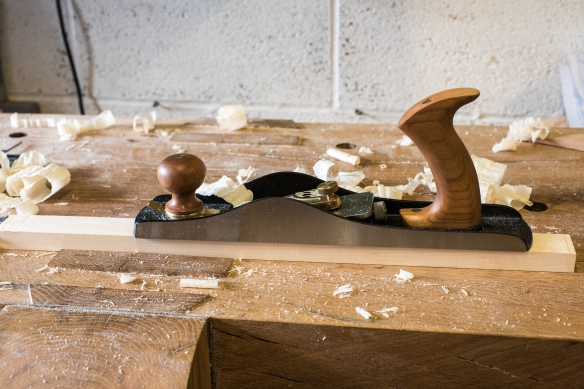
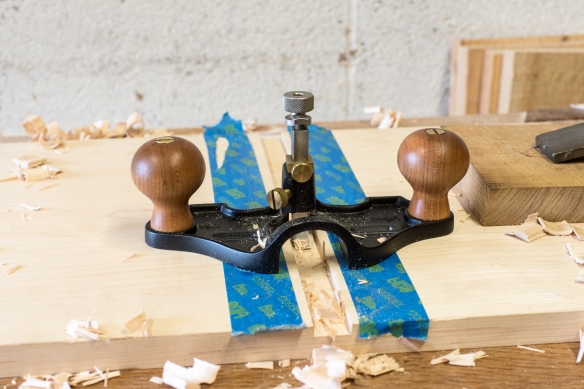
Once the saw is cutting at full depth along the length of the dado it’s time to chisel out the waste. Start with the bevel facing up – this is more aggressive and will knock out the waste quickly. It is vital to work from each end of the dado to prevent spelching at the ends. If you watch the saw kerfs it is possible to gauge by eye how much material needs to be removed. As you get closer to the bototm, switch to a bevel-down chisel orientation. Once I am close to the bottom I then move to the router plane to clean up. The router plane is not a bulk removal tool, so it really does help to have removed as much material as possible with a chisel. Placing blue tape either side of the dado helps to avoid marking the surface with the router plane.

DSC_2920

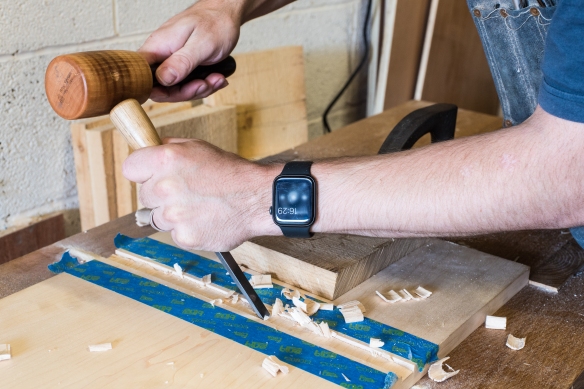
Using the chisel bevel down is less aggressive, which is useful as you approach the bottom of the dado

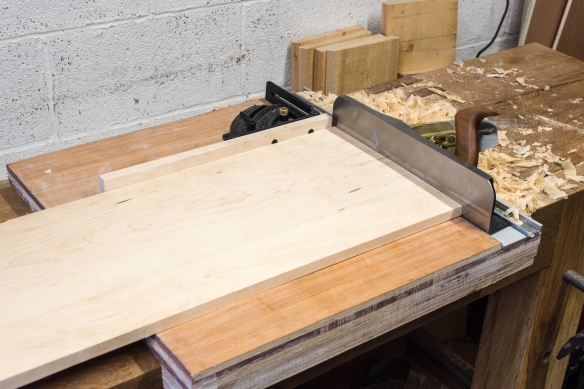
I had limited shop time this weekend, so have a bit of work left to do on one side, but then the joinery will be cut and I can look at assembling the main structure of the bookcase.

DSC_2922

Cleaning up the dado with the router plane

The fun stuff draws closer

DSC_2887

Laying out the shelves to avoid bad knots and splits

I had a final push this weekend to finish dimensioning the main components for the boarded bookcase (the sides and shelves), ready for cutting joinery. This largely consisted of bringing the shelves down to the required width, and trimming all parts to final length. All straight forward stuff, although as with every step of this build I’ve found the hard maple means that every process takes longer and requires more frequent sharpening.

DSC_2889

Shooting the ends square

I chose to dimension the shelves to their final 12.5″ width before triming to length as this meant that I had less end grain to trim. When carrying out the same process on multiple components I prefer to undertake each  step for all of the parts before moving onto the next step. Here, that involved first planing a reference edge square and straight with the No8 jointer for all the shelves, and then marking the width with the Hamilton panel gauge, after which I ripped the excess width with my Disston D8 and then finished up with the No8 jointer plane. Batching up the steps across each board made for a very efficient process, instead of moving thorugh the full operation for the first board, and then starting again for the second and so on.

DSC_2894

Once the shelves were down to width I shot one end of each square using the new shooting board, and then using that end to then measure the final length and mark off the opposite end. I trimmed the excess waste using a hybrid filed tenon saw – the shooting board makes a very efficient bench hook for wide pieces which my standard bench hooks would struggle with, and then shot the end square with the Lie-Nielsen No51. The new shooting board worked very well – the track keeps the plane travelling true with minimal friction, and the fence mechanism is solid and reliable. Shooting end grain square is a critical step, but can feel like a real chore if your shooting board is fussy or unreliable, but after putting in an extended shooting session, I’m pleased to report that the Veritas hardware feels reliable and sturdy (this is not an ad – I paid full price for the hardware, etc). Having a 24″ square shooting board has also proved to be very useful for these larger pieces – yes it is overbuilt, but I doubt I’ll ever find myself complaining that the desk does not support the workpiece sufficiently.

DSC_2896

Dimensioned and ready for joinery

Once the shelves were dimensioned I then trimmed the sides to final length using the shooting board. These components are now lying in stick ready for the joinery to be cut. While that stack of boards doesn’t look like much, it has been a fair amount of work to glue up 6 panels and dimension them all by hand, especially in unforgiving hard maple. I’m looking forward to the fun stuff coming up (joinery!), and then gluing up the main structure of the bookcase.

Straight Shooting

IMG_7355

Everything you need for a rock solid shooting board.

Before I could finish dimensioning the shelves and sides of the boarded bookcase, I needed to build a new shooting board for squaring the component ends. I ordered the Veritas track and fence hardware earlier this year, and it has been sitting on the side in the workshop waiting for me to get round to it. I finally had an opportunity two weeks ago to go on a supply run to my local timber yard and pick up some plywood for the deck of the shooting board. Although I was after a half-sheet of 3/4″ baltic birch, there was limited stock to choose from – I believe due to Covid-19 disruption to their supply chain. Fortunately I managed to snag three pieces of 1/2″ ply, all 24″ square. This would do nicely.

IMG_7490

Laminating the cleat

The first stage of the the build was to laminate layers of ply to form the deck. While Veritas provide suggested dimensions and minimum thickness in their instructions, given the material I was able to pick up, I decided to overbuild this shooting board. Two layers of play were laminated together to provide the base of the shooting board, with the third square offset by the width of the track. I had some PU glue leftover from the express lathe stand build last year, and while it’s not an adhesive I would use for furniture building, it is perfect for jig building as it is water resistant and won’t degrade in my unheated workshop. PU is very slick and can encourage glued components to skate around, so I glued the laminations over a couple of days to make clamping sheets of ply which wanted to slide around more manageable.

DSC_2845

Preparing the maple fence with the Lie-Nielsen No62

Once the deck had been laminated, I rummaged through my scrap pile and found a length of 2″ wide 3/4″ ply which I cut into two 24″ lengths, which were then laminated to form a 6/4″ thick cleat on the underside of the rear edge of the shooting board deck. The cleat will allow me to hold the shooting board in place with the leg vise, or to simply brace it against the edge of the workbench. Shop jigs are a great way to use up scrap, and I also rescued a piece of maple for the sacrificial fence.

DSC_2843

Removing the foamed and hardened PU squeeze-out

PU might be convenient for ‘shop jigs, but the squeeze-out foams up and makes an awful mess. Fortunately, the Benchcrafted skraper is an excellent tool for removing stubborn dried glue, and cleaning up the squeeze-out horror show was a quick and easy job.

IMG_7499

Preparing finish with a magnetic stirer. No more endles shaking jars waiting for shellac flakes to dissolve for me

Before installing the hardware, I also applied a simple finish to the deck. In the spirit of useing scrap, I mixed some old shellac with a little pumice powder. Brushed on, this provides a slightly grippy surface (which is beneficial for jigs where a slick finish would make holding the workpiece tricky) which will provide protection from glue and moisture – a finish recipe I learned from Derek Jones. I’ve just picked up a cheap magnetic stirrer for mixing shellac, following Chris’ recent post, and it worked well mixing the pumice power into the shellac solution.

DSC_2844

Calibrating the fence with the Vesper 10″ square

Once the shellac dried, it was then a case of installing the hardware. Veritas provide very clear instructions, although it is a shame that there is no initial diagram specifying what each of the fence components is. Nonetheless, the instructions were easy to follow and I had the hardware installed pretty swiftly. The fence feels rock solid when locked down, but also offering a significant level of adjustability for different common angles as well as fine tuning the position to get the required angle bang-on. I calibrated the 90 degree setting with my Vesper 10″ square which functions as a master square in my shop.

DSC_2847

The finished shooting board and Lie-Nielsen No52, ready for action

Unfortunately, I ran out of time to test drive the shooting board, but my Lie-Nielsen No52 runs sweetly in the track, and the 24″ square plywood deck will facilitate working on boards upto 15″ wide, while providing plenty of support to the workpiece. I’m looking forward to testing out the new shooting board in earnest over the coming week.