In print on both sides of the Atlantic

The June issue of Popular Woodworking is now in stores on both sides of the Atlantic, and carries my feature on Karl Holtey (including quotes from interviews with Chris Schwarz, Wayne Anderson, Raney Nelson and Konrad Sauer). Also featured is a staked table project by Chris, Megan’s medicine cabinet, and Peter Follansbee’s excellent regular column.

My copy landed on my door mat yesterday, and it was a real buzz to see my words nestling amongst articles by such well acclaimed woodworkers and writers.

Getting to Know… Joshua Klein

Every “getting to know…” feature is a real privilege for me, and I am indebted to each of the participants who give their time to answer questions for Over the Wireless. This month is a very exciting instalment. Taking the hotseat is the driving force behind one of the most singular, and important, woodwork publications of the present day,  not to mention a woodworker who has tirelessly given back to the community, and offered countless insights into a different approach to handtool work.

So without further ado, let’s get to know… Joshua Klein.

LNclassportraitKLEIN

  1. You trained as a luthier, right? What lead to the move from lutherie to furniture conservation?

I did. Ironically, I started out as an amateur musician interested in finding a steady career in the music industry. I liked the idea of working with my hands and thought repairing instruments might be a good fit. I went to a lutherie school but, frankly, was less than enamored with the specialized jigs for machinery to make each precise cut. Even though I didn’t have any other woodworking experience at the time, it felt more like a machine shop than a woodworking shop. I guess it just felt too precise for my personality type and interest. To further expand my skillset, I attended the National Institute of Wood Finishing in Rosemount, MN and trained under Mitch Kohanek. It was through learning to preserve old finishes that I fell in love with historic furniture. Although we learned many aspects of wood finishing from conventional finishing technology to conservation work, I gravitated toward the preservation end of things. Seeing the history of an object recorded in the marks and wear of an old surface really resonated with me and so seeking to understand and preserve that story became my passion. I think the richness of American furniture history pulled me away from the interest I had in 20th century guitars.

mtsampleissue-16

  1. To my knowledge Mortise & Tenon is unlike any other woodwork publication available, and fills a very specific space. What prompted you to create this very singular publication?

I’m not going to lie… I got bit by Schwarz’s Anarchist’s Tool Chest bug when it first began circulating. Through that reading I became increasingly interested in exploring the viability of using only hand tools in the shop. This developed in my mind because, as a furniture conservator, I saw so many of the originals whose construction looked nothing like the uber-precise modern machine-made reproductions I saw. Through this examination of the originals it dawned on me that most folks today that pooh-pooh hand tools as slow and arduous do so because they’re unfairly assuming modern machine tolerances. I knew I had to find a way to share this information with woodworkers who were interested in giving hand tools a fair shake.

As a furniture conservator, I occupy a unique (and sometimes awkward) place. I’ve always felt like I was straddling two spheres: I spend a lot of time around curators and antique dealers and at the same time have a lot of woodworking friends. I’ve learned so much from each but found that it seemed these worlds don’t interact much so Mortise & Tenon came out of a passion to connect these dots. My belief is that by looking closely at the originals we can understand how hand tools were used efficiently by our ancestors. This is the way we can rediscover hand tool only woodworking to be viable option for woodworkers today.

mtsampleissue

  1. The first issue of Mortise & Tenon has (very rightly) caused a lot of excitement. What do you have planned for M&T issue 2, or the future of M&T more generally?

Issue Two is already under development. I have authors started on pieces and most of the rest of the content is planned out. As far as future expansion or development is concerned, I feel like I can’t say for sure. M&T is definitely a worthwhile and sustainable project that will continue. The magazine has been getting way more interest than I ever anticipated and it’s been an immense amount of work to keep up with. I’ve hired some friends to help keep this thing running. We hope to begin releasing this publication twice a year after a couple more issues. We’ll be at woodworking shows and other events throughout the year. Who knows? Maybe in the future we’ll be putting on our own events. We’ll just have to take it as it comes.

riving

  1. You are also writing a book on the 19th century minister and furniture maker Jonathan Fisher (due to be published by Lost Art Press). Tell us a little about that book and the research process. Fisher sounds like he led a multifaceted life, as do you – do you find him to be a kindred spirit in that regard?

Jonathan Fisher was a furniture-making minister in Blue Hill, Maine working in the first quarter of the 19th century. The house he built for his family is now a museum filled with furniture attributed to his hand. When I first visited I thought it was neat until I learned that his chest of tools survived in another Maine archive. Then I was intrigued. After a little more inquiry, I discovered that not only was there all this furniture and the tools used to produce it but that there are 35 years of daily journal entries documenting everything he did each day. Then I was thrilled. It was the realization that no furniture scholar had ever been made aware of this rare survival that made me obsessed. The past few years, the Fisher museum has graciously given me access to the collection for regular examination. The book I am working on for Chris and John is looking at this unique survival of a skilled but part time furniture maker serving his local rural community. I want to mine this story for all the gems it has for today’s woodworkers. I think many people will resonate with Fisher and find inspiration in his work. I know I definitely find a kindred spirit in Fisher. I also have many interests and so I find his proficiency in all of these areas inspiring.

phil (15)

  1. As if you weren’t busy enough with your furniture conservation business, M&T, and the book on Fisher, last year you also bought a 200 year-old house and promptly dissassembled it for the purposes of rebuilding it on your homestead. How is the rebuilding process going? And can you tell us a little about the rationale for relocating an existing historic property?

Doesn’t everybody do that? Kidding. No, I don’t know. My wife and I are hopeless antiquarians. This local gem of a central chimney cape cod was going to be bulldozed because the sills and first floor joists were totally rotted out and no one was willing to put the effort in to restore it. We didn’t have the heart to let it go. We had been shopping around for a house to raise our boys in and the timing worked out. I hired a crew of guys to help for a few months. There are many hundreds of photographs and drawings and every joint is labeled and documented. It’s safely stored disassembled for now. This year we will begin the multi-year process of restoring it to its original glory. The trim was almost completely untouched original Federal and Greek Revival trim. All the original doors and hardware were there. There was minimal electric wiring and the house never was plumbed. Because it was pretty much original it was a perfect candidate for a historically sympathetic restoration. We feel very blessed to have it.

Freddy (11)

  1. A respect for, and immersion in, traditional techniques and work methods seems to be the common thread that binds together your furniture practice, M&T, the book on Fisher, and your homestead. What is it that draws you to traditional ways of living and furniture making?

I guess I have fallen on my face too many times when I ignored the wisdom of those who have gone on before me. For me, any way to connect to simple and traditional lifestyle choices is a very grounding thing. I am not all about eschewing modern society but I do think we all know very well that sitting on our butts staring at a screen all day is not a very human way to live. We are all creative beings that need to connect to our community around us and I guess I think of community as a transgenerational thing. If we are going to try to solve problems all our ancestors faced already or use the tools they used, maybe we should ask them to give us some pointers. I think we might all be a bit better off.

Boston Sec (10)

Down the workbench rabbit hole

IMG_2901There is a rabbit hole down which most, if not all, woodworkers eventually disappear, regardless of what they make. And I now find myself teetering on the edge of this same rabbit hole. Let me explain.

My current workbench is a Sjoberg Duo (now marketed as the “Nordic Plus“). It has served me well over the four-and-a-bit years I’ve owned it, and it was definitely the right choice for me at the time. But I am now at the point where I’m butting up against the limitations of the bench, and it is time to re-assess what I need from a bench… and then build one myself.

Before I discuss the limitations of my current bench, and how I intend to address those shortcomings, let me go back to why I bought the Sjoberg in the first place. In 2012 I set up a new workshop – some significant health issues had kept me from any woodwork for 18 months or so, and I’d bounced round the country with work for a spell. So when I was finally in a position to get back in the workshop I had a very clear choice – my first project could be to build a bench, or I could buy one and get straight back to lutherie. I’d actually just finised reading the first edition of Chris Schwarz’s Workbench Book at the time, but made the decision to get back to lutherie and buy a bench. Part of my reasoning was that working on a commercially made bench would give me some practical insight into exactly what I needed from a bench, and what was superfluous. All in all, I think that was the right decision, and the four-plus years I’ve spent working on my Sjoberg have definitely been illuminating. Furthermore, the Sjoberg won’t be wasted once I’ve built a replacement bench, as it will replace the small sharpening station and assembly bench at the end of my workshop.

So now, the limitations of the Sjoberg. Firstly, mass. As in, the Sjoberg has very little of it. Which for most of the lighter lutherie work I do is not a problem. But for heavier work, for instance over-hand ripping of thick stock (like for my Moxon build) or taking a thick cut with a jack plane, then the bench twists and skitters across the workshop floor. The second and third limitation both relate to the bench top. The bench top is thin, which means that there is not much scope of flattening the bench – so after four years the bench top is not exactly what you’d call overly flat. Finally, the benchtop is only secured to the chasis by two carriage screws, which is not a particularly secure method. After four years of seasonal wood movement, the threads have stripped out of the bench top and I’ve had to patch in some maple blocks to keep the benchtop and the base together.

So what will the replacement bench look like? As it happens, I’ve been reading the second edition of Schwarz’s Workbench book at the moment. I’m decided on a Roubo style bench – the thick top and iconic rising dovetail joint represent that perfect combination of practicality and joinery-flair. The Roubo promises to address all of the limitations I’ve outlined above. But really this decision raises more questions and options. Do I want a slab top, or laminated? Will I have a tail vise or rely on planing stop and doe’s feet? If I have a tail vise, will the end cap be bolted on or will I go for some Frank Strazza style condor tails? I’m undecided on all of these points as yet, although I do know that a Benchcrafted Glide leg vise will fitted.

And here I am. Teetering on the edge of the workbench rabbit hole. And although I’m unlikely to be in a position to start work on the new bench until the very end of the year, I’m looking forward to getting stuck in and building the last bench I’ll ever need.

Hamilton Panel Gauge

DSC_0991

Back in November 2014 I wrote about the 4″ marking gauge Jeff Hamilton made for me. Since then that marking gauge has been in constant use in my workshop, and no project has crossed my bench in that time without my Hamilton marking gauge touching it.

As my workshop activities continue to include more furniture making, I’ve discovered a need for tools which were not particularly necessary as a luthier. In particular, for marking large panels to dimension, a panel gauge went quickly from a luxury item to an essential tool. There are a couple of tool manufacturers offering panel gauges, as well as the option to devise a homebrew solution. But the little 4″ Hamilton marking gauge nestling in the top tray of my Anarchist’s Tool Chest kept calling to me, and in the end placing an order for the Hamilton Panel Gauge was a very easy decision.

That was in Octover 2015, and the gauge itself arrived in mid-December – Jeff makes all panel gauges to order so there is a short wait time involved. Having lived with the gauge on my workbench for the past couple of months, it is fair to say that the tool is entirely worth the wait.

First, the essential stats. The Hamilton Panel Gauge has a 28″ beam, which to my knowledge makes it the longest commercially available panel gauge. The beam is square on three sides, while the bottom edge of the bean has a gentle convex radius which matches the mortise through the gauge head. As standard the gauge comes in beautifully figured curly maple, alth0ugh a range of other timbers are available on request. At one end of the gauge is a thumbnail shaped cutter, which will be familiar to anyone who has used one of Jeff’s other marking gauges, while the other end has a hole for holding a pencil – perfect for making out rough stock. The pencil is secured by way of a knurled brass thumbscrew at the end of the gauge beam.

The gauge head is 8″ wide and has a 1/2″ wide step for riding on the edge of the work piece, both edges of which are protected by brass wear strips. A further brass wear strip can be found at the end of the beam with the cutter. On top of the head is a large knurled brass thumbscrew which operates the locking mechanism to fix the head in position. It is this locking mechanism which really sets the Hamilton Panel Gauge apart from other manufacturers’ offerings, or indeed any homebrew gauges. Most gauges fix the head in position with some sort of bolt which cinches down on the beam. This works initially, but as the beam wears the clamping force will be lost until the beam waggles loosely like a dislocated arm. Which is obviously no good. Jeff’s solution is for the locking mechanism to apply pressure both downwards and sideways, which when combined with the radius on the underside of the beam secures the beam in a corner of the head mortise. The result is a panel gauge which will lock securely after many years of use.

DSC_0990

The satin finish on the gauge allows the wood figure to really pop, and gives a wonderfully tactile experience when handling the gauge. The fit and finish are exactly what I expected from my previous experience of buying from Jeff; the brass is fitted perfectly, and all sharp cornes have been knocked off the beam and head. This is an undeniably pretty tool, but how well does it work in practice?

In short, perfectly. The beam is perfectly fitted to the mortise, and slides through the head smoothly. The brass knob locks the head authoritatively, and the head remains locked solid. The cutter has sliced through all the timber species I’ve been able to throw at it, leaving a true and straight line without wandering to follow difficult patches of grain. This is definitely a marking tool I can trust to give me accurate layout lines. Yes, this might be the most expensive panel gauge on the market, but it is worth evey penny. Jeff calls each customer who places an order for a panel gauge personally, to thank them and to discuss their order. It’s a small gesture, but is shows the commitment this fine tool maker has to making reliable and beautiful tools.

Moxon, because my biggest vice is history… part 1

IMG_2771

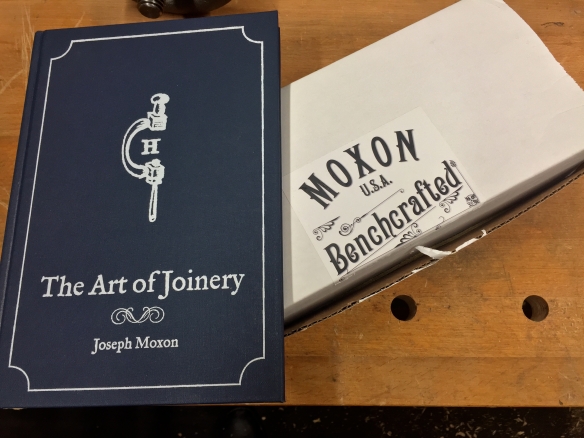
History was one of my first loves, specifically early modern English and North-European religious and political history. It’s what I studied for four years before I went to law school, and I still have my History PhD research proposal (and primary source material) saved on my laptop hard drive. One day I will attend to the siren call of the PhD. Which is an unnecessarily long winded way of saying that of my favourite titles published by Lost Art Press is Joseph Moxon’s  17th century text ‘The Art of Joinery‘. Moxon is mostly known for his description of the double-screw bench-top vise, which as a consequence is commonly referred to as a ‘Moxon vise’ (despite not being invented by Joseph). It seems like building a Moxon vise was pretty much an inevitability – a historic form of vise, which reduces the amount of bending I have to do at the bench (I’m 6ft2)? How could I resist? So recently I picked up the hardware from Benchcrafted (via Classic Hand Tools) and set to work.

DSC_0991

Marking the oak to width with my Hamilton Tool Works panel gauge

This also marked the Apprentice’s first trip to the timber yard, and she helped me pick out a 6 foot long board of 1 3/4″ thick, 6 1/2″ wide oak, perfect for a Moxon build. I’m keeping my Moxon pretty much in line with the Benchcrafted instructions, although I did decide to make the front chop the same depth as the fixed jaw. This is something of a trade off – the Benchcraft plans call for a front jaw which underhangs the fixed jaw to help align the vise with the edge of the benchtop, so as to increase clamping power. However this disparity in the lower edges of the jaws makes the vise less easy to store when not in use, and means that the vise can only ever be used at the edge of the bench. On balance, I’m happy to trade the benefits of a deeper front jaw for a more versatile (and easily stored) vise.

IMG_2651

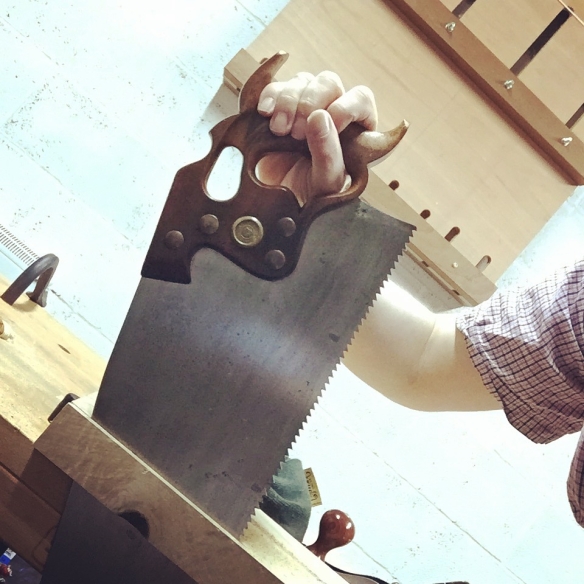
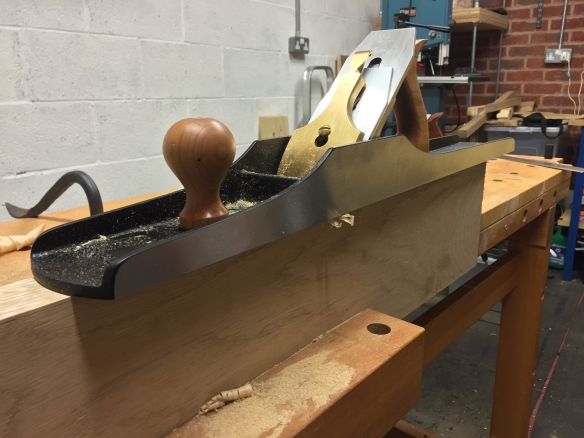
I cut the two jaws to width with my new Bad Axe mitre saw and vintage mitre box, which resulted in very clean and square ends right off the saw. At 6 1/2″ wide the jaws were over width by 1″, which is more than I’d care to plane off oak if I can help it. Instead, I clamped the jaws to the bench and hogged off most of the waste with my 116 year old Disston D8 rip saw using an over-hand grip. Although not a widely used technique, over-hand ripping is very efficient at removing waste very quickly, although it tends to leave a rougher finish than more delicate ripping on a saw bench. As a guide I lined up my layout lines for the final width of the jaws with the edge of my bench, so that the bench acted as a fence and stopped the saw crossing the line on either side of the workpiece. Ripping nearly 6′ of oak felt an awful lot like work, and while firing up the bandsaw would have probably been a faster way to remove the excess stock it would definitely have been less fun. The jaws were then taken down to final width with my No.8 jointer plane.

IMG_2655

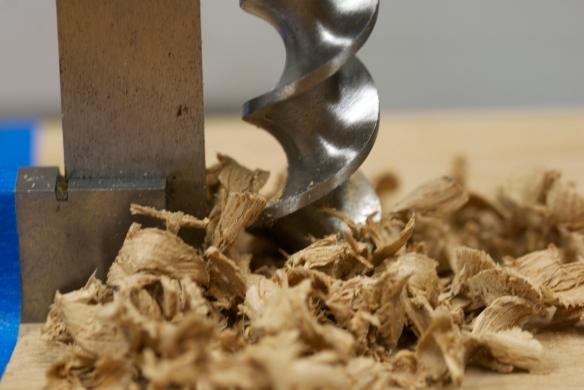
Having foresworn the ease of the bandsaw, I decided to stick with the handtool-only theme. Which mean that drilling the holes for the vise threads was an excellent opportunity to break out the 1920s era North Bros. brace and a 3/4″ Jennings pattern auger bit. I drilled the holes for the front jaw first, flipping the board over once the screw thread had started to emerge from the back of each hole. When it came to drilling out the fixed jaw, I clamped the two jaws together and used the holes in the front jaws as guides to ensure that I was drilling perfectly plumb and that the would be no minor variances between the two sets of holes which could foul the working of the vise.

DSC_0995

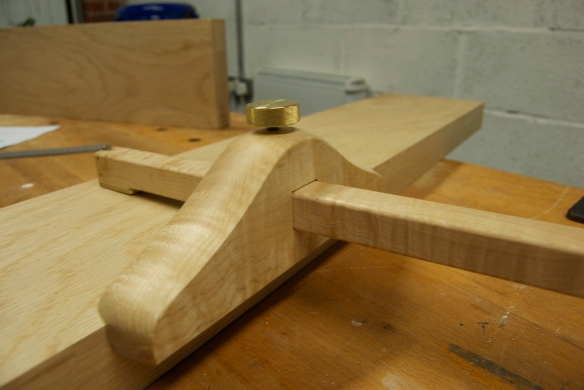
The Benchcrafted hardware requires a bolt to be mortised into the inner face of the fixed jaw. This mortise can either be shaped precisely to fit the bolt, or simply an oversized round hole drilled with a large forstner bit. I didn’t have a large enough drill bit to hand, but in any event, I figured that if something was worth doing it was worth doing properly (even if no one would see the mortise). Which meant shaping the mortise to fit the bolt. With the vise rod passed through the fixed jaw, I threaded a bolt into position and marked the sides of the mortise round the bolt using a fine marking knife. If you are clever you can position the bolt so that all six of its sides run across the grain, which is what I did for the second mortise. If you have one or more sides of the bolt running along the grain (as I did on my first mortise, before I got clever) then extra care must be taken when chopping the mortise to avoid splitting the workpiece.

DSC_0998

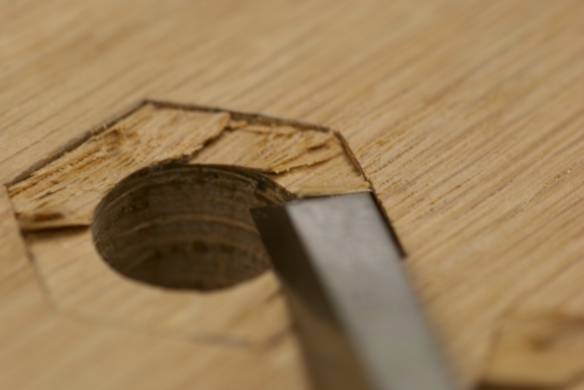
To start the mortise I defined the edges by placing a 1/2″ chisel into the marking knife kerf and giving a couple of sharp taps with a heavy mallet (I used the 24oz joiner’s mallet by Blue Spruce Toolworks). For mortises which have sides running along the grain, I chop all of the sides running across the grain first, and only then the sides which are with the grain. Chopping the sides in this order means that the sides running across the grain will act as a stop if the cuts with the grain start to split the workpiece. I then carefully pare away the fibres up to the edges defined by my chisel, using the same chisel in a bevel up position. Once a shallow mortise has been created it is possible to be much more agressive with the paring, turning the chisel bevel down and taking larger cuts to clear the material out swiftly. As I work my way round the mortise I chop the sides, followed by paring out the waste material, followed by another round of chopping then paring. Paring across the grain makes for very efficient waste removal, as wood is far weaker laterally (across the grain) than it it longitudinally (with the grain). Consequently it takes far less effort to pare even quite a deep mortise when working laterally than it would longitudinally, and I was able to chop these deep mortises (20.6mm, or 13/16″ in old money) in little over 15 minutes each.

DSC_1004

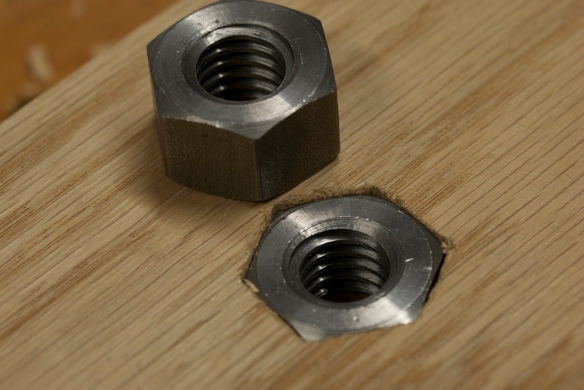
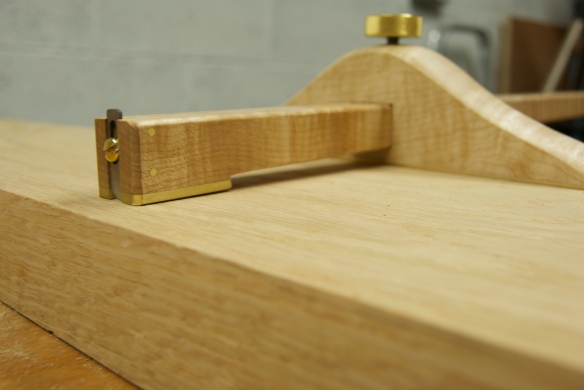
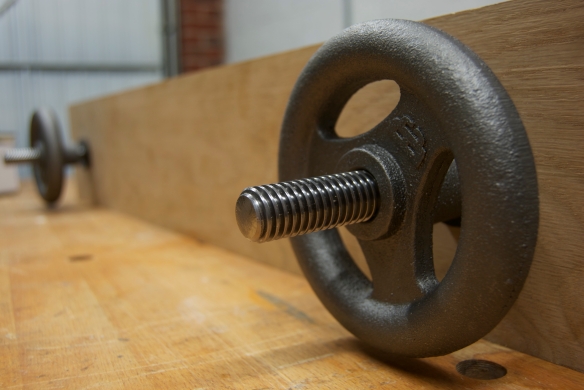
The bottoms of the mortises were cleaned up with a small router plane to ensure that the bolts would be flush and square to the top, and the bolts fitted nice and snuggly with no rotation or slippage. Assembling the vise for the first time showed that the front jaw moved smoothly, and clamped with excellent pressure thanks to the heavy cast iron handwheels. Although it would be tempting to call the vise done at this point, there are a few finishing details I want to implement first, and I will write about these next time around.

DSC_1006

Over the Wireless in Unexpected Places

So here’s another announcement I’ve been patiently waiting to make.

Last October I took a trip up to the Scottish Highlands and spent two days with storied plane maker Karl Holtey, and his wife Claire. Karl is in the process of finishing his final run of planes, after which retirement beckons. The purpose of my fieldtrip was to interview Karl on his career, processes, and plans for retirement, for an article for Popular Woodworking (my very first for PW).

The June issue of Popular Woodworking has now been unveiled, and you can read the introduction to my article on the PW website here.  In addition to the interview with Karl, the article also includes interviews with Wayne Anderson, Raney Nelson, Konrad Sauer, and Chris Schwarz.

The PW June issue is in stores from 26 April, and I am looking forward to it very much.

And before you ask, no, this is not some elaborate April Fool (unless Megan has been plotting this since August 2015, in which case I entirely deserve to be duped…).