Getting to know… Jamie Ward

The “getting to know” series continues this month with Jamie Ward in the hot seat. I first met Jamie at the inaugural New English Workshop summer school – while Chris Schwarz cracked the whip and 18 of us slaved away at building Anarchist’s Tool Chests, the seemingly unflappable Jamie was on hand to run the workshop and offer constant advice and encouragement.

Jamie with Roy Underhill

Jamie with Roy Underhill

Although you are now course leader at Warwickshire College, you have previously worked as a professional furniture maker, right? Tell me about your career before you moved into education, including where you trained?

I trained at Warwickshire College in the late eighties which is interesting as I have gone full circle and returned to the workshop where I first started and now teach from. So when I am trying to motivate one of our 16 yr old students who is having a ‘bad day’, I try to think back to when I was on the course and their age.

So I went from that course into the construction industry, mass producing joinery (windows, doors, stairs etc) for large house builders like Barrats, Redrow, David Wilson Homes. We had daily targets to run 3500 metres of components through the machines, it was a touch soul destroying and monotonous. I was made a supervisor by the time I was 20. Once I had learnt how to use the various wood machines, including four cutters and double ended tenoners it was time for me to move on.

So after 9 years in my first job, I decided I needed to change things to progess and so I decided to sell my house, give my job up and go to university – I was 26. I felt I could use my woodworking skills gained from my joinery days and refine these and go into furniture making. I did my research and felt that Buckinghamshire College in High Wycombe (the home of furniture making), was the college for me. At that time it had the largest furniture making education department in the country and lots of industry still located around the town. Unfortunately Bucks New University as its known now, is about to close most or all of its furniture making courses – very sad.

So I embarked on 5 years at uni, first on a HND Design (Furniture) course then progressed on to BA Hons Furniture Design & Craftsmanship degree course and I loved it. It was so satisfying breaking away from the rigid routine from working in a factory to being able to design furniture and then make it. The experience gained before uni was invaluable in gaining work whilst at unI and my first college job was working holidays in an amazing furniture workshop ran by Richard Williams.

This experience taught me lots, including accuracy, attention to detail and how different it was to work in a small bespoke furniture workshop compared to a large joinery workshop; complete chalk and cheese. In fact as I write this I have just returned from a surprise party at Richard Williams to celebrate his 25 years in business. It was great to see Richard and many people who have played apart in his business and that includes his university tutors from who were also my tutors, this just confirms how supportive the industry is and how tight knit it is and everyone knows everyone.

My time at Bucks College was great, I met my wife there and it gave me a first class degree, something I never thought possible when I was at school. A lesson to my 16 yr olds students – ‘you can change things and make things happen even after a bad time through school’!

After university I help set up a furniture workshop in the Cotswolds in a beautiful village but making furniture for clients in London, it allowed me to use the skills from both university and my joinery days to build a successful workshop and business. After a couple of years I started teaching an evening class at Warwickshire College which 13 years later, I still teach. Within two years of starting teaching part time I then went full time at college.

Teaching is amazing, I love passing on my skills and showing passion for furniture making and seeing students leave and gain jobs in the industry or go onto university just as I did.

I still keep my hand in and design and make furniture in my spare time, but teaching takes priority.

Oak sideboard by Jamie

Oak sideboard

What prompted the move into education? 

I never set out to go into teaching, it began with an inquisitive question to the course leader of the furniture course at the time, do you have any part time teaching posts available? and before I knew it I was teaching an evening class.

I caught the teaching bug here. I was teaching mainly mature students just 1 evening a week, they made a couple of set projects like  tables and wall cabinets then they moved on to their own projects. We continue to have projects that range from bird boxes to the largest project to date, a flight of stairs.

Jamie

Community Is!

Running the furniture programe at Warwickshire College puts you at the forefront of training the next generation of makers. What from your perspective  are the main challenges for keeping the woodwork crafts alive?

FUNDING! I have helped implement a forum with fellow furniture course managers from around England and we often discuss the challenges of proposed funding cuts and how we can overcome these. Because the furniture industry is quite an unknown industry, its not the first career choice of many.

Did you know the UK Furniture Industry is bigger than the Aerospace industry in its turnover? I have recently become a freeman of The Furniture Maker’s Company. Only last week there was a conference called ‘Mind the Gap’  at The Furniture Makers Company  and it discussed the challenges of training and engaging with education and industry, there was also a recent survey carried out – please do click on this link to find out more.

Next is getting the opportunity to discuss furniture making to 13-15 year olds and therefore RECRUITING FROM SCHOOLS. Because we are a Further Education College with various courses ranging from  A-Levels to plumbing to engineering and furniture making, I feel some schools see us as competition. Therefore it can be challenging to gain access to this age group and promote furniture making as a career. There are some local schools that welcome the college in and offer careers events, it would be good if this was more widely practised. Staying in school to do A-levels is not for everyone! And now children have to stay in education until they are 18. Even before secondary schools, it could be said children are making less, how many of you played with Lego bricks or made Airfix models? I did and I loved making things. So are enough children being exposed or getting the opportunity to put the Ipad down and be creative?

Last is PROGRESSION, we have some industry on our doorstep, and we work hard to keep and maintain contact with these companies. It is important to have routes into jobs and for some, onto higher education courses. Around 70% of our students progress into a job or on to a university on completion of their studies. These jobs include, furniture making, wood machining, boat building, kitchen making, theatre set making and joinery to  name just a few. The jobs are there but we don’t always hear from employers, it is common for companies to want employees with experience, but its that old chestnut, ‘how do you get experience if no-one will give you a job?’?

Fan shaped wall cabinet

Fan shaped wall cabinet

So, challenges aside, what are the positive elements of teaching woodwork? What do you find most rewarding?

I love teaching, I do not struggle to get out of bed and come to work each day. Every day is different and always rewarding to see skills being past over to the next generation – ‘Inspiring the next generation!’ sound familiar?  As a tutor we are rewarded in many ways, whether that is seeing a student master cutting dovetails or stand back and look at their finished piece of furniture and a broad smile appear when they have concluded the production journey and the birth of a piece of furniture.

The realisation that this can be such a self fulfilling activity.

We have an end of year show and this an excellent platform to witness the joy of furniture making and end results where students show their work to family, friends and possible employers.

It is very rewarding to observe and watch the smiles of the students, the faces of proud parents the feeling of my job has been completed for this stage in their careers and now its over to them to see where they can go in the industry.

So reward comes in various amounts, daily, weekly or in one big dose at the end of the year.

Union Table

You obviously have to teach a broad range of skills, but how would you classify your own approach to woodwork? Are you a handtool purist, a machine focused worker, or do you have a hybrid approach? What lead you to your  method of working?

Well, with a varied woodworking background, my approached has evolved. As mentioned, I began mass producing joinery, there was no time to spend using my trusted Stanley no 5 there! University and working for Richard Williams showed me how there could be a mix between machines, power tools and hand tools and still make beautiful crafted  furniture and there be a successful business.

So my approach to teaching is that of a pragmatic, or as you put it, a hybrid approach to woodworking, If you are going into industry I feel it is my duty to show a range of ways to work. This could be by hand with very little machines or with the use of a broad range of machines and accompanied hand skills, for example hand cut dovetails when making drawers.

This is my approach to furniture making, use the kit around me and use hand skills when required. Preparation of materials like sawing and planing, well I do like our machine shop full of Wadkin and Robinson machines – so I’m happy to use them!

‘Time is money’ is a mantra that I have learned, and with two young children, ‘time is precious’!

Custom fitted bathroom cabinets

Custom fitted bathroom cabinets

With your own woodwork, what styles or types of work do you consider to be influences?

Influences I feel are varied for me, the obvious ones would be Richard Williams who gave me my first fine furniture making opportunity.  Elegant and well made furniture with the use of quality materials.

Charles Rennie Mackintosh and his use of sculptural or dominant designs to set a feel for a room, for instance the ladder back chair in the hill house.

Paul Smith with his use of colour and stripes; love the understated exterior of his suits and then a flash of colour with the linings.

Then I have to mention the arts and crafts movement with Gimson and The Barnsley’s. I’ve really enjoying visiting Arts and Crafts houses this year and seeing the furniture with through tenons or solid oak panels. True and honest furniture, build to last but also functional.

Let me finish with a William Morris quote,  ‘Have nothing in your house that you do not know to be useful, or believe to be beautiful’.

Brace Yourself… Part 3

If bracing is one of my favourite elements of building acoustic guitars, then shaping and profiling the braces is one of my favourite elements of the bracing work. This is the moment when you really start to craft the tone of the instrument by removing material from specific points of the braces, and shaping them to a final profile that is pleasing to both the eye and the ears. As I’ve mentioned before, shaping the braces is an act of juggling structural integrity and acoustic resonance, and ultimately it comes down to feel, using your ears, and understanding how string tension is applied to the soundboard. Numbers alone are of very little use here!

DSC_0105

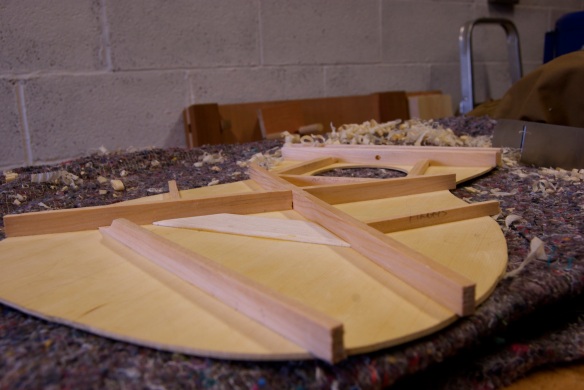
The braces at nominal height, but before any shaping work

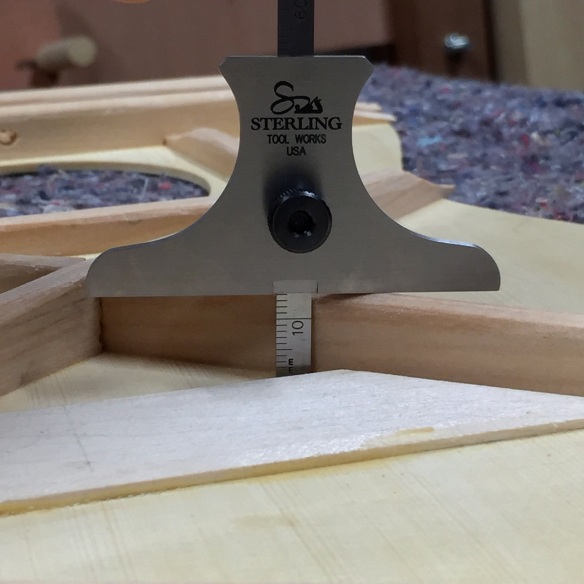
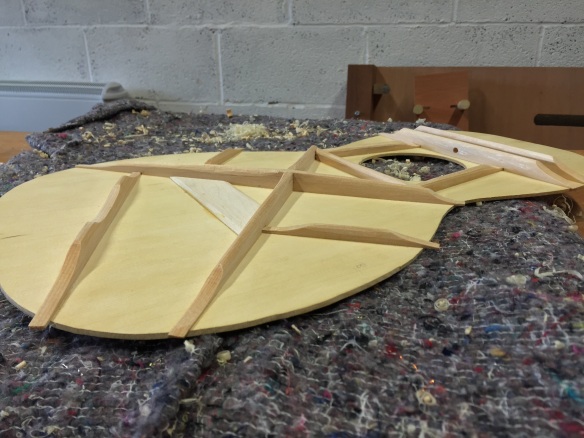
With the braces all now glued to the soundboard, I planed the transverse and X braces down to their nominal height (13mm and 14mm respectively). This gave me the first opportunity to assess the effect of the bracing on the tap tone of the soundboard, and as expected the bracing at this point was too heavy, meaning that the soundboard did not resonate as much as I would like. But no bother, as there was plenty of material still to be removed.

IMG_1908

Checking the height of the braces with a Sterling Tool Works depth gauge

Broadly speaking, the area of the soundboard from the soundhole up contributes less to the sound of the guitar, but is critical for the structural integrity of the guitar. The braces in this area are therefore left heavier than the area from the bridge and below, as this lower area is the part of the soundboard that makes the largest contribution to the sound of the instrument.

My first step when tuning the soundboard braces is to shape the X braces. There are a number of options available here, including scalloping the lower legs of the X, or planing a gentle curve across the length of each X brace. I prefer to curve the X braces rather than scallop them, and my tool of choice for this is my trusty low angle block plane. The lower legs of the X brace had the most material removed, with the very end of each brace curving down to 3mm in height, while only a very gentle curve was planed into the top legs of each brace so as not to reduce the structural strength of the soundboard round the soundhole and upper bout. All the time while planning the curve into the X braces (and in fact removing any material from any brace) I was checking my progress first by gently flexing the soundboard across its length, and also holding it between forefinger and thumb and tapping the lower bout to assess how responsive the soundboard was. This is something that comes with experience, but essentially I listen for the point when the tap tone starts to open up and resonate. As you get closer to this point it is important to progress very cautiously, as removing too much material can loosen the soundboard up too much, which can pose the risks of both the instrument folding under string tension, or developing a flabby bass heavy sound with little definition between notes.

IMG_1872

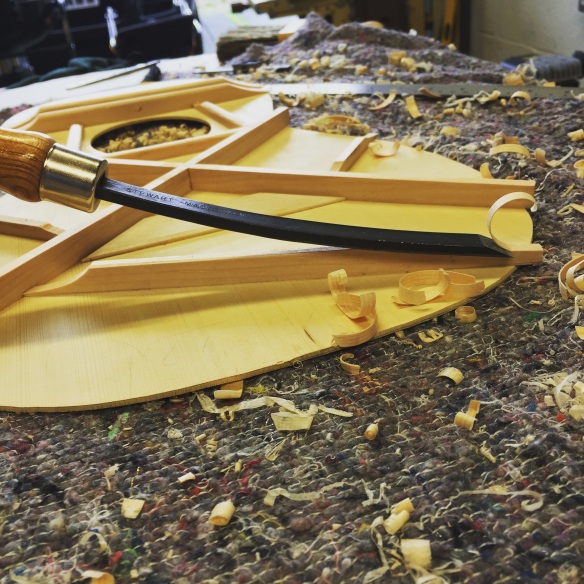
Carving the taper for the end of the tone bar using “Old Bendy” – a curved chisel

Next I tapered the ends of all of the braces, as I had previously done for the ends of the finger, tone, and soundhole reinforcement braces where these connected with other braces. I carve a taper of just less than 1/3 of the length of each brace , save for the X braces where the taper is roughly 1/6 of the length of the brace, and the finger braces where only 1/4 of the length is tapered. The taper results in the tip of each braces brace being reduced to 1.5mm in height. These tapered ends fit into the kerfed linings when the guitar is assembled.

Having removed further material by carving the tapers at the end of each brace, I was getting closer to a point where the soundboard had the desired responsiveness. Taping and flexing the soundboard I felt that the transverse braces only needed minor tweaking, and shaving a further 0.5mm off their nominal height brought them down to a good final height. The height of the tone brace was also lowered a little from the nominal height of 13mm

The curve on the X braces and tweaking the height of the transverse and tone braces had opened the tap tone up, but I felt there was a little more to come off. Rather than increase the curve of the X braces any further, my next step was to shape the profile, or cross section, of the braces. Some builders profile the braces after they have tuned the bracing for the optimum balance of strength and resonance, but I prefer to use the profiling as a means to tune the braces. Because after all, profiling involves removing yet more material from the bracing. The profile is a matter of personal preference, and some builders use a gentle rounded profile while others aim for a more pointed, almost gothic, shape. There really is no right (or wrong) answer, providing that the optimum amount of material is removed from the braces, so I profile the braces until I am happy with the appearance and the tap tone indicates that no further material should be removed.

IMG_1271

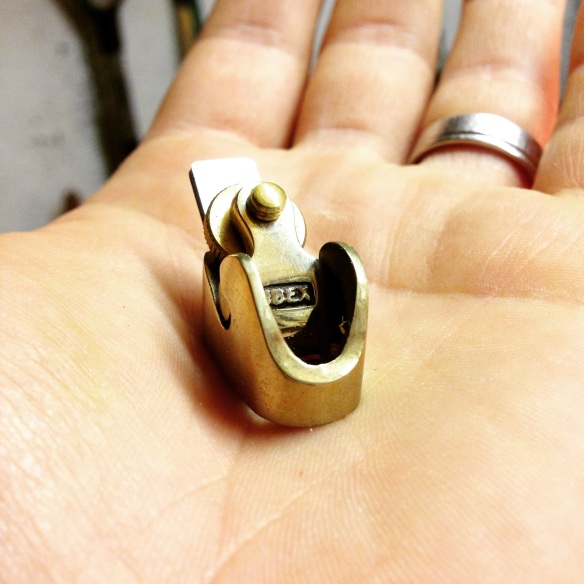
The 25mm long thumb plane I use for all my brace profiling

I profile the braces using a 25mm long thumb plane, slowly knocking off the corners of the braces and gently bringing them to the desired shape. A sharp ½” chisel is also useful for working into tight spaces between braces, both used bevel down, and bevel up with the chisel back pressed against the line of the brace. I prefer to leave my braces shaped from the plane and chisel blade, rather than sanding out any tool marks. Again this is personal preference, and while I like to finish the exterior of the guitar to as high standard as possible, it pleases me to think that internally there are some signs that my instruments have been made by hand rather than machine. The braces for this soundboard ended up with a gothic arched profile, which looked sharp and also lightened the bracing a little further.

Having profiled the braces, the resonance of the soundboard was very close to where I wanted it, but not quite 100%. The final touch was to gently scallop the middle of the tone bar by 3mm, and this resulted in a lively and responsive soundboard which still had plenty of stiffness. It just goes to show how a little spruce can go a long way, when you consider that the scalloping did not remove much material from the tone bar but definitely had a significant impact on the sound. Scalloping after the profiling leaves a nice crisp transition between the different cross sections of the tone bar, although again there are no hard and fast rules about how to do this and some makers will scallop before they profile the braces.

The only remaining task for the soundboard is fitting the bridge (which is in effect the final brace) and I will be writing about this soon.

IMG_1915

The finished soundboard bracing

Brace Yourself… Part 2

DSC_0094

Once the glue for the flat braces had cured I broke the soundboard out of the go bar deck and planed the flat braces to their nominal height. The finger braces and soundhole support braces are 8mm high each, while the tone bar has a nominal height of 13mm. Each of the nominal heights may change a little when I carve and shape the braces to achieve the desired sound, but at this stage reducing them to a nominal height is sufficient, and also easier to do before the curved braces are fitted. To protect the surface of the soundboard when carving and planing the braces I use a thick removal blanket on top of the workbench.

The tone bar (in the foreground) and finger brace (in the background), having carved the ends to fit into the X brace.

The tone bar (in the foreground) and finger brace (in the background), having carved the ends to fit into the X brace.

The tone bar and finger braces fit into slots on the X braces, and two of the soundhole supports similarly fit into slots on the lower transverse brace. So the next task was to taper the ends of the tone, finger, and soundhole braces to a height of 1.5mm, ready to fit into the curved braces. Much of the waste was removed using a 1/2″ chisel with the bevel down, and then the final  curve faired up using a curved chisel.

Many builders curve their braces by sanding them on a radius dish, which then doubles as a clamping caul in the go bar deck. However I still use the method taught at Totnes, and shoot the curvature for the X braces and transverse braces on a shooting board using a jack plane. For this guitar I am using a 3.5mm curve for the soundboard (which equates to a 23′ radius, if my admittedly shaky maths is to be believed). The X braces have the full extent of the curve planed into them, while the curvature for the transverse braces is calculated from the bracing plan I previously drew. The finger and tone braces (which are at this stage already fixed to the soundboard) all have a curve under 1mm – the finger braces have a curve of around 0.25mm. Because these braces are quite thin (6mm wide each) I can get away with planing them flat as the tension of the X braces will then bend them into position.

A demonstration piece in scrap southern yellow pine. You can see the magic point marked between the 1/4 and 1/3 points, and at the end the 3.5mm curve point.

A demonstration piece in scrap southern yellow pine. YOu can see the magic point marked between the 1/4 and 1/3 points, and at the end the 3.5mm curve point.

To shoot the curvature for the X and transverse braces I first mark on the length of the brace the quarter, third, half, two thirds and three-quarters points. At each end of the brace I then mark the amount of curve desired (so the full 3.5mm on the X braces). Half way between the 1/4 and 1/3 points, and the 2/3 and 3/4 points, lies the magic point, which is also marked on. I plane a straight line from each end of the brace to the respective magic point, so that the curve mark is connected to the magic point. It is then a matter of taking very fine cuts with the plane around the magic point so that the corner at that point becomes a smooth curve. This is then faired out across the full length of the brace with a single pass or two. At all times I ensure that no material is removed from the centre point of the brace – the mid point is sacrosanct when curving the braces! The progress is measured by rocking the brace along a straight edge, feeling for any bumps (caused by corners) or positions where the brace seats firmly on the straight edge (which would indicate a flat). The brace is done when it smoothly rocks from end to end along the surface of the straight edge.

Testing a brace on a straight edge

Testing a brace on a straight edge

Admittedly this method is slower than using a radius dish, but means that I am fully in control of the curve of each brace and means that I can use any radius I wish without needing to build a new radius dish each time. It also ensures that the gluing surface of the curved surface of the brace is flat for a good bond, rather than slightly domed as would be the case when using a radius dish.

Having curved the X and transverse braces I then cut the slots to receive the ends of the finger, tone and soundhole braces. This was a case of placing the curved braces on the soundboard, and marking the position of the brace ends with a fine marking knife. The waste was then removed with a fine chisel until the flat brace end fittied tightly into the slot. The half-lap joint for the X braces was marked in a similar way, and the bulk of the waste removed with a No.2 blade in a piercing saw, and pared to a good fit with a sharp chisel.

The bracing cradle

The bracing cradle

Because I don’t use a radius dish I have to find alternative solutions to support the soundboard while it is in the go-bar deck. A bracing cradle that fits the curvature of the braces is easily made out of scrap, and I always start with small squares of material of a consistent thickness which support the ends of the braces at the perimeter of the soundboard. These establish a consistent body datum, and I glue them directly to a copy of the bracing plan. Further small squares of scrap are then selected so that they support the braces, and do not either leave a gap or force the brace to sit higher than the datum established by the perimeter pieces. For the transverse and X braces I normally use 4 packing pieces per brace, and glue these all to the bracing plan copy. Plywood is useful for building the bracing cradle, as layers can be split off or pared away with a chisel to provide packing pieces of precisely the correct thickness. The height of packing pieces can be further built up with folds of paper, or thin stock as necessary.

Testing the braces on the bracing cradle

Testing the braces on the bracing cradle

To prevent the bracing cradle from denting the soundboard, I cut a slightly oversized soundboard caul out of 3mm thick plywood. This lies between the bracing cradle and the soundoard, and is thin enough to bend under the pressure of the go bars.

Once the glue on the bracing cradle had dried I placed the cradle, plywood caul, and soundboard all back on the go bar deck. The X braces were glued in first, followed by the two transverse braces. On a glue up involving a large number of go bars I find it best to work at one end of each brace, and work down the length towards the outer edge of the guitar. This avoids the awkward situation of frantically trying to reach into the middle of a cats cradle of go bars while the glue sets. As with the first glue-up session, I left the braces oversized so that I could later plane out any dents left from the go-bars.

IMG_1828

Brace Yourself… Part 1

Bracing is one of my favourite elements of building acoustic guitars. It is the perfect balance of ensuring structural integrity and sculpting the sound of the resulting instrument. Brace too lightly and the soundboard could fold under the several hundred pounds of string tension. Brace too heavily and the soundboard will not be free to resonate, and the sound will be muddy and lifeless.

Building acoustic guitars is a constant calibration of many different factors (body size, body shape, timber selection) and bracing encapsulates this perfectly. The appropriate bracing pattern must be selected for the desired sound (pre-war ladder bracing? X bracing? A bracing?), then the size of the braces in terms of thickness and height of each brace determined for the stiffness and strength of the specific soundboard timber being used. That is a lot of juggling to do, and it is wonderful.

The flat braces and bridge plate.

The flat braces and bridge plate.

The bracing for the parlour guitar is a pretty standard X brace, with a single finger brace on each side of the main “X” brace, two transverse braces across the upper bout, and a single tone brace off the lower leg of the treble side of the “X”, along with three soundhole reinforcement braces and a bridge plate. The first step I always take is to draw a full size plan of the bracing, onto which I mark the curvature of the soundboard (there will be more on the curvature in my next post). I also then draw the position of all of the braces onto the inner face of the soundboard itself, using a very fine and light pencil. This helps ensure that they are in exactly the correct position come glue-up.

In the past I have glued all of the soundboard braces in one go. This can mean a glue-up session involving 11 or more braces, each with multiple go bars providing clamping pressure. Which tends to get pretty intense. So for this guitar I decided to split the glue-up into two sessions. The first session would be gluing the flat braces, and the second would fit the curved braces.

Ripping the spruce stock for the soundboard bracing

Ripping the spruce stock for the soundboard bracing

I prepared all of the brace stock in one go – cutting a 12mm wide, quartersawn, slice off a large block of spruce I keep for bracing. This was my first proper opportunity to give my new (to me) 1900 era Disston D8 a try, and it cut through the 3.5″ spruce like butter. There is a reason why the D8 is the king of rip saws! The spruce slice was then flattened with my No.8 jointer plane, and the slice split into smaller sections each containing two braces. These smaller elements were planed down to thickness and the flat braces then split off using a fret saw. The reason for thicknessing the braces in pairs is that this gives larger work pieces which are easier to hold in place whilst planing.

The three soundhole braces are each 8mm thick, while the two finger braces and the tone brace are 6mm thick. All braces were left at 15mm high for ease of gluing, and I left each of them 6mm overlength. The soundhole reinforcement braces each have angled ends where they meet other braces. Rather than use a sliding bevel to mark these angles, I showed each brace to the bracing plan, and marked the intersection with the adjoining braces using a small marking knife. The waste was then removed with my 12″ carcass saw and I snuck up on the final angles with a low angle block plane.

With the flat braces ready to be glued, I turned my attention to the bridge plate. This was made out of a straight grained piece of maple, which I planed flat and cut to shape using my carcass saw. The lower legs of the X brace pass under the rear corners of the bridge, and the bridge plate extends 8mm in front of the bridge and 15mm behind the bridge. Once cut to size and shape, I then bevelled the edges of the bridge plate with a block plane.

For the first stage of glue up I placed bracing plan on the deck of the go-bar station, with the soundboard facedown. The flat braces and bridge plate were then glued in place using original Titebond and secured with go bars, before being left overnight for the glue to cure.

A shot partway through the first glue-up - the third soundhole reinforcement brace and the tone bar have not yet been fitted.

A shot partway through the first glue-up – the third soundhole reinforcement brace and the tone bar have not yet been fitted.

In my next post I will describe the more involved processes behind the curved bracing – which is where the fun really begins!

Mortise and Tenon Magazine – coming soon!

unnamed

For me one of the most exciting developments of 2015 has been watching furniture conservator (and Popular Woodworking columnist) Joshua Klein slowly unveil details of his new print publication, Mortise and Tenon magazine. An annual publication, Mortise and Tenon promises to be a “merger of perspectives” between makers, conservators, and scholars, all focused on historic furniture.

Joshua has now released this trailer for Mortise and Tenon, which is well worth three minutes of your time, and has announced that pre-orders for issue one will be taken from 1 December. I for one will definitely be placing an order sharpish on 1 December.