Brew Your Own

“…You got the hot wax residues, you never lose with your razor blade shoes, stealing pesos out of my brain, hazard signs down the Alamo lane…”

Hotwax, Beck

putf0997

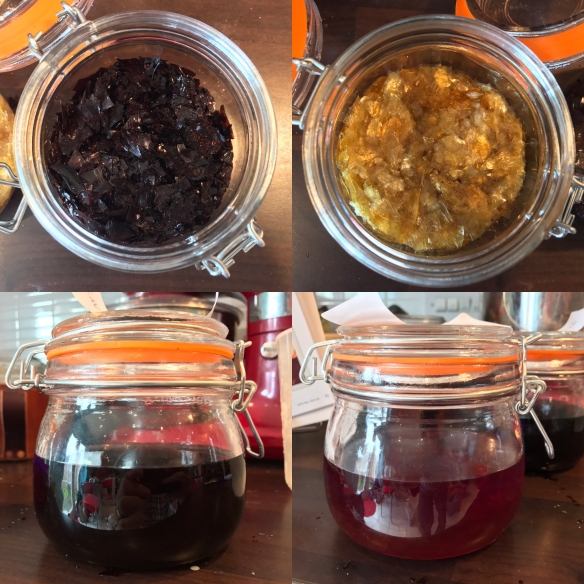
Mixing 2lb cuts of garnet and blonde shellac

Finish can be an incredibly personal element of a piece of furniture or musical instrument. I know people who have been put off furniture instantly due to the type of finish applied, before they have even had an opportunity to look at the lines and form of the piece. Now I’m quite a simple soul when it comes to finishes – I like finishes which are durable, look good, and which are easy to apply. Preferably without too many health warnings. For these reasons, shellac and wax is a combination I rate pretty highly.

img_4866

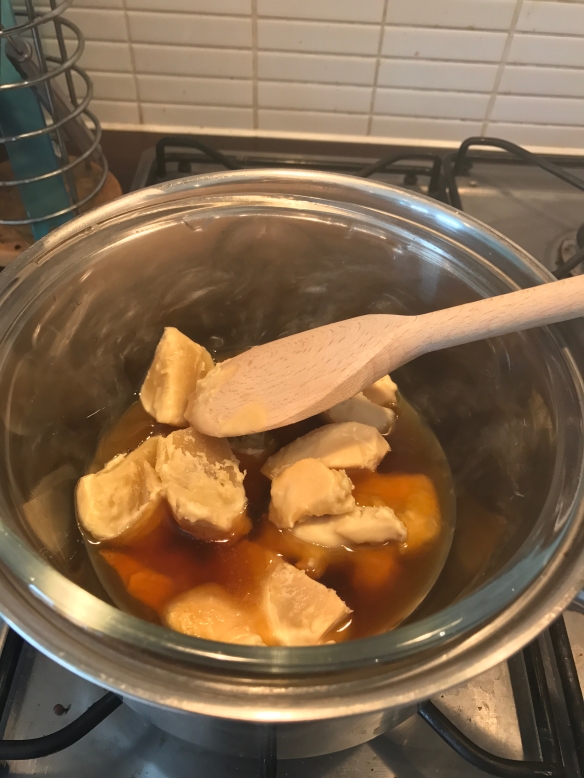
Melting down bees wax and shellac wax

For the Policeman’s Boot Bench I had originally discussed a shellac and wax finish wih the client, which will work nicely in the period hall where the piece will sit. What the client had not settled on was the shellac tone and type of wax top coat, so I decided the best way to bottom this out was to make up a sample board of possible finishes to allow him to make an informed decision on one of the most subjective elements of the build.

img_4907

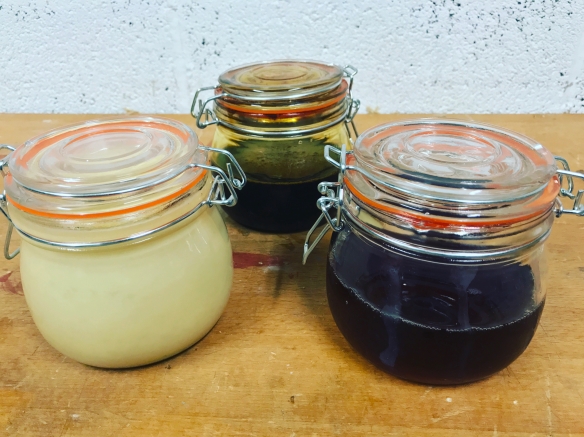
Home brewed hard wax, garnet shellac, and blonde shellac

To make the sample board I mixed up batches of blonde and garnet shellac (both 2lb cuts), using the excellent tiger shellac flakes from Tools for Working Wood. These are my two preferred tones, depending on application, and a 2lb cut is thick enough to give good coverage after only a couple of coats, without being so thick that it becomes overbearing. The shellac went into a couple of mason jars, into which I poured the required volume of meths, and sat on the side with the occasional vigorous shake to keep things dissolving. After  24 hours both jars contained a perfectly dissolved mixture with no sediment or undissolved flakes.

img_4951

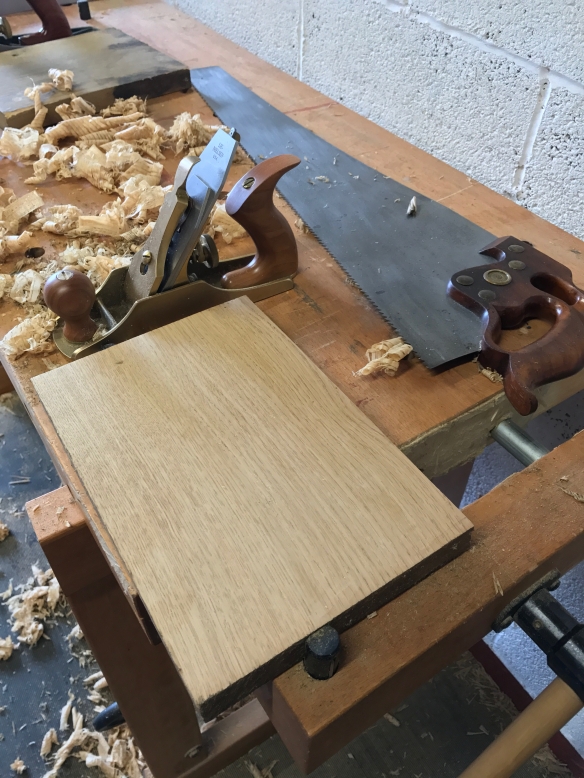
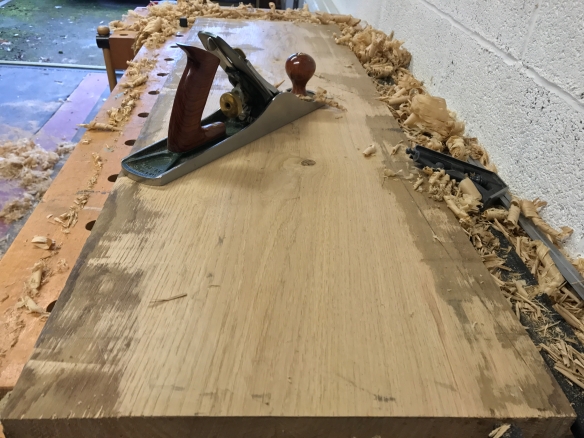
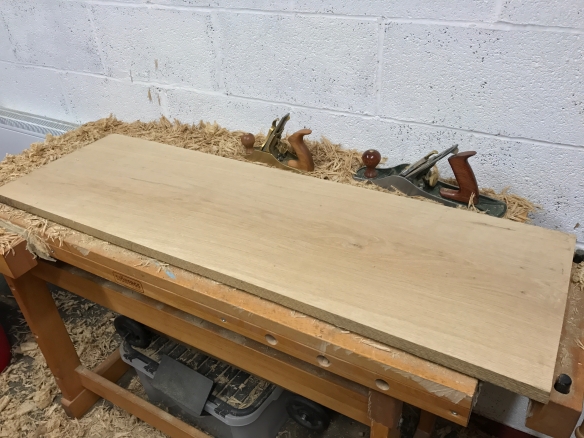
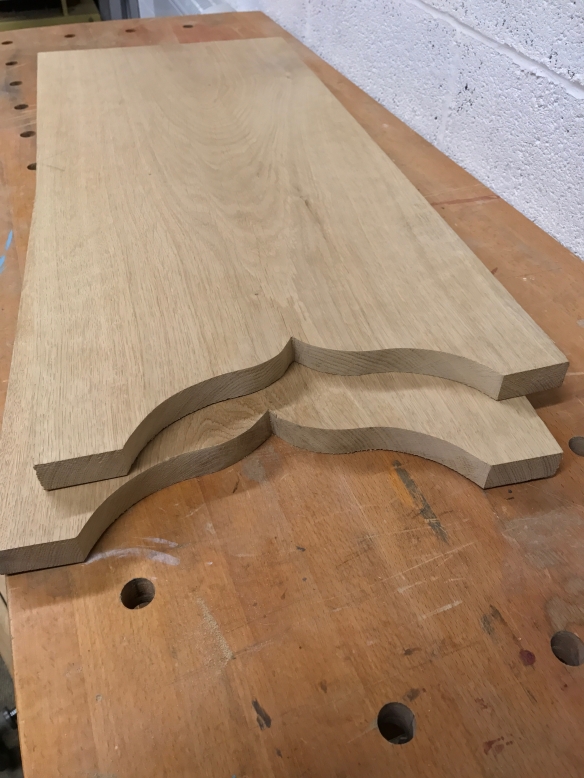
A quick sample board from the same oak as I used for the top and end pieces of the boot bench

I also wanted to give the client two choices over the type of wax. The first option is Liberon black wax, which I’ve not used before but which Chris has written about in glowing terms a number of times. The second option is a hard wax recipe I got from Derek’s book on French Polishing, which I have wanted to try ever since I used his soft wax recipe to great effect on my Anarchist’s Tool Chest. Home brewed wax is is easy to make and equally easy to apply. In this case a mixture of bees wax (I used Cornish beeswax from Workshop Heaven), shellac wax, turpentine, and white spirit (if you want the proportions then you’ll have to buy Derek’s book, which is well worth reading). The wax was melted in a ban marie, and then mixed with the turps and white spirit before being decanted into a mason jar to set.

img_4953

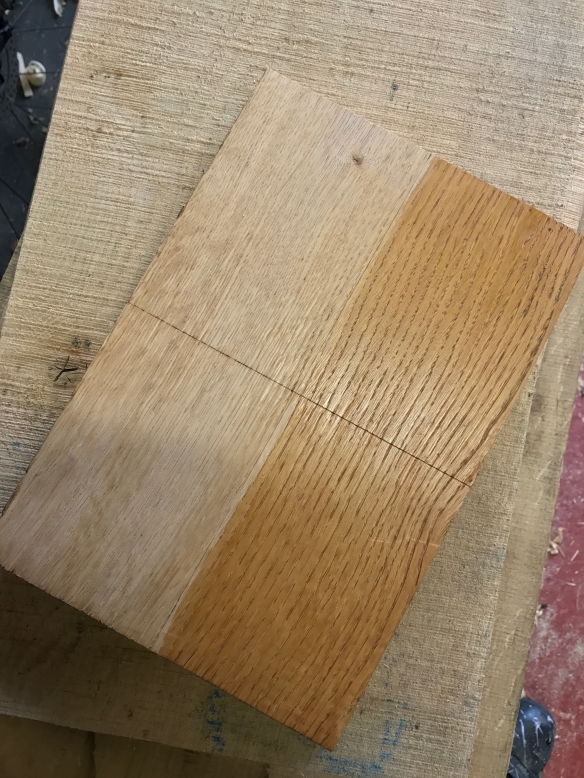
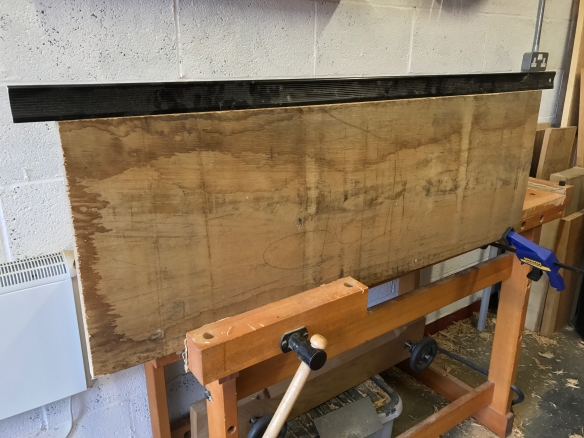
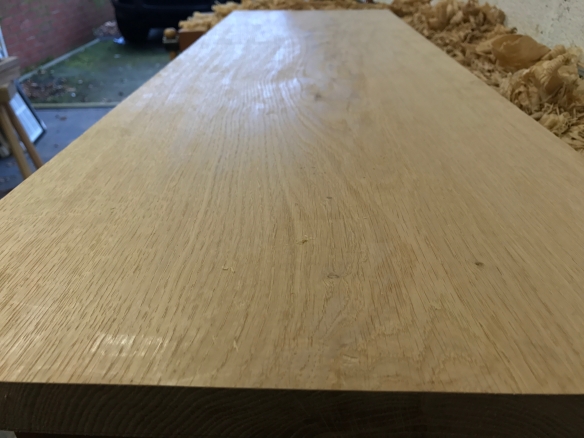
The sample board, shellac but no wax. Blonde shellac on the left, garnet shellac on the right

The sampleboard itself was the end of the oak board from which I had harvested the top and end pieces of the boot bench. I prepared one face with my smoothing plane to give a good finish, and then divided that face into quarters. Two quarters received two coats of the blonde shellac, while the other two quarters were treated to two coats of the garnet shellac. Once the shellac had dried, one quarter of each shellac tone was given a good coat of the hard wax, while the other two quarters were rubbed over in the Liberon black wax. I left the waxes to dry then buffed them out.

img_4961

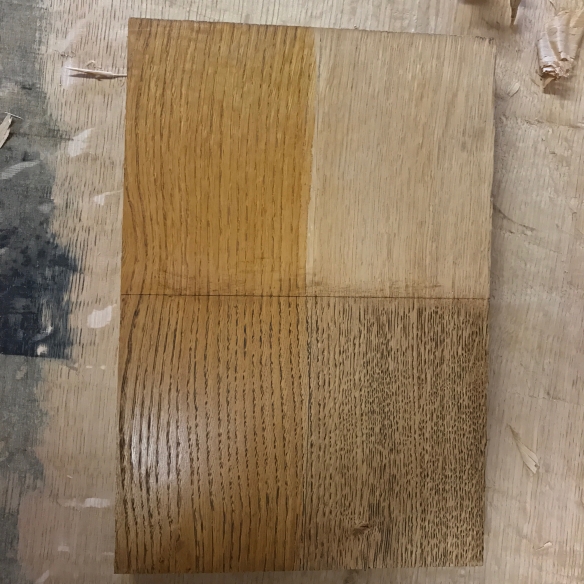
The finished sample board – clockwise from top left: garnet shellac with hard wax, blonde shellac with hard wax, blond shellac with black wax, and garnet shellac with black wax

The result is a sample board giving four very different options. It is striking how changing the wax topcoat can make such a profound difference to the appearance of the shellac. And hopefully this will give the client a good range of options from which to choose. The hard wax has a higher sheen than the black wax, although it is still an antique style sheen rather than a high gloss. Both both top coats work very well, and I definitely have my favourite combinations from the sample board. It will be interesting to see what the client selects.

The Policeman’s Boot Bench… Part 5

I’ve now processed the top for the boot bench and it is waiting to be dovetailed to the end pieces. Every project provides different lessons, and while processing the top I started thinking about the challenges of working on pieces of a different scale to what you’re used to (which also stopped me writing another simple “hey I flattened a board by hand” post, which could get dull quite quickly).

img_4892

Traversing cuts to remove the majority of the material, just like on smaller boards.

If you are used to working with small casework, or (in my case) guitar-sized components, the move to larger casework can feel a little daunting.  The Policeman’s Boot Bench is 43″ wide, which makes it my largest piece to date, something I’ve noticed all the more so given that the majority of last year’s projects tended to be in the region of 10-20″ wide. In particular, the top of the bootbench is the largest piece of timber I’ve processed entirely by hand, especially as I cut all my components a little oversized to start with so that any minor shakes can be identified and dealt with as the timber settles. When I first started to work the top it was 47″ long and 15″ wide, and covered the majority of my workbench. I may have had to buy a longer straight edge as a result.

img_4883

Jointing the reference edge – the reference face is on the other side of the board. This project necessitated purchasing a 50″ straight edge.

The thing about larger scale work is that it is both the same as smaller scale work, and a little different. Well that sounds wonderfully nonsensical, but when you stop and think about it, processing a 47″ long board requires exactly the same techniques as for a 15″ wide School Box. The difference, I think, is that the fundamental techniques need to be cleaner and more deeply embedded to be effective for larger scale work. Let me explain.

img_4644

The only real difference between a 15″ long board and a 47″ long board is the size of the workpiece. So the same techniques will work, the trick is not to be overawed be the extra timber in front of you, and not to panic. That is where deeply embedded core techniques come in – remembering that regardless of the size of the workpiece, the same workflow will equally apply, traversing cuts and all. Cleaner technique becomes relevant because that extra expanse of wood gives a greater opportunity to get in a muddle and create problems through sloppy technique.

_dpp3093

The left hand does all the important work when jointing, the right hand just pushes the plane. The fingers of my left hand act as a fence to keep the plane in a constant orientation to the work piece.

The good news is that expensive gadgets or new ways of working are not necessary – just doubling down on those core techniques. The best example of this I’ve found from working the top of the boot bench is when jointing the edges square. On a long edge there a greater potential for the plane to wander or skew, and consequently for localised areas of the edge to slope out of true, or even worse, in an opposite direction to the rest of the edge. Using the off-hand fingers to keep the same portion of blade cutting along the entire length of the board becomes even more important, as it keeps the angle at which the blade meets the edge constant. The result is an edge which is at a consistent angle, and which can be worked to true even if the plane blade itself is a little off being level. Secondly, good technique with stop cuts becomes more important because it is more likely on a long edge that there wil be localised areas which need addressing.

img_4836

Before dimensioning, the top of the boot bench covered most of my work bench

Unsurprisingly, the top took a little longer than usual to process, but the same basic techniques resulted in a board that was flat and square. That was a lesson in reinforcing the core handplane techniques, which I expect will be further embedded as I have four shelves (each 42″ long) still to process.

img_4896

This oak has a beautiful finish straight off the plane blade.

The above sounds all very forboding, but it is not meant to. If anything, I think that working on a piece that is of an entirely different scale to your usual work is a very beneficial way of honing the fundamental techniques and developing as a woodworker, whether it is building an 8ft long Roubo bench (on my project list for 2018), or some Marco Terenzi style minatures. Anything which forces us out of our comfort zone and makes us think critically about technique has, to my mind, to be a good thing.

The Policeman’s Boot Bench… Part 4

img_4799

Laying out the foot detail with only a compass and pre-industrial geometry

Today I carved the feet for both end pieces of the boot bench. After a lot of flatwork recently it has been really liberating to exchange the tyranny of the straight line for some flowing curves.

img_4806

Both feet laid out – simple geometry keeps things symetrical. And that big knot will be gone once I cut out the waste.

The feet are formed by cutting a cyma reversa detail into the bottom of each end piece. Since I prepared the full sized plans over Christmas I’ve been experimenting with a number of curves for this detail – changing the transition point between the concave and convex portions, as well as both fixed radii curves and complex curves using french curves. In the end the detail that worked best to my eye was a pair of fixed radii curves, with the transition point two fifths of the distance from the top of the detail. Placing the transition point closer to the top of the foot ensures that there is plenty of material below the bottom dado to support the shelf, and provides an elegant curve that directs the eye upwards. The foot starts 2″ from each edge of the workpiece, and finishes 3″ above the bottom edge at the centre of the workpiece. Marking on those dimensions effectively gave me two right-angle triangles back to back (one for each half of the foot detail) terminating at the lower edge of the  bottom dado.

img_4812

Removing the waste with the Knew Concepts coping saw

Normally I make ply templates for curved work so that the curves are easily repeatable. However, for this detail I wanted to put into practice the pre-industrial geometry that Jim Toplin and George Walker covered in By Hand and Eye, not to mention George’s excellent article in Issue 2 of Mortise & Tenon, so I laid out both feet using just my Starrett compass and the principles expounded by Walker and Toplin. Marking out repeatable curves like this is actually very straight forward once you get the hand of some simple principles. First off find the centre point for each of the two curves. To do this set your compass so that it spans the distance between the end point and the transition on the hypotenuse of the triangle marked on the workpiece, then sweep the compass in an arc from each point. Where the two arcs cross is the centre point of the circle. Lay out that curve, then repeat for the other half of the cyma reversa. Because the centre point of the convex curve fell off the end of the workpiece I butted both end pieces together to provide a continuous working surface. I’ve left the layout lines on the inside of the carcase to tell a story for any future generations who look inside. Despite the geometric terminology, this method is really intuitive and requires no numbers whatsoever (which is my kind of maths). And the Romans used it to lay out viaducts, which is pretty nifty.

img_4839

A pair of whale tails!

With the curves marked clearly on the inside face of both end pieces, I removed the waste using a large Knew Concepts coping saw and a fresh skip-tooth blade, making sure to cut on the line. Even in 1″ thick oak the Pegus blades cut smoothly and swiftly. After using plenty of bad coping saws, the Knew Concepts saw is a revelation, particularly when loaded with Pegus blades. The coping saw removed a large whale-tail piece of waste, and left a surface that was smoother than you’d expect.

img_4824

The Moxon vise brings work up to a comfortable height for rasping

Cleaning up the curves was where the fun really started. The first priority when rasping or filing work is to elevate it so that it is close to eye level without needing to stoop. My Moxon vise is perfect for this, and the end pieces were rock solid and at a much more comfortable height. Cleaning up the saw marks was done with a 9 grain (10″) Auriou cabinet maker’s rasp, which quickly removed all blade marks and left a reasonable surface. The curves were then faired up and refined using a 13 grain (7″) Auriou modeller’s rasp which leaves an incredible surface. It is important to work from the show surface towards the back edge of the work, to avoid blowing out grain on the face of the work. For curves that will only be viewed from one side, I slightly undercut the curves from the rear, which means that I can focus on fairing the show side. Once the curves were flowing and fair I sent a photo to the client, to gauge his response. He requested a slightly deeper and dramatic curve on the convex portion of the detail, so I spent some time deepening that curve using the same rasps.

At this point the feet are probably 95% done. I’m going to leave the end pieces out so that I can live with the curves for a few days and let them seem into my subconscious. Then I will return to them mid-week and see if there is any more subtle refinement to be done. Once I’m completely happy with the feet it will be time to dovetail the carcase together.

img_4828

Happy feet (which also happens to be the Apprentice’s favourite film)

A different thread…

IMG_2504

Winter seems to be dragging on with no end in sight round these parts, so wearing extra layers is an essential survival strategy. Which is why I am pleased to announce that I’ve had a third run of Over the Wireless t-shirts printed. Now that all the pre-orders have shipped out, I have a good range of sizes in Cardinal Red left in stock, as well as a lone medium left in British Racing Green. The tees are priced at £20 including shipping in the UK, or £25 including shipping to the US (other shipping locations on request). Orders can be placed by leaving a comment below, or by emailing kieran@overthewireless.com

As always, I hope to have another run of tees printed but that depends on demand. So if you want a tee, drop me a line just in case this is the last print run. Of course, if you would like a British Racing Green shirt in a size other than medium, let me know and I’ll start the fourth print-run order list.

Swimming into Focus – The John Brown Book

img_3988

I spent yesterday in Hay-On-Wye for the first of many field trips for the John Brown book. Picturesque Hay, home to the renowned book festival and equally renowned (if somewhat more niche) spoon festival, is halfway between the village where Chris Williams’ (my co-author for the project) lives and Birmingham, so it makes for an ideal location to meet up and formulate a plan of attack for the book.

And we are very much at the planning stage currently. To do this book properly (which is the only way we want to do it) is going to be a huge endeavour,with a significant number of interviews with John’s friends, family, and woodworkers, not to mention field trips to locations significant either to John or to Welsh Stick Chairs, and of course the chairmaking itself. With so many moving parts, having a clear road map from here to publication is the best way to stay focused on the key threads, and to make sure that nothing important falls by the wayside.

So over the past couple of months we have been engaged in a constant dialogue about what we want to achieve, and how best to go about it. Who to interview, what to make, where to visit, and what to read. Yesterday was the culmination of that dialogue, not to mention an excellent opportunity to spend a day talking woodwork with someone who has spent over 30 years working in the woodcrafts, and who personally worked with John for many years.

Slowly The Life & Work of John Brown is swimming into focus. What has become very clear over the time that Chris Williams and I have been discussing the book, and even more so yesterday, is that is for both of us it is important that we honour and embody John’s ethos as a chairmaker. What that means is that the chairmaking section of the book must make building these fascinating chairs accessible to everyone, with an emphasis on the minimal use of specialist tools or hard to find timber. That is not only consistent with John’s Anarchist Woodworker philosophy, but will also hopefully contribute to the longevity of a relatively uncommon chair form.

Which is all very well and good, but how will we achieve this? Well, one of the ideas currently being kicked around is starting the chairmaking section not at the workbench, but at the timber yard. Timber selection can be a truly daunting experience for the inexperienced woodworker – I still remember my first trip to the timberyard, and how the choice was almost crippling. Many woodwork books tend to assume that you already have material and are standing at your workbench ready to start work, but to our minds the timberyard is where every build starts, and to start anywhere else would be omitting a key step. By having Chris Williams guide the reader through timber selection for a Stick Chair, we hope to remove one of the greatest hurdles to chairmaking.

We are also considering of building chairs with pieced and carved armbows rather than steam bent bows. While English and American Windsor chair making traditions use steam bending for arm bows, Chris Williams tells me that due to the social function of Stick Chairs there was little or no tradition of steam bending in Wales. The pieced arm bow is very striking, and relies on techniques and tools common to most woodworkers. So accessible and historically accurate. Perfect.

These snapshots are really exciting to us, and I hope that by sharing some of the processes behind the book we can encourage more dialogue about John and his chairs, and also share our enthusiasm for the project. This is just the start of the process, and plenty is likely to change as we continue to work. But as the framework for the book starts to fall into place I can see how it will hang together, and what an important contribution this could be. There’s a lot of hard work to do over the next couple of years, and I hope that you will all join us for the ride.