Beneath the surface…

_DPP2274

For me one of the most exciting moments of woodwork is cleaning up timber to reveal the final surface – even when you have a good idea as what to expect wood can often find a way to surprise you with unexpect figure, colour, or interesting grain. Planing the swamp ash body for the Mysterycaster was no exception.

Once the glue had cured on the body joint I broke the timber out of the sash cramps and secured it between four bench dogs using my end vise. Whenever I worked a jointed panel I always plane the area around the joint first, to make sure that there are no unexpected problems and that the joint is solid. Even when I feel confident about a  joint, the grand reveal under a plane blade is an exciting moment tinged with tepidation – will I find unexpected horrors from the glue-up? Fortunately, working the joint on the front of the body with my low angle block plane revealed a good tight joint with no visible glue line or gaps – the only indication that the body is commprised of two pieces is the sudden change in grain pattern along the joint. The same was true of the joint line on the back of the timber, so all in all I’m satisfied with this joint.

_DPP2258_01

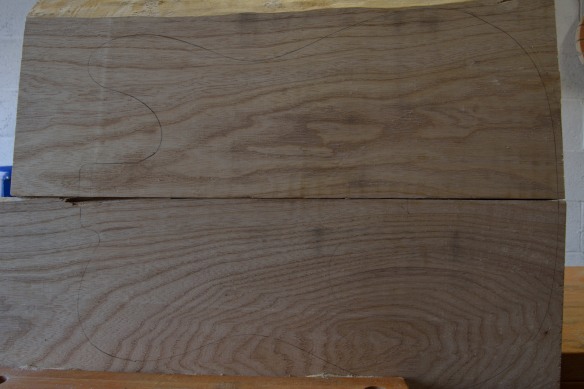
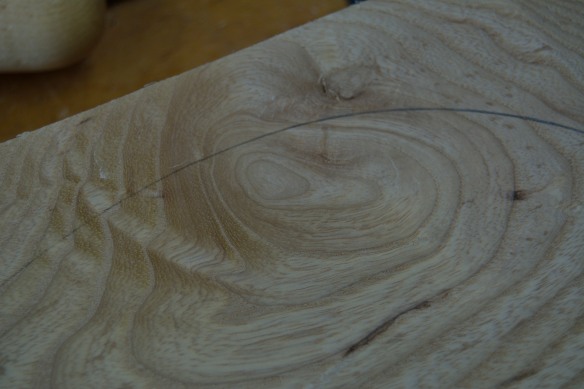
The front of the body, cleaned up and ready to be cut to shape.

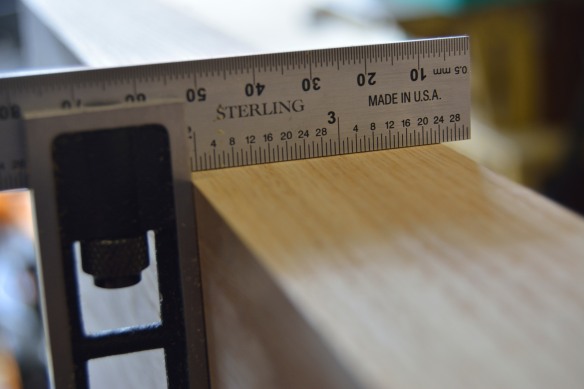
Although I do give timber a final sand before finishing, I prefer to use the planed surface as far as possible, and so my focus in planing the front of the guitar was to flatten it and achieve a clean, and tear-out free, surface. Fortunately the front was reasonably flat, and so I skipped using a jack plane and went straight for the No.8 Jointer. Achieving as flat a front and back as possible for the guitar is important, so that they  will provide a consistent reference surface when radiusing the corners of the body later on in the build process. Setting the No.8 plane to an increasingly fine cut as I flattened the front of the guitar resulting in a gorgeous and clear surface. Using a jointer plane as a “super-smoother” isn’t practical in many instances, but just occasionally the extra work is justified.

_DPP2255

A near-mirror finish right off the plane, and wafer thin shaving.

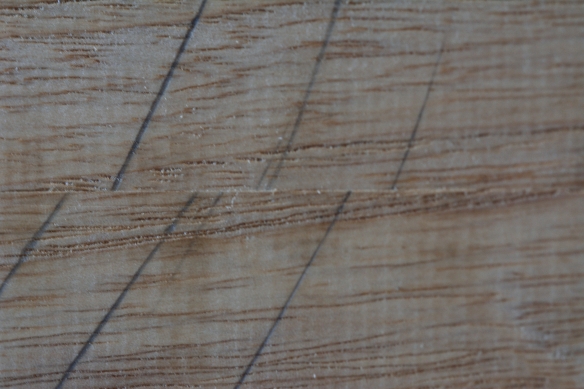
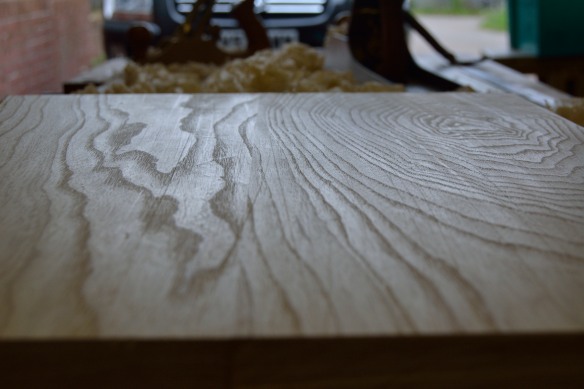
With the front flattened, I moved my attention to the back, and it was here that the swamp ash surprised me. I started by marking on three edges of the timber the thickness of the timber from the front using a marking gauge (the fourth edge was significantly bevelled on the front so I had no accurate datum line to work from). Again, as very little material was to be removed, and I wanted as flat a surface as possible, I reached straight for the No.8. Which worked beautfully on one half of the timber. However, on the other half, right where the lower bout of the guitar will dip into the belly curve, my plane uncovered some really striking rippled grain, of which there had been no indication before starting work. Even set to a very fine cut, my freshly sharpened No.8 tore out (not something which happens very often as this plane seems to ignore grain direction). My usual strategy to deal with tricky grain is to reach for a No.3 smoothing plane fitted with a mid pitch (55 degree) high angle frog. This cleaned up the difficult spots of grain, removing all tear-out easily, and then it was a simple matter of flattening the rest of the back to match.

_DPP2266

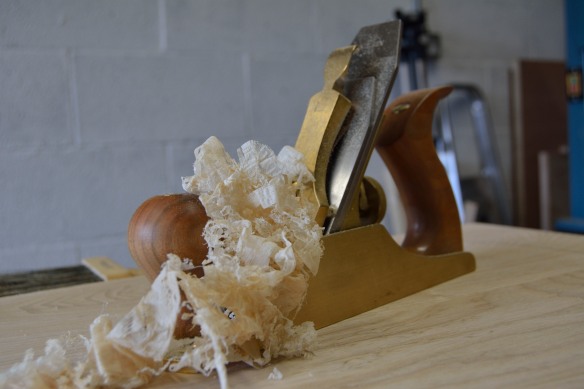
The Lie-Nielsen No.3 Smoother with high angle frog is my go-to choice for dealing with difficult grain.

But man, that grain. That characterful and unexpected figure is a wonderful addition to the guitar – an element of visual interest which will look fantastic under a translucent butterscotch finish. For me Tele-type guitars are rugged workhorse instruments with gritty character – Keith Richards is said to have preferred Telecasters because he found the curve of the body to be perfect for hooking behind the heads of over-enthusiastic stage invaders! And I think the striking colour and swirl of the grain on the back of the guitar really emphasises this aspect of the guitar, without going as far as the bonkers knotty pine bodies some folk are currently using. So I am carefully positioning the layout of the body blank to retain as much of this figure as possible. Thank you, wonderful wood for this unexpected treat.

_DPP2275

Here is that inexpected ripple and characterful grain, which will look stunning under a translucent butterscotch blonde finish.

Mysterycaster – I’d have got away with it too, if it wasn’t for you pesky kids

I’ve put the parlour guitar to one side temporarily while I work on a couple of more urgent projects – the Mystercaster (the customer for which has been very patient with me) and also a couple of builds for Furniture & Cabinetmaking. I’ll continue to work on the parlour guitar in between those projects, and it has definitely not fallen by the wayside.

_DPP2236

I really enjoyed my first Telecaster build. Electric guitar builds, particularly the classic Fender designs, are a very different workshop experience to my more usual acoustic guitars. This is in part due to the increased use of machinery – you could go hand tool only building an electric guitar, but cutting the body to shape in 2″ thick timber wouldn’t be much like fun. And Leo Fender deliberately designed the Telecaster and Stratocaster to be easily built with the technology available to him – they were after all the first production guitars. So this was an interesting process for me, given that I am very much a hand tool focused woodworker. And I’m sure I’ve said it before, but the tool I like using the absolute least in my workshop is the router – the thing just plain terrifies me. So when I first started building Laurie (my first Telecaster) there was some tension between the best way to build the instrument, and my prefered approach to lutherie. I’m not for one second saying that using machines is bad and wrong – many people make wonderful instruments and furniture with machines. But for me that is not a process, or an approach, which I find particularly satisfying (and again, see the blind terror or switching on the router). So for Laurie I forged a path where some operations would be fully powered – for instance shaping the body and fitting the truss rod, but as much as possible would be hand tool work. This hybrid approach worked well, and I’m looking forward to refining the same approach with the Mysterycaster before I retreat to some hand tool only projects.

_DPP2222

This is the body timber before I started planing. More gaps than the proverbial beaver with a meth habit.

My first task for the Mysterycaster was to joint the two halves of the swamp ash body. When edge jointing, before I introduce a plane to the work I find it useful to assess the extent to which the joint will need flattening, firstly by holding a straight edge to the edge of the workpiece, and then by holding both the two edges of the joint together and seeing where the gaps fall. Unlike edge jointing for furniture, where a spring joint can be used, and it is common to leave a very faint hollow across the width of the joint, jointing for electric guitar bodies requires a joint that is deadnuts flat across both the width and the length of the joint. This is so that the glue joint does prevent the two halves of the guitar from resonating properly, and so that you don’t get any nasty surprises when surfacing and thicknessing the jointed body. There are no special tricks behind getting a solid edge joint, just good planing technique and using a straight edged blade (rather than one with a gentle camber like some furniture makers use). A very useful technique I’ve found invaluable for edge jointing is making stopped cuts without leaving a step behind – courtesy of Chris Schwarz’s Popular Woodworking blog. Edge jointing can require working localised highspots, and a stopped cut is the perfect way to do this. However a poorly executed stopped cut can leave a stepped transition which results in more gaps, not fewer. Chris’ technique for starting the cut with no downward pressure on the plane, and lifting the heel of the plane off the work (instead of the toe) at the end of the cut worked perfectly, leaving a smooth transition across my stopped cuts.

_DPP2234

Flat across the width, and square to the face of the workpiece.

My prefered plane for edge jointing is the Lie Nielsen No.8, partly for it’s excellent length (which helps to keep long edges straight) but also the wide blade which makes edge jointing even the 47mm wide swamp ash I’m using for the Mysterycaster a pleasure.When edge jointing I check my progress constantly, mainly with a straight edge to check the length of the joint for flatness, and the diagonals (corner to corner) to make sure I’m not introducing any twist or wind into the joint. For checking that the width of the joint is both flat and square to the face of the timber, my Sterling Tool Works Double Square is invaluable. The best check however is against the other half of the joint. I worked one half of the body until it was 90% there, and then moved to the other half. Once both sides of the joint were very close I fitted them against each other and noted where there were any hairline gaps. It is important to check the back of the timber as well as the front, because one side can look perfect while still having significant gaps on the other.

_DPP2226a

The finished joint – through a macro lens you can see where the joint falls because of the change in grain directions, but you can’t see the joint line.

Once I was satisfied with the joint, I resharpened my plane blade and took a couple of very fine cuts from each side of the joint (no more than 3 cuts per side). This last touch closed everything up nicely, and the joint looked good and tight from both sides. A thin layer of Titebond and one rub joint later, and the body is now resting in three sash cramps over night.

_DPP2250

The End of Year Round-Up: 2015 edition

Is December already drawing to a close? I can scarcely believe that it is now time to start penning the end of year review, list my favourite albums of the past twelve months, and compile the traditional end of year mix cd. 2015 has genuinely disappeared in the blink of an eye. I suppose this is to be expected given all that has happened; the relocation from Bristol to Birmingham, buying and decorating a new house (phase 1 of the decoration saw 5 rooms decorated and completed, and phase 2 will be commencing in January), and becoming a father. I’d like to think that the above constitutes a reasonable level of activity.

IMG_2213

The parlour guitar build has been the main focus of 2015

Amongst all of this, I also found time to set up a new workshop, make some shavings, and keep writing. The new workshop has turned out to be ideal, and having given myself some time to settle into the new space I have made a few changes and additions since my original workshop tour, which I will write about separately. In terms of projects completed, 2015 is a little thin on the ground, although a lot of progress has been made on the parlour guitar, and I should be in a position to assemble this guitar in the next couple of months. I also managed to secure a new paying commission (the Mystery-Caster) and came close to bagging a paying commission from one of my favourite musicians (in the long term I’m hoping this one will still come to fruition).

2015 saw seven of my articles published in Furniture & Cabinetmaking, and the blog has had nearly twice as many views when compared to 2014, as well as introducing the new “Getting to Know…” feature (which I hope to continue into 2016).

IMG_0809

Peter Follansbee contemplates swiping my Hieronymus Bosch print Docs…

I had the pleasure of meeting both Peter Follansbee and Tom Fidgen, as well as taking Roy Underhill’s Woodworking with Thomas Jefferson class. Learning from Roy for a week was an incredible experience, and helped to develop all manner of parallel skills. Peter, Tom and Roy are not only incredibly knowledgeable, but also very generous with their knowledge, and I highly recommend taking a class (or simply just chatting with them) if ever the opportunity presents itself.

IMG_0882

Roy and Esmerelda become acquainted.

The other highlight of the year was of course exhibiting at the European Woodworking Show in Cressing Temple, and it was wonderful to get to meet so many inspiring makers and tool manufacturers, as well as people who read the blog (or my articles), and to spend two days chatting about woodwork face to face. Thank you so much to everyone who came and said hello during the two days.

Chris Schwarz

The “Community Is…” project in many ways defined 2015 for me. Thanks to all the contributors (including Chris Schwarz – pictured here)

And this very neatly brings me to the real highlight of 2015. Which is not projects built or achievements unlocked, but rather the sense of community in the woodcrafts. Lutherie always used to be a very solitary activity for me, but particularly over the past 12 months the online community through Instagram and the blogosphere, then reinforced through events such as EWS, has meant that I find myself within a wider community of craftspeople. And this has had the effect of enriching my time in the workshop, situating my work within broader practices and traditions, and providing new opportunities to learn and question. The community is made up of so many wonderful craftspeople that mentioning individuals seems like a foolhardy endeavour. However special mention must go to James McConnell whose Daily Skep blog debued this year, and is rapidly becoming one of my favourite woodwork blogs(seriously, I read James’ blog and wonder if there’s any point in me writing anything ever again). Again, EWS provided a wonderful opportunity to put faces to names and to connect with members of the woodworking community in person.

IMG_1422

Finally meeting Vic (Minimalist Woodworker) in person was one of the highlights of EWS

Looking forward to 2016, there will be more articles in Furniture  Cabinetmaking, in addition to which I hope to be able to announce a very special article for another publication in the coming months. In the workshop, my focus will be on finishing the parlour guitar, and also building the Mystery-Caster, both of which will be covered in detail on this blog. A number of teaching opportunities have presented themselves, and consequently there is also the possibility that I will be let loose on unsuspecting woodwork students – more details to follow once I have them. So plenty to keep me occupied, and 2016 is shaping up to be a very exciting year!

And to finish where we started, my top five pick of new releases from 2015 (in case anyone was wondering) in order, are:

  1. Banditos – Banditos
  2. Nashville Obsolete – Dave Rawlings Machine
  3. Edge of the Sun – Calexico
  4. Meta-Modern Sounds in Country Music – Sturgil Simpson
  5. No Cities To Love – Sleater-Kinney

Happy New Year, dear reader, catch you in 2016!

Mystery-caster; a new project begins

IMG_0557

A week and a half ago I took delivery of the timber for a new commission. The client wanted a Telecaster with very similar specification to Laurie, and I readily said yes.

The full specification has not yet been finalised, but what we currently have is a blackguard era Tele, with:

  • Two piece swamp ash body;
  • Quarter sawn maple neck (plain, with no figure);
  • Plain maple fretboard;
  • Dyed black sycamour veneer between neck and fretboard (as I did on Laurie);
  • Black tahiti pearl fretboard makers;
  • The same Gotoh bridge and Spertzal tuners I used for Laurie; and
  • Period appropriate translucent butterscotch blonde (again as with Laurie).

I’ve also managed to source a wonderful vintage-spec bakelite scratch plate just like the 50’s Telecasters used.

David Dyke (my usual timber supplier) really knocked it out of the park with this one. I had explained that this build is for a special client, and what they delivered is one of the nicest neck blanks I’ve ever seen – straight-grained maple with no discernable figure and a beautiful even colour. The swamp ash and fretboard are similarly high quality, and the trick with this build is going to be removing myself from the equation and letting the beautiful timber speak for itself.

IMG_0644

The swamp ash came as a single 40″ long piece, so this morning I broke it down into two shorter lengths so that it can stabilise for a month or so before I start work on the build in earnest. I marked out the kerf on the face and edge of the timber using my marking knife, and then with a wide chisel cut a shallow v shaped trench into the knife kerf. This guides the saw and keeps the first few strokes nice and straight. I really should buy a cross cut hand saw for this work, but my 16″ Bad Axe tenon saw (filed hybrid) does a very good job on this work. This saw really is unstoppable, and is a real workhorse in my shop.

IMG_0645

Work will continue on the parlour guitar while I left the swamp ash stabilise, and thereafter I’ll be working on the parlour guitar and mystery-caster concurrently. So stay tuned for in-progress posts on both guitars.