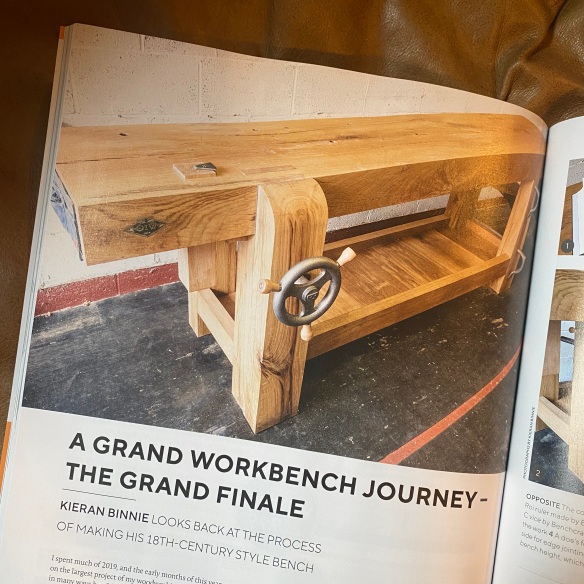
Issue 294 of Furniture & Cabinetmaking is now in print, and amongst other content includes the tenth and final part of my Roubo bench series. This article looks back over the build process, and also examines how the bench functions in use.

Issue 294 of Furniture & Cabinetmaking is now in print, and amongst other content includes the tenth and final part of my Roubo bench series. This article looks back over the build process, and also examines how the bench functions in use.
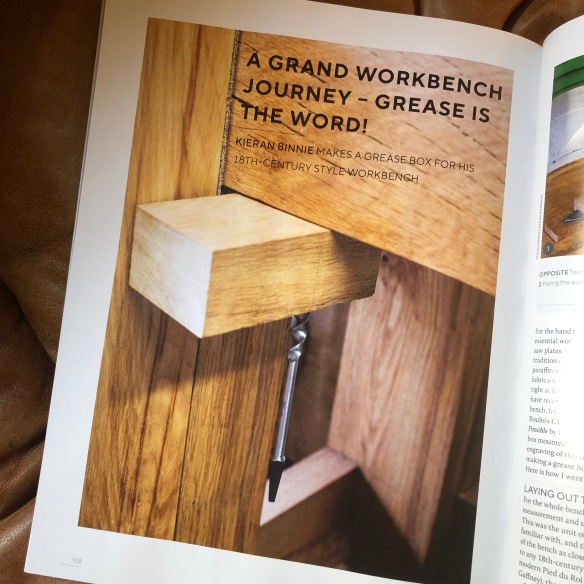
Issue 295 of Furniture & Cabinetmaking is now in print, and includes the penultimate instalment of my 10-party Roubo bench build series. This article looks at making the grease pot described by Roubo, which I’ve found to be a very useful addition when processing stock by hand.
Traversing large boards has never been so enjoyable as it is on the Roubo bench
I’m finding my rhythm with the boarded bookcase project, and enjoying the process. In particular, it is fascinating testing the capabilities and functionality of the Roubo bench as I work.
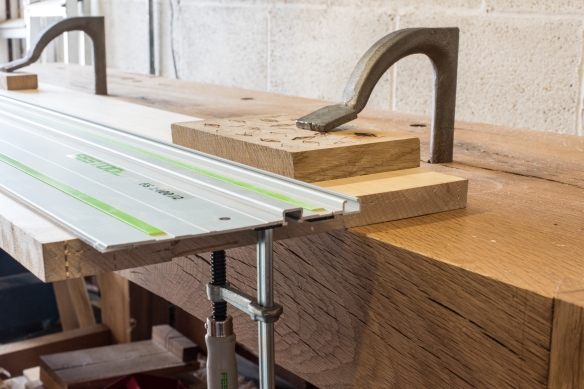
Holdfasts and track saw – combining technologies across centuries for an efficient workflow
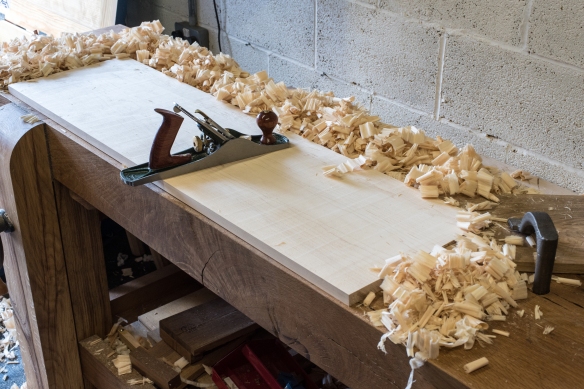
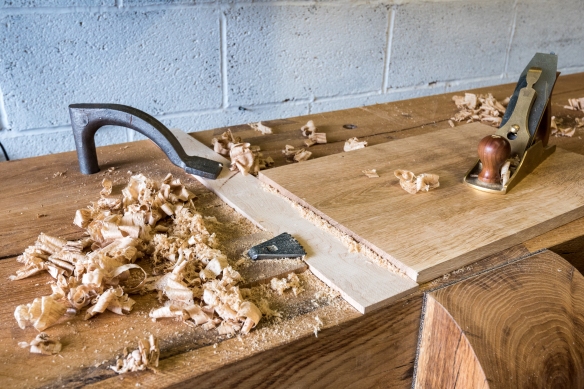
This week I’ve been processing yet more maple, which involved working on several faces of the board. As a test, I also decided to see how the bench fared with a hybrid woodworking approach. After all, the design arose at a time when woodworkers were using hand tools exclusively hand tool, but how does it function when power tools are introduced into the mix? I don’t use power tools all that much, but I do have a few which I find useful to keep around, including a Festool tracksaw. Ordinarily I prefer to reach for my Disston D8 when ripping stock, but as a test I set up the tracksaw to rip one edge of the maple panel straight before planing it. Getting a rock solid set up was much easier on the Roubo than my old Sjoberg, and the two Crucible holdfasts held the workpiece in place with the edge to be cut hanging off the edge of the bench. This set up was quick to set up, stable, safe, and allowed for easy operation of the tracksaw – a win by any reckoning. I’m sure that holding workpieces for work with the Festool Domino (which I find indispensible for shop jigs and some other work ) and the router (which I honestly try to use as infrequently as possible) will be as straightforward and dependable. So the Roubo seems to be a solid choice for the hybrid woodworker as much as hand tool purists.
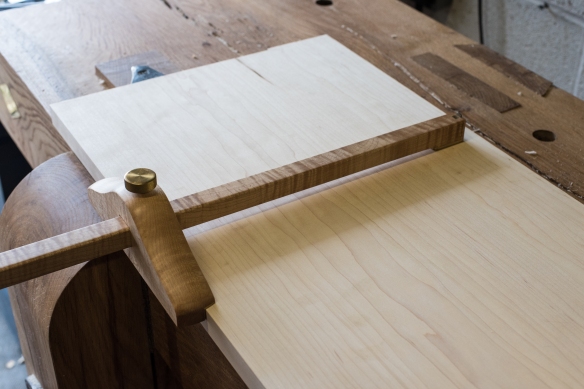
Making the width of the board with the panel gauge – working into the planing stop holds the workpiece steady
The planing stop is also very versatile. While the main function is to hold workpieces in place while planing, I have found it is also very useful for steadying the work while using marking gauges to strike lines. Today I made use of the planing stop for this purpose with the workpiece in two orientations – firstly striking the width of the panel using the Hamilton Toolworks panel gauge, then to gauge the thickness of the panel, with the workpiece stood on it’s side, supported with a does’ foot at the back end. This is much quicker than securing the workpiece in the leg vise. Less time fixing the workpiece in place means a smoother and more efficient work flow.
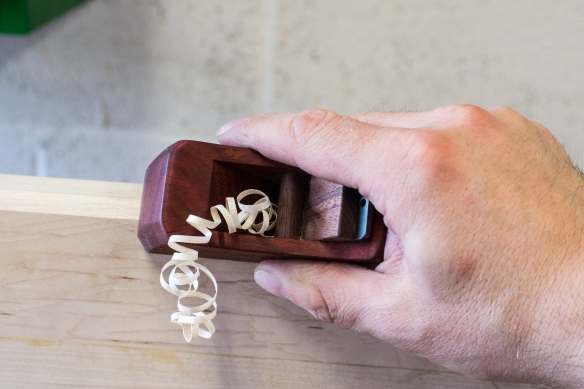
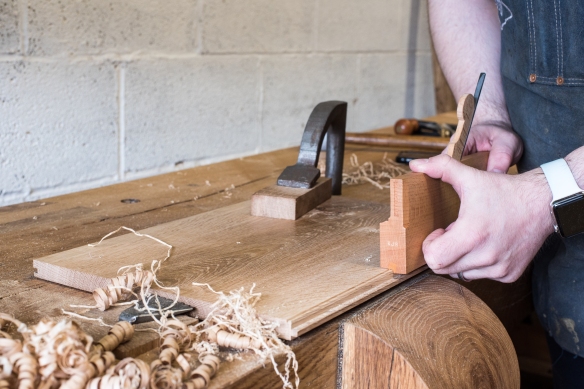
I don’t use this sweet Krenov style block plane by my buddy Jim McConnell as often as I should – here I’m bevelling the far side of the board to avoid spelching when taking a traversing cut
I was also struck by how much the Roubo bench offers a solid working experience when traversing the maple board with my No5 jack plane. While this is a very standard technique in my work, I never got the work holding on my old Sjoberg bench to co-operate when taking heavy traversing cuts – the tail vise just wasn’t up to holding workpieces for traversing, and after a few strokes the work would start to wriggle across the benchtop. Which was both frustrating and an impediment to steady work. In contrast, a single holdfast and the planing stop was enough to secure the 47″ x 13″ maple panel in place for an extended session of traversing with no movement whatsoever despite taking a heavy cut. This is what this bench was made for, and it excels as a planing bench.

Traversing removes the bulk of the waste efficiently, and leaves a wonderful texture. If this were the underside of a shelf I’d leave that texture and call it done, but as this is the side of the bookcase I’ll dress the surface with a smoothing plane for a clean and smooth surface.
I’ve almost finished working the two sides of the bookcase, following which I’ll have an opportunity to see how the bench performs for cutting joinery. I fully expect there is nothing I can throw at this bench which it cannot handle.

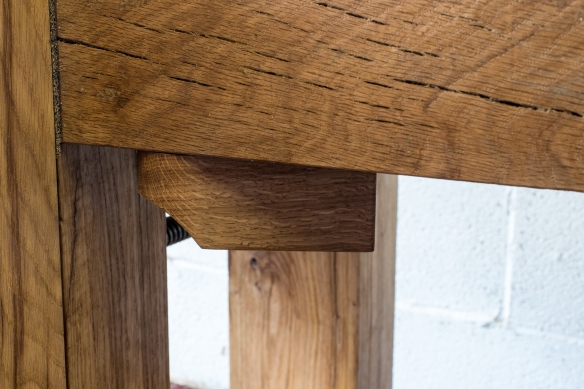
The tenons are now proud of the workbench
One of the interesting experiences associated with building a slab-top Roubo workbench is the knowledge that while you’re aiming for tight, rock solid joinery when the bench is assembled, the nature of the slab top means that the joinery is unlikely to stay visually perfect for very long.
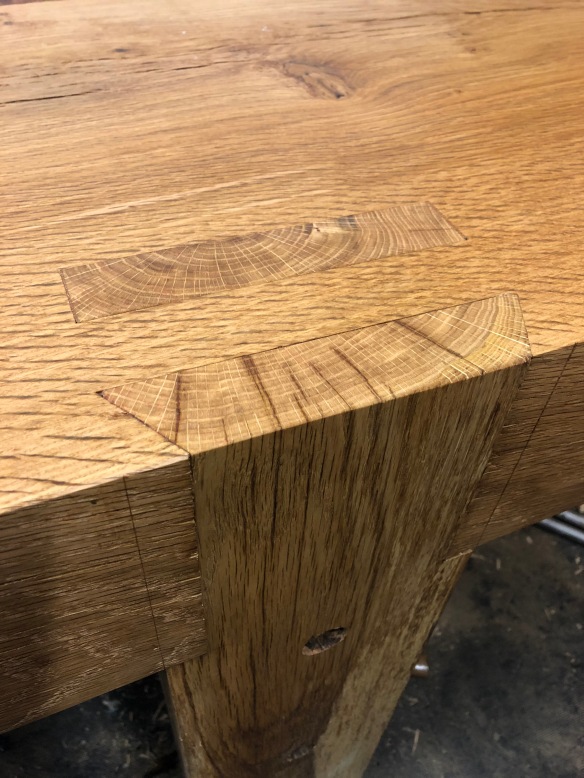
The same joint when it was originally assembled and cleaned up – good and tight
I assembled my Roubo bench on 24 November 2019 – almost exactly five months ago. And when I cleaned up the joints in the weeks that followed they were pleasingly tight and gap free. Now, I built this bench in full knowledge that the slab would move during the first year or so, as it slowly reached moisture equilibrium with my workshop. Most timber reaches this point relatively quickly, but the sheer mass of the slab means that it takes longer to reach equilibrium. The benefit, is that once the slab achieves equilibrium it will move much less than a thinner conventional benchtop. So while the movement can be more dramatic at first, the bench should be much more stable as time passes.

This week I noticed that those lovely tight leg joints were showing a consistent gap around the tenon, and that the tenons (which I had flushed when I flattened the bench top in December of last year) were now approximately 0.5mm proud of the bench top. This is to be expected, as the bench top shrinks around the leg joints. A quick check of the bench top with a straight edge showed that the top has started to cup a little, 4 months after I flattened it. I was expecting to flatten the bench top several times over the first 12 months of the bench’s life, so again this isn’t much of a surprise. The amount of cupping isn’t enough to interfere with using the bench, so I will leave it for a month or so before undertaking the first re-flattening of the year.
The top has started to cup again. Next month it will be time for a flattening session
Do those gaps around the leg joints matter? Not in the slightest – the bench is still rock solid and the gaps are only cosmetic. Those joints are not coming apart any time soon, if ever. I will add wedges to fill the gaps when I next flatten the bench, and will flush up the joints. This is all part of life with a Roubo bench, and I’m ok with that.
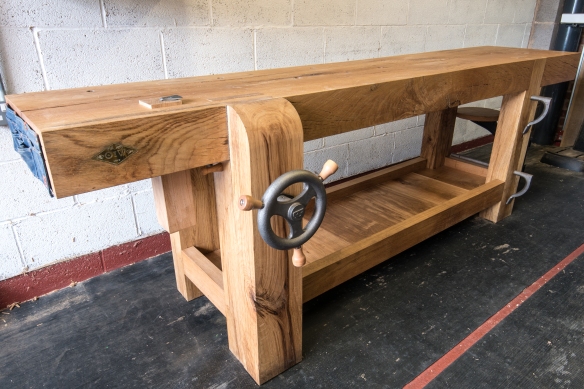
There is nothing quite as cathartic as the traditional end of a project clean up in the workshop. The opportunity to re-order the timber racks, clear out scrap, and impose order on the ‘shop. Completing the Roubo bench called for this more than ever, given that the project itself has prompted a major re-organisation of the ‘shop. While the workshop was looking tidy and clean I decided to take some beauty shots of the bench, before it settles into a life of being used. In normal times, Gareth Partington would be working his magic (as he has for the pieces in my portfolio), but these are not normal times and lock-down makes calling in an external photographer unviable. Maybe I’ll ask Gareth to take some photos of the bench in a few years’ time to capture the patina, battle scars and wear.
But for now, these will suffice. Proof that Roubo is here, and he is good.
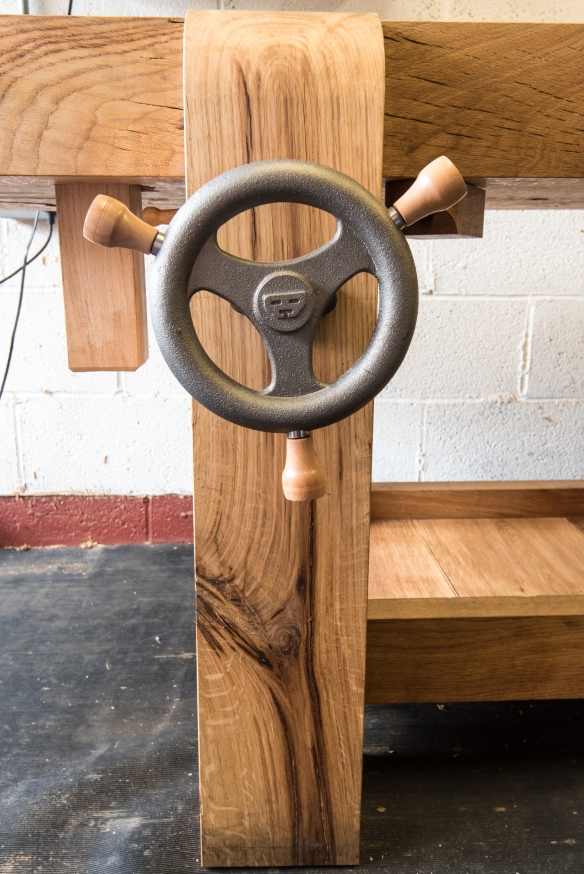
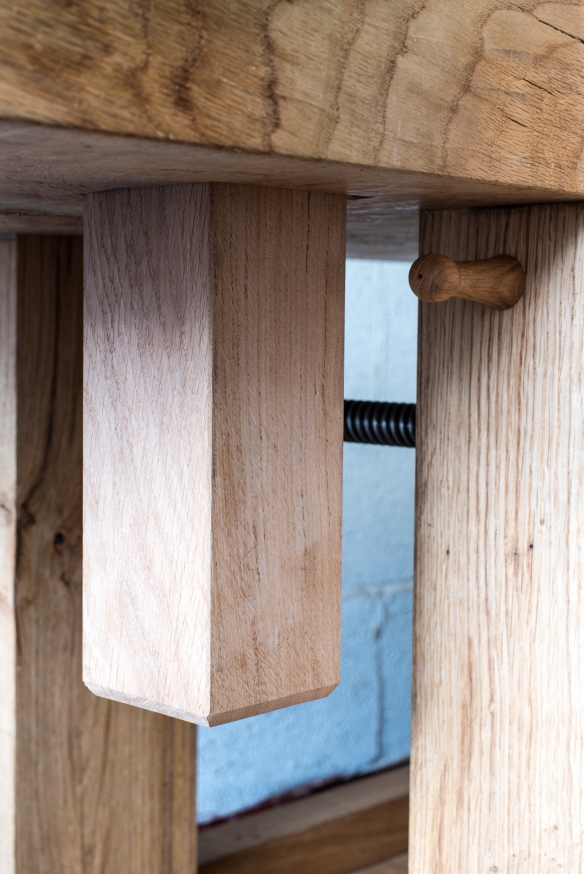
Benchcrafted Glide C vise
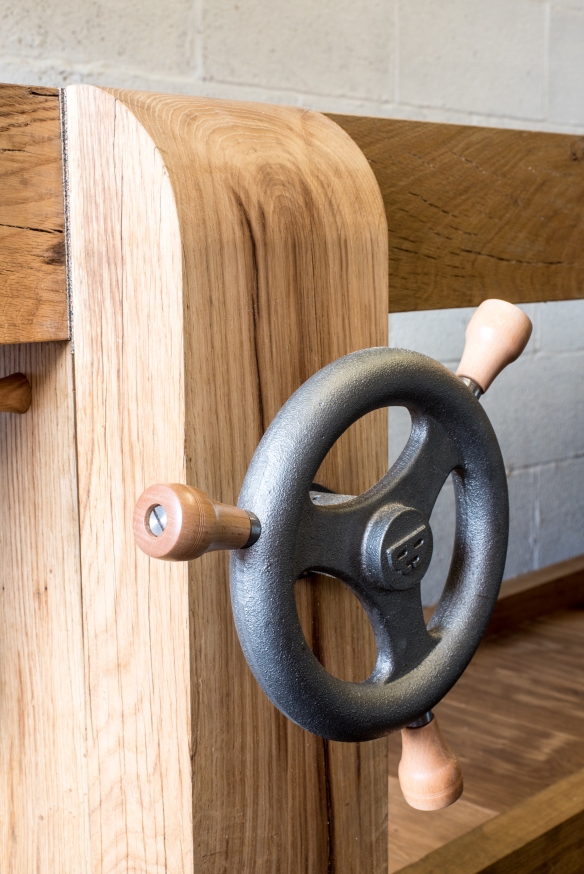
Curved vise chop profile, and vise handwheel
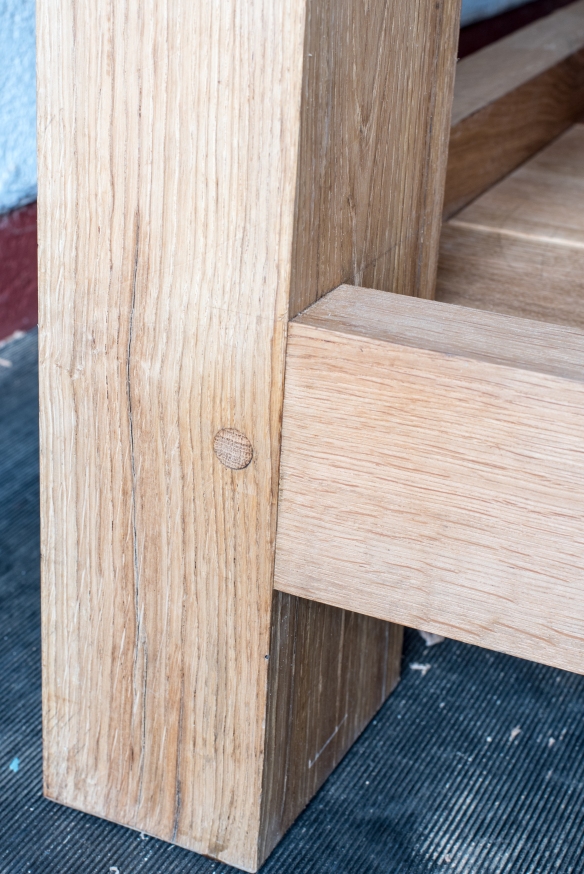
Draw bore peg in barefaced mortise and tenon joint
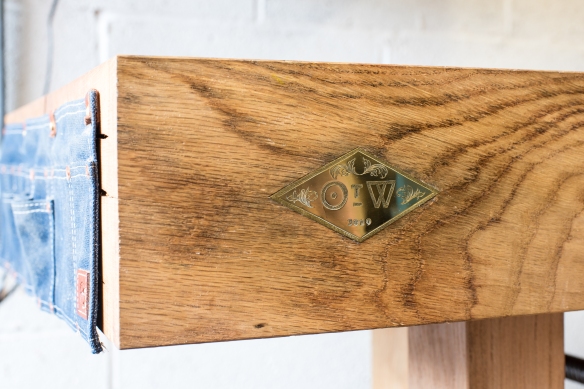
Maker’s Mark Plaque by Jenny Bower
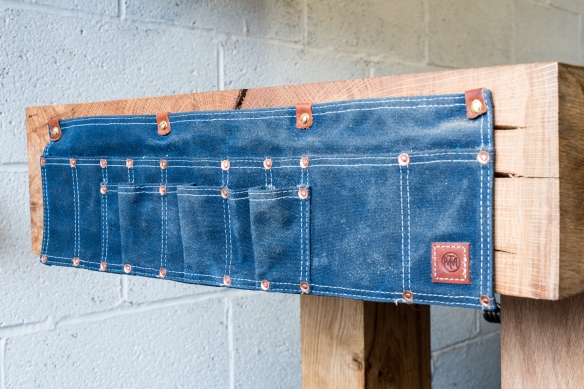
Saddlebag by Texas Heritage, mounted at front end of bench
Planing stop and lump hammer peg
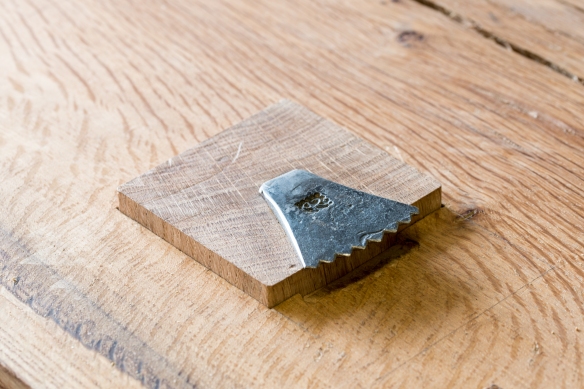
Planing stop forged by Peter Ross
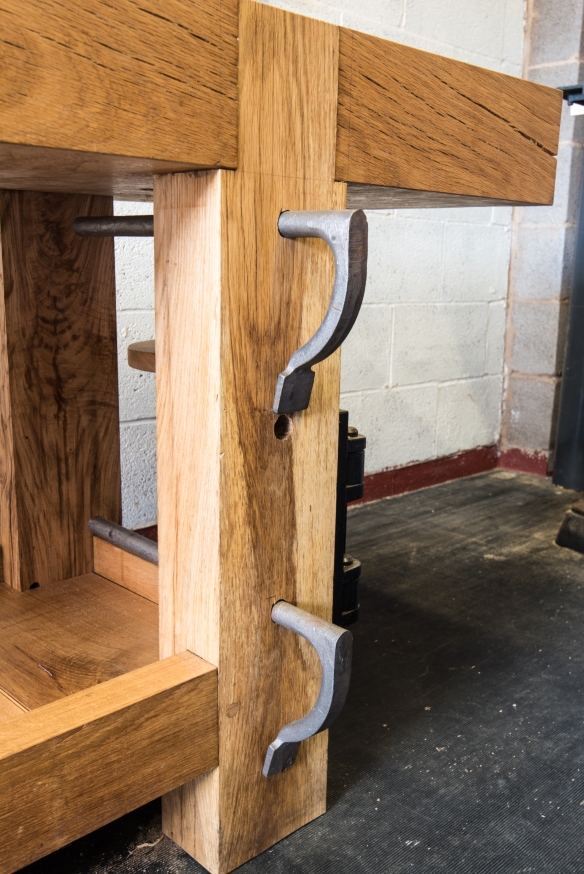
Crucible holdfasts, stored in the front-right leg

Benchcrafted swing away seat, mounted on front right leg
Shelf fitted with tongue and groove joinery and beading detail
Grease box
Grease box pivoted out for access
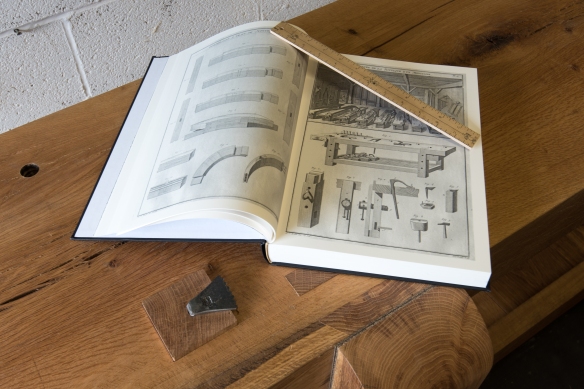
Roubo on Roubo – Plate 11 provided the blue print for this bench, and the Burn HeartPied du Roi ruler provided the base unit of measurement
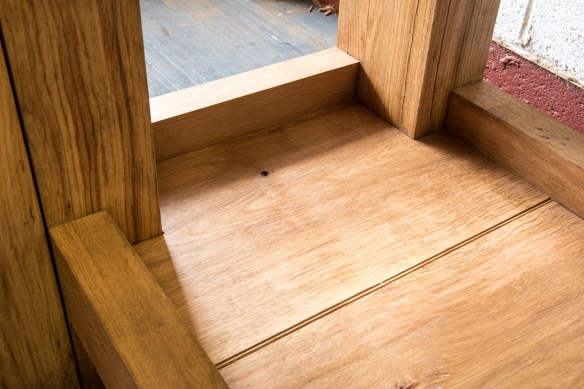
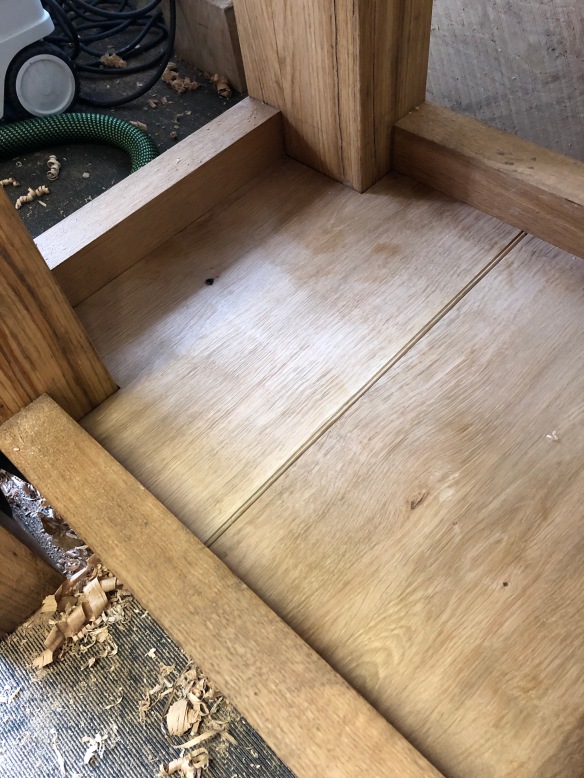
I left the shelf last week with one board left to fit to the shelf between the stretchers. I had deliberately laid out the shelf so that the narrowest board fell in the centre of the shelf, and once the other boards were fitted I measured the remaining aperture and cut the board to size and cut the tongue and groove joinery which would connect it to its neighbours. After slotting the board in place I applied a coat of boiled linseed oil to the entire shelf, to match the finish on the rest of the bench.
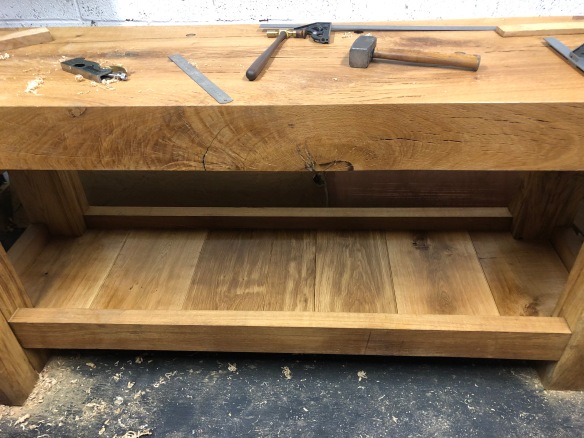
The completed shelf after a coat of boiled linseed oil
A good lump hammer or mallet is essential to the operation of the Roubo-style bench – it is used to adjust the planing stop and set holdfasts. So the final detail which I wanted to add was a peg to the front left leg, from which to hang my lump hammer. I can’t take credit for this idea – when I was teaching at the LAP storefront last autumn I noticed that Chris had fitted a peg to his Roubo bench for this purpose, and after a week or working a that bench I was sold on it as a very useful addition.
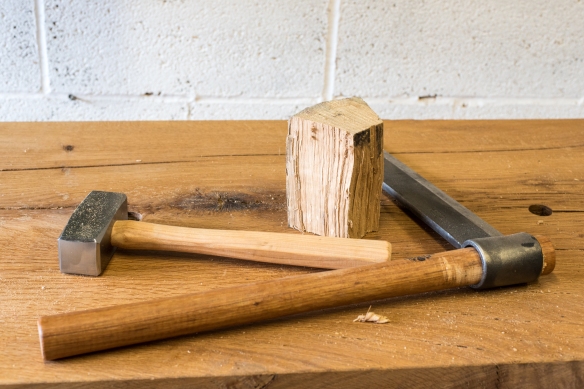
I used riven oak for the peg, which was left over from the Welsh stick chair I built for Mortise & Tenon last year
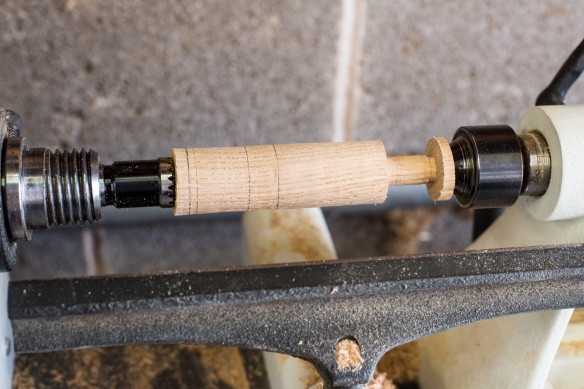
I’m still in my infancy as a turner, but simple jobs like this are a great opportunity to develop skills, and I really enjoy firing up the lathe. Because the peg will carry the weight of a 2.2lb lump hammer, I wanted to make it from reliable strong stock. After rummaging through my stash of air dried riven oak (a bucket of shorter pieces lives at the foot of my drill press) I found a suitable piece roughly 5″ long, which I brought down to rough size with a froe and lump hammer.
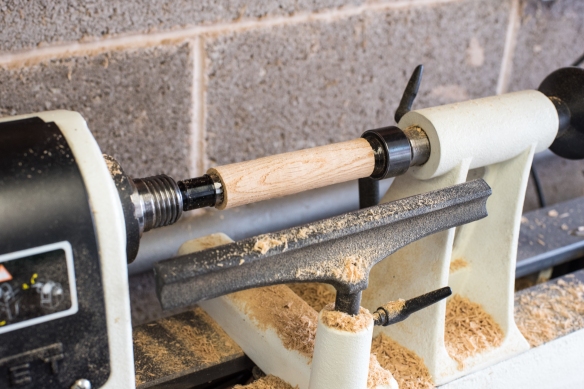
Stage one is turn the blank to a cylinder
I turned the roughly sized oak into a cylindar a little over 1″ diameter, and then turned a 1″ long tenon to just over 1/2″ diameter using a parting tool and Peter Galbert’s very helpful Caliper. With the tenon turned, I removed the workpiece from the lathe and cut the excess material using a Bad Axe 12″ carcase saw.
Turn the tenon, and layout the sections of the peg
I then turned the peg, using a set of zero jaws to grip the tenon. The head of the peg is roughly 1″ in diameter, and I turned the body of the peg by eye until it had a pleasing shape – no real meaurements were involved. While the form is not as elegant as the “shaker” style peg Chris has on his bench, this peg is plenty stout and should support the lump hammer without any problem. I sanded the tool mark off with 320 grit paper while the peg was on the lathe.
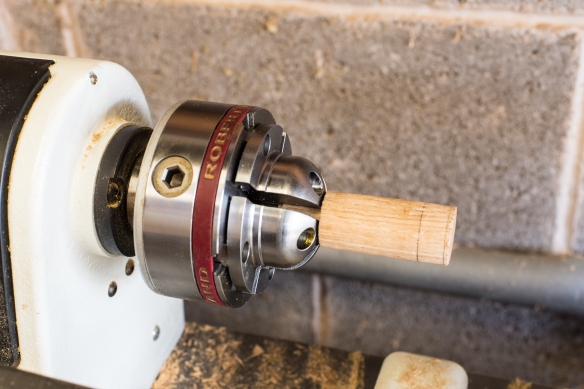
Zero jaws hold the tenon so that I can shape the peg
After checking the placement of the peg, I bored a mortise in the leg using a 1/2″ auger bit in my North Bros brace. I’ve never used the ratchet function on the brace before, but the proximity of the bench top meant that I was unable to use the full sweep of the brace, and engaging the ratchet made easy work of boring the mortise to full depth using only 2/3 turns of the brace.
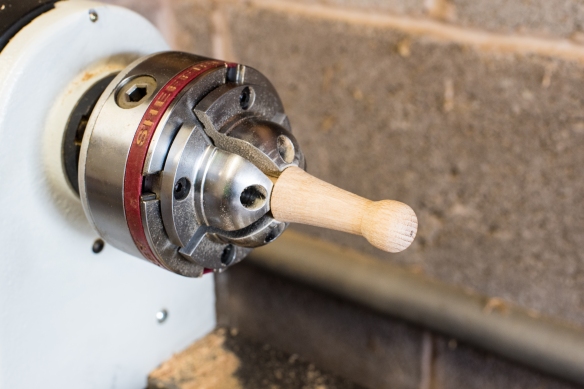
The shaped peg, ready to be fitted to the bench
The peg tenon was a little too snug to fit into the mortise, so I borrowed a chairmaking technique from Chris and compressed the tenon with a pair of non-scratch pliers. Applying a coat of hide glue allowed the tenon to slide into the mortise before the moisture in the glue caused the tenon to swell, locking it in place. A quick coat of boiled linseed oil on the peg, and the bench was finished. I’ve ordered some leather cord and once this arrives I will drill a hole in the handle of the lumb hammer and hang it from the peg, ready for work.
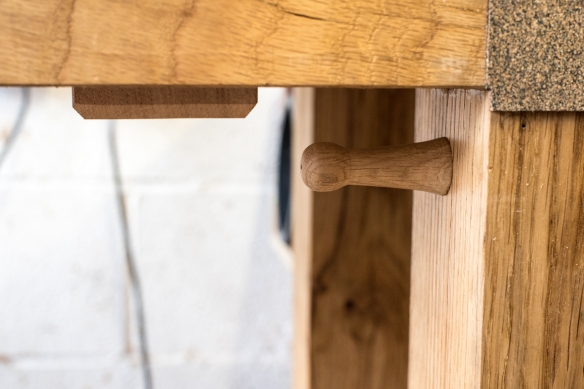
Fitted to the bench and oiled
And so, after 13 months’ work, I can finally say “Roubo Is Here“. I celebrated with a whisky at the bench to christen it.

Christening the bench with a very nice single malt
Smoothing the shelf boards – planing into a batten supports the workpiece and means it can be moved quickly.
The final significant task before I call the Roubo bench “done” is fitting a shelf between the stretchers. There are a few details to fettle, but I”m very much on the home straight and the finishing line is in sight.
Transferring the size of the recesses directly off the legs.
For the shelf I am using scrap oak left over from the Policeman’s Boot Bench and other projects – a number of the shelve boards are gnarly pieces which did not make the grade for furniture quality work. It is a perfect opportunity to get them off the scrap pile and into use, and to be honest the “character” fits in nicely with the rest of the Roubo bench. I really like tongue and groove joinery for base or back boards for casework, and shelves for the bench. With a dedicated plane cutting the joinery is quick and simple, and it provides a strong joint. It also gives me an opportunity to use my 1/8″ Philly beading plane, which is probably the most enjoyable tool in my toolchest.

Cutting the recesses with the Bad Axe 16″ tenon saw
The boards were all of varying width and thickness. Rather than loose too much material by making them a consistent width, I bought four down to a width of just over 10″, and a further pair to 9″ wide. All were processed to a consistent thickness of a half a pouce (keeping with the 18th century unit of measurement wherever possible for this project). While my tongue and groove plane is set for 1/2″ thick boards, offsetting the joinery does not matter providing both halves are cut from the same reference surface so that they match. Processing the boards also provided an opportunity to try another work holding solution – planing into a batten held by the planing stop and a holdfast. This worked very nicely, and not having the boards held down mechanically meant that the workflow was very efficient when changing workpieces over.
Tongue and groove joinery is a cinch with the Lie-Nielsen No.49
Once the boards were trimmed to length to fit between the stretchers I started by laying them out. Pairs of the wider boards were placed at each end, with pairs of the narrower boards set in next to them. The outer most boards need to be let into the gap between the legs so that they meet the narrow stretchers at each end of the undercarriage. Instead of measuring the recesses, I marked these directly off the surface of the legs by holding the board against the legs and marking both dimensions with a marking knife registering off the surface of the leg. I then cut the recesses using my Bad Axe 16″ tenon saw. Normally for piston fit joinery I would cut against, but not on, the knife kerf. However, a little bit of slop here helps to ease the fit of the shelf boards, as the undercarriage is not perfectly square. So for the recesses I cut on the knife kerf. The resulting fit was nice and clean, without being overtight.
Beading is about the most fun you can have in the workshop.
Once the end boards were in position, I then cut the tongue and groove joinery with a Lie-Nielsen No.49, and a bead on the shoulder of the “tongue” half with the Philly Planes beading plane. The boards are fitted together and rested on the shelf support battens – there is no need to nail or glue them in place as they lie quite flat, and the weight of my Moxon vise, shooting boards and other appliances will hold them in place. Being able to lift the shelf out easily will be beneficial, if I ever need to replace or repair the boards.
The shelf fits around the legs nicely.
With the four-board arrangement in place, I could then measure the remaining gap for a central narrower shelf board. I will fit this board and oil the shelf during the week, and then do some tidying up before calling the bench done by the end of the month. Having the width of the shelves reduce from each end towards the middle of the shelf adds a nice visual rhythm, and made fitting the boards a lot more straight forward.
There is one final board to fit before the shelf is ready to be oiled.

Today was my first opportunity to spend any real time in the workshop this month, due to a number of factors outside my control. I’ve been itching to complete the Roubo bench build, and am determined to do so by the end of the month. That seems achievable right now.
The planing stop is one half of the work holding solution
Today’s work involved processing some oak stock for a pair of shelf supports on the long stretchers. This is straight forward work – flatten one face, joint an edge, rip the support off and clean it up, joint the cut edge and repeat for the second support. I’ve written plenty about processing stock with hand planes before, so don’t intend to write much about the process here. But what is worth spending some time talking about is how the bench functions and supports this sort of fundamental task. I processed and fitted the shelf supports for the short stretchers before I assembled the bench, but the difficulties associated with processing long stock on my Sjoberg bench meant that I’d procrastinated over the long shelf supports. And so, today was the first time I’ve processed a decent sized piece of rough stock with hand planes using the Roubo bench. Really, this is one of the first tests of the bench, and the experience was instructive to say the least.
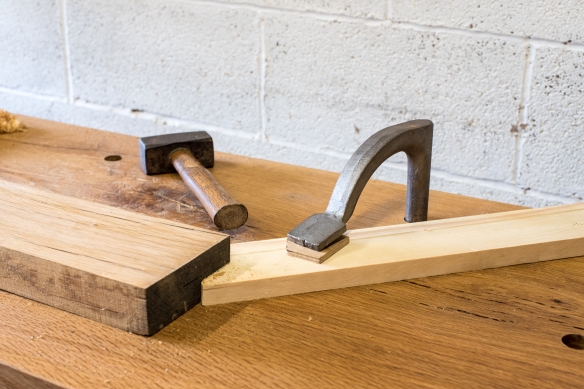
A holdfast and doe’s foot is the second half of the work holding solution
I’d read plenty about the use of Roubo benches before I started to build mine, and I knew the theory of working with planing stops, holdfasts and doe’s feet. But with woodwork reading only takes you so far – the real learning comes at the bench, when you implement the theory for the first time (and the second time too). I’ve been itching to find out how working at the Roubo bench would feel, and put simply, it just works. Rock solid work holding which is swift and unfussy to set up. The bench is stable, has plenty of capacity for large stock, and does not make a song and a dance out of supporting the workpiece. It just holds everything in place while you work. Within a few plane strokes I forgot that this was a new way of working for me, and I was able to focus on processing the stock – work holding became second nature. Which is exactly what I wanted when I started building the bench.

Thicker pieces, like this 2″ thick oak, can be held in the same way for edge jointing
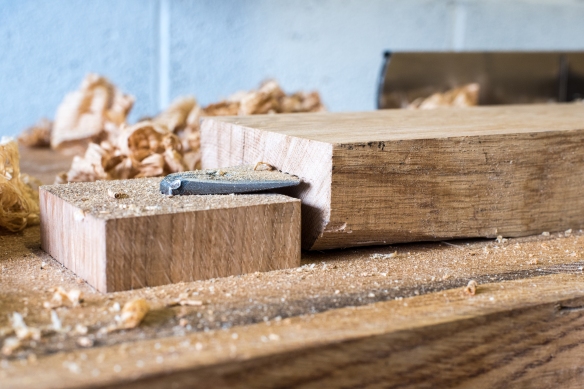
For the uninitiated, the work holding strategy on the bench top (as distinct from holding in the leg vise) is comprised of two elements – the toothed planing stop, and a doe’s foot secured by a holdfast. The doe’s foot is simply a piece of scrap with a 45 degree corner cut out of the end. The workpiece is pushed into the planing stop (a tap from a lump hammer or mallet drives it onto the teeth), and the doe’s foot is then slid into position to constrain the rear end of the workpiece. A holdfast keeps the doe’s foot in place. This allows the face of the workpiece to be planed, and thicker stock can also be rotated for edge jointing. One benefit of this arrangement is that releasing the work holding is very quick, to allow for the workpiece to be moved or measured, which makes for a very smooth workflow. This is exactly how I like my work holding solutions – dirt simple, effective, and quick to set up. The Crucible holdfasts have a tenacious grip, and the doe’s foot is incredibly effective for such a simple fixture. I mocked up a quick doe’s foot using some scrap pine today, but will make a few nicer versions of varying thicknesses (for processing stock of different thicknesses) using hardwood when I have a free moment.

The Texas Heritage Saddle Bag holds smaller tools while I work
The Texas Heritage Saddle Bag is also proving to be very useful as a safe resting place for measuring and layout tools while I’m at the bench. All of my tools go back into my Anarchist’s Tool Chest at the end of the day, but having somewhere to put delicate tools within easy reach while you’re working is a great way of speeding up workflow, and the Saddle Bag does this perfectly.*
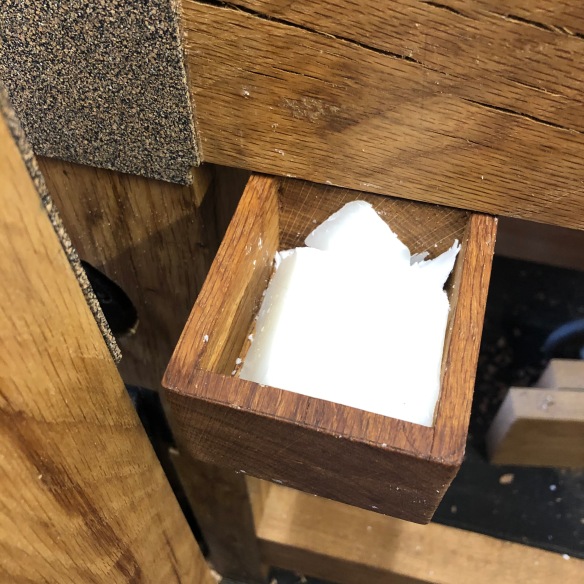
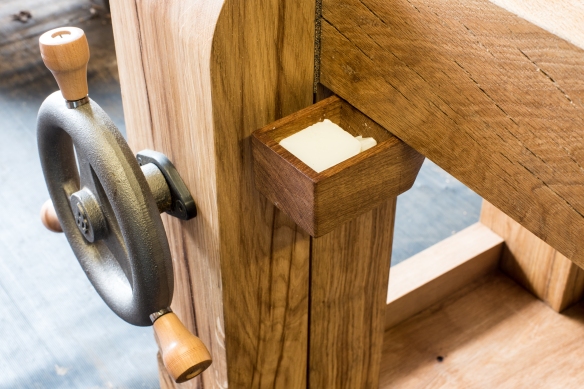
Grease pot full of paraffin wax
I also filled up the grease pot with paraffin wax. While I ordinarily use mutton tallow, I was concerned that having a large pot of tallow open to the air might attract critters into the workshop (who doesn’t want rendered sheep fat on demand?) so decided to use paraffin wax instead. Paraffin wax works very nicely, and a 1kg block was very cost effective. The grease pot has already proved its worth while processing the oak stock today – locating the post next to the leg vise and planing stop means that the wax is easily at hand so I lubricate more often, and having the pot rotate under the bench top means that it stays out of the way while working. Another feature of the bench that just works. I think that the Roubo bench and I will get on just fine.
*N.B it is worth commenting that I purchased the Crucible holdfasts, Peter Ross planing stop, and Texas Heritage Saddle Bag at full price. Just a gentle reminder that I’m #neversponsored
Testing the action of the grease box once it was mounted under the bench – pretty satisfying. Now I just need to load it up with grease.
Paring the walls square
One of the bench details Roubo mentions in passing is a grease box, mounted under the benchtop. The engraving at Plate 11 shows a simple box, but on the whole there is not much time spent describing the grease box. Hand tool work benefits greatly from a lubricant for plane soles and saw plates, and regular readers will know that I use mutton tallow as my lubricant of choice. Adding the grease box mentioned by Roubo was high up my priority list when I started planning this build, and it turned out to be a very enjoyable, and quick, addition to the bench.
Hollowed out, and with the shaping marked in
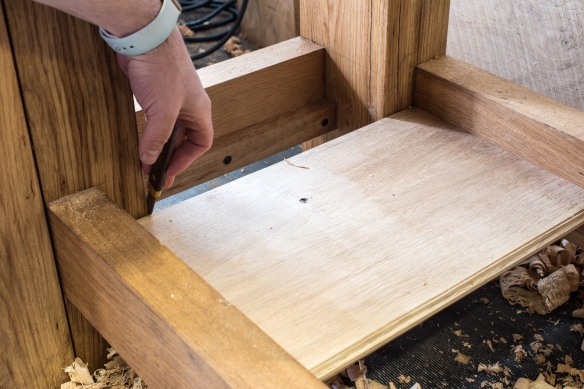
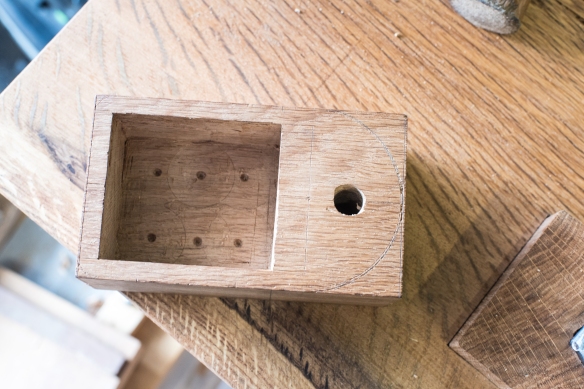
Roubo does not give any dimensions or specific details for the grease box. I decided to use an offcut from the stretchers, which I trimmed to length so that it measured 5 pouce long, three pouce wide, and 2 pouce thick. While this is a simple part of the build, the sequence of operations is critical if you are to enjoy easy workholding – carry out key operations in the wrong sequence and life will be that much more difficult. After laying out the grease compartment and the shape of the box, I drilled the mounting hole, as it was easier to hold the workpiece with a holdfast before the box was hollowed out and shaped. Another reason for this order was that I could then test the layout of the compartment by holding the grease box in place under the bench top with an auger bit through the mounting hole, and pivot the box out. Once I was happy with the layout and the position under the bench, I clamped the box to the underside of the bench next to the left-hand front leg, and drilled the pilot hole for the screw in the benchtop using the mounting hole in the greasebox as a guide.
Rounding over the front corners with a 13 grain Auriou rasp
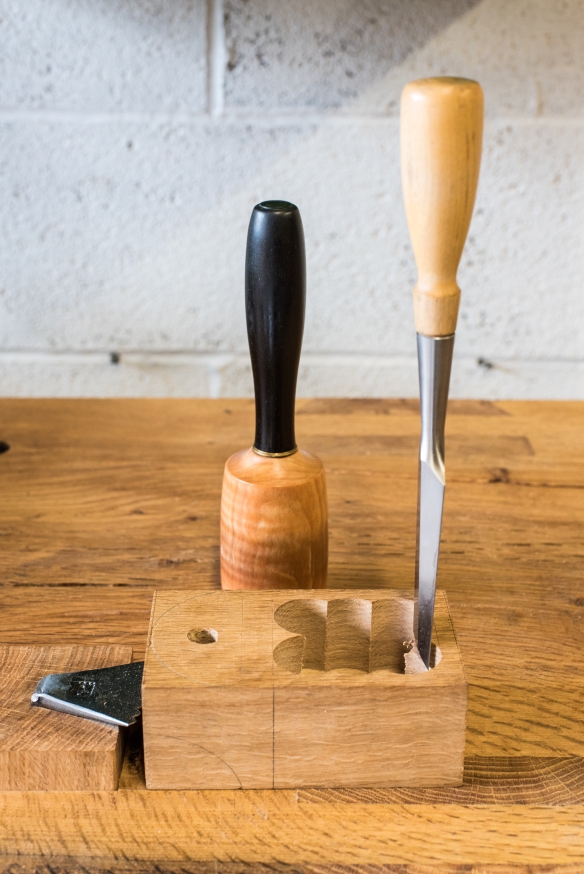
To hollow the box I used a forstner bit in my North Bros brace, as this removed material rapidly and the centre point leaves a much shallower divot than the lead screw of an auger bit. The walls of the box are 1/4 pouce thick, and I left a 1/2 pouce thick bottom. Counting the revolutions of the brace resulted in a pretty even box floor, following which I pared the walls flat and square with a wide chisel.
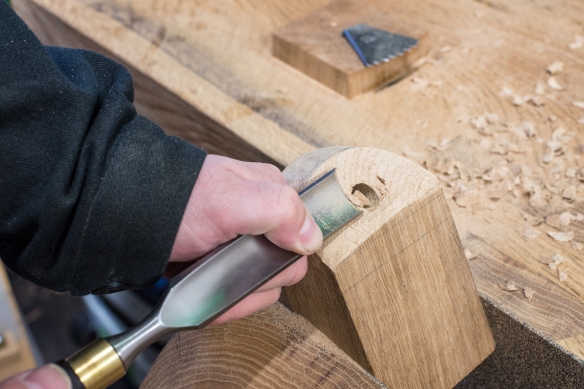
Hogging out the cutaway with a firmer gouge
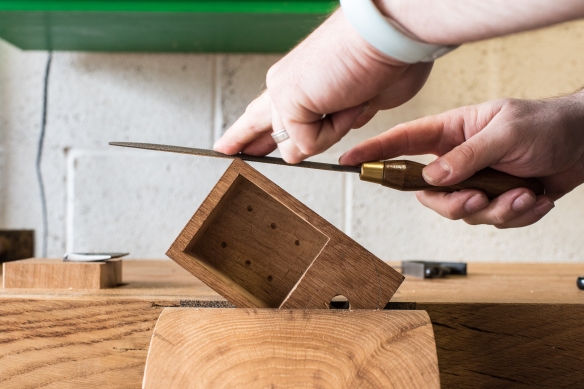
Most of the work on the grease box was shaping it. I decided to make my grease box roughly the same shape as that shown by Roubo in Plate 11, with a rounded end, and a gentle cutaway under the mounting screw. After gently rounding the front corners of the box with an Auriou 13 grain rasp, I then shaped the rounded rear end with a 9 grain rasp (also by Auriou). The 9 grain rasp is aggressive but still very precise, and by working from each side to the apex of the curve, I was able to achieve a flowing curve quite quickly. The tool marks were removed with the 13 grain rasp and a quick rub down with sandpaper (the first time I’ve used sandpaper on the bench build).
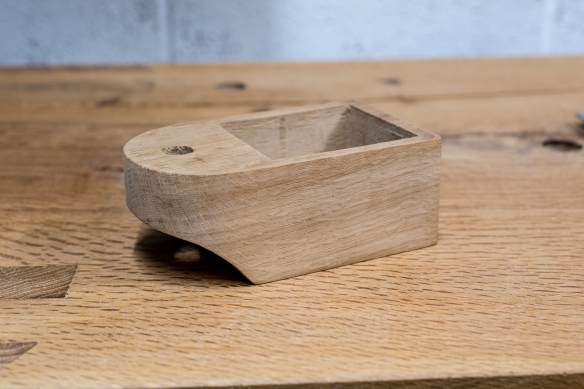
Shaped, and ready for oil
Shaping the cutaway involves working across the full width of the box. Instead of working across the full width straight away, I prefer to bevel one edge and rough in the curve on that edge before expanding the curve across the width of the box, refining as I get closer to the line. The 9 grain rasp roughed in the curve, and then I removed much of the waste using a wide firmer gouge to work across the grain. Once the curve was roughed in, I went back to the 9 grain rasp. Each Auriou rasp is hand-stitched for either right or left handed use, and is intended to be skewed across the workpiece (I visited the Aurio forge in 2016 – see posts here and here for more about these heirloom tools). However, ecause of the width of the box, I worked side to side, moving the rasp across the box instead of skewing it. This ensured that the curve was even across the width, and still removed material cleanly. Once the curve was shaped, I moved to the 13 grain rasp to remove tool marks, followed by sandpaper.
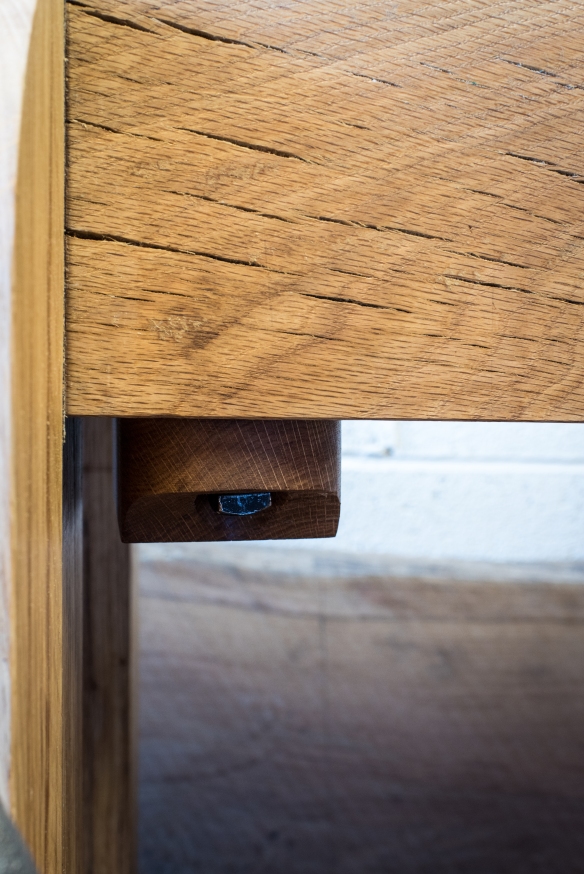
The grease box rests underneath the bench top, next to the front, left-hand leg and the leg vise
Once I was happy with the appearance of the box I gave it a coat of boiled linseed oil, and left it for 24 hours for the oil to dry, before mounting it under the bench using a 1/2″ x 2″ square headed lag screw and washer from blacksmithbolt.com – this will easily support the weight of the box. The mounting hole in the box is slightly larger than the width of the bolt, meaning that it pivots freely, and I also drilled a flat area to allow the bolt head and washer to seat cleanly on the cutaway. All I need to do now is order some more tallow (or possibly paraffin wax) and load it up.
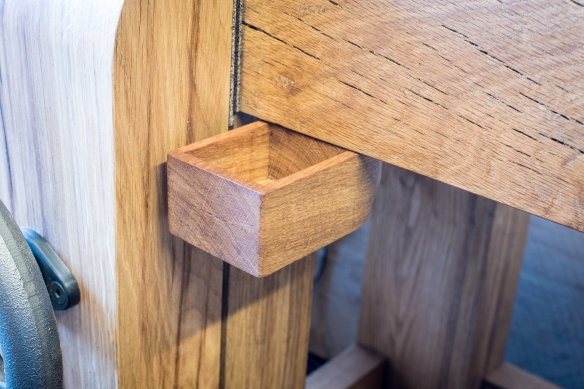
Rotated out, ready to be filled with paraffin wax or mutton tallow
