Mysterycaster – I’d have got away with it too, if it wasn’t for you pesky kids

I’ve put the parlour guitar to one side temporarily while I work on a couple of more urgent projects – the Mystercaster (the customer for which has been very patient with me) and also a couple of builds for Furniture & Cabinetmaking. I’ll continue to work on the parlour guitar in between those projects, and it has definitely not fallen by the wayside.

_DPP2236

I really enjoyed my first Telecaster build. Electric guitar builds, particularly the classic Fender designs, are a very different workshop experience to my more usual acoustic guitars. This is in part due to the increased use of machinery – you could go hand tool only building an electric guitar, but cutting the body to shape in 2″ thick timber wouldn’t be much like fun. And Leo Fender deliberately designed the Telecaster and Stratocaster to be easily built with the technology available to him – they were after all the first production guitars. So this was an interesting process for me, given that I am very much a hand tool focused woodworker. And I’m sure I’ve said it before, but the tool I like using the absolute least in my workshop is the router – the thing just plain terrifies me. So when I first started building Laurie (my first Telecaster) there was some tension between the best way to build the instrument, and my prefered approach to lutherie. I’m not for one second saying that using machines is bad and wrong – many people make wonderful instruments and furniture with machines. But for me that is not a process, or an approach, which I find particularly satisfying (and again, see the blind terror or switching on the router). So for Laurie I forged a path where some operations would be fully powered – for instance shaping the body and fitting the truss rod, but as much as possible would be hand tool work. This hybrid approach worked well, and I’m looking forward to refining the same approach with the Mysterycaster before I retreat to some hand tool only projects.

_DPP2222

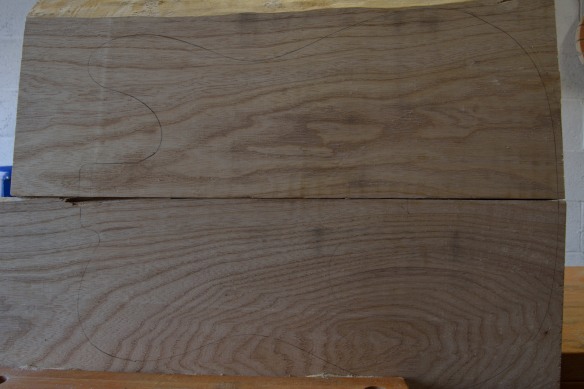
This is the body timber before I started planing. More gaps than the proverbial beaver with a meth habit.

My first task for the Mysterycaster was to joint the two halves of the swamp ash body. When edge jointing, before I introduce a plane to the work I find it useful to assess the extent to which the joint will need flattening, firstly by holding a straight edge to the edge of the workpiece, and then by holding both the two edges of the joint together and seeing where the gaps fall. Unlike edge jointing for furniture, where a spring joint can be used, and it is common to leave a very faint hollow across the width of the joint, jointing for electric guitar bodies requires a joint that is deadnuts flat across both the width and the length of the joint. This is so that the glue joint does prevent the two halves of the guitar from resonating properly, and so that you don’t get any nasty surprises when surfacing and thicknessing the jointed body. There are no special tricks behind getting a solid edge joint, just good planing technique and using a straight edged blade (rather than one with a gentle camber like some furniture makers use). A very useful technique I’ve found invaluable for edge jointing is making stopped cuts without leaving a step behind – courtesy of Chris Schwarz’s Popular Woodworking blog. Edge jointing can require working localised highspots, and a stopped cut is the perfect way to do this. However a poorly executed stopped cut can leave a stepped transition which results in more gaps, not fewer. Chris’ technique for starting the cut with no downward pressure on the plane, and lifting the heel of the plane off the work (instead of the toe) at the end of the cut worked perfectly, leaving a smooth transition across my stopped cuts.

_DPP2234

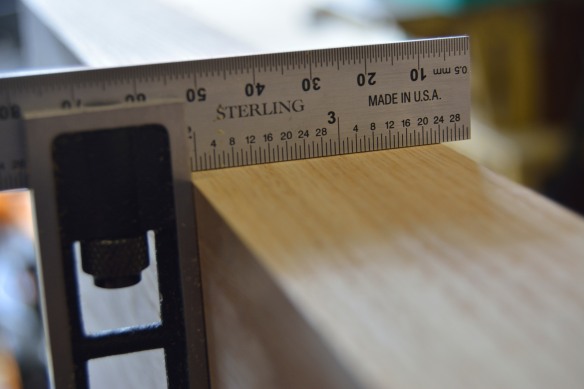
Flat across the width, and square to the face of the workpiece.

My prefered plane for edge jointing is the Lie Nielsen No.8, partly for it’s excellent length (which helps to keep long edges straight) but also the wide blade which makes edge jointing even the 47mm wide swamp ash I’m using for the Mysterycaster a pleasure.When edge jointing I check my progress constantly, mainly with a straight edge to check the length of the joint for flatness, and the diagonals (corner to corner) to make sure I’m not introducing any twist or wind into the joint. For checking that the width of the joint is both flat and square to the face of the timber, my Sterling Tool Works Double Square is invaluable. The best check however is against the other half of the joint. I worked one half of the body until it was 90% there, and then moved to the other half. Once both sides of the joint were very close I fitted them against each other and noted where there were any hairline gaps. It is important to check the back of the timber as well as the front, because one side can look perfect while still having significant gaps on the other.

_DPP2226a

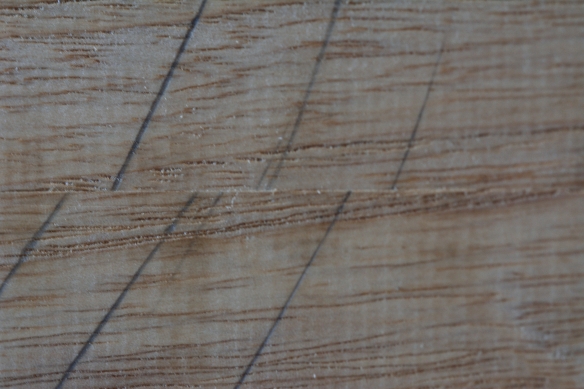
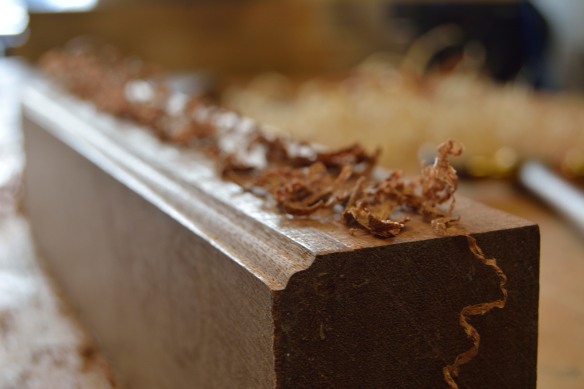
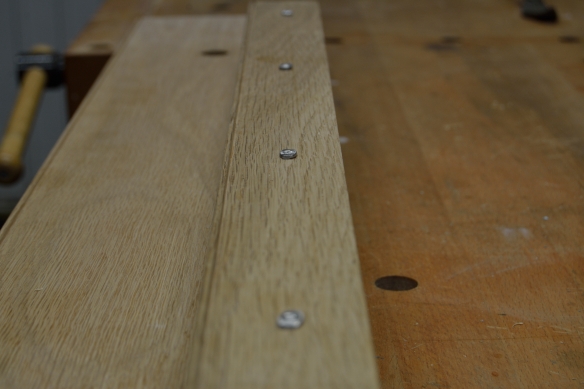
The finished joint – through a macro lens you can see where the joint falls because of the change in grain directions, but you can’t see the joint line.

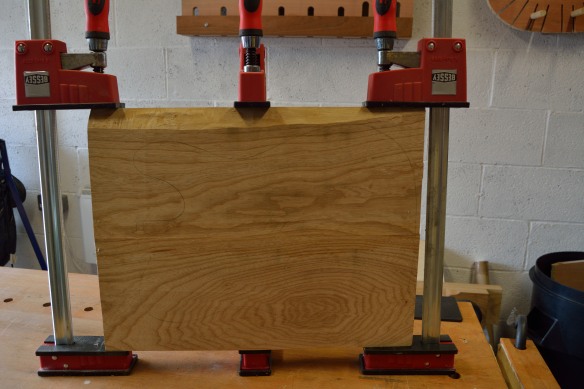
Once I was satisfied with the joint, I resharpened my plane blade and took a couple of very fine cuts from each side of the joint (no more than 3 cuts per side). This last touch closed everything up nicely, and the joint looked good and tight from both sides. A thin layer of Titebond and one rub joint later, and the body is now resting in three sash cramps over night.

_DPP2250

An evening with Patrick Leach (and a new/ old tool)

_DPP2181

Vintage 3/8″ square ovolo plane, and my trusty Sterling Tool Works plane adjusting hammer

Subscribing to the used tool list on Super Tool is a right of passage for many hand tool woodworkers (over 12,000 of us, apparently). Patrick Leach is renowned for being able to source an awe inspiring range of hand tool exotica as well as the more everyday essentials, all at good prices and in good condition.

I’ve been on the look-out for a 3/8″ square ovolo moulding plane for some time now. Caleb James appears to be alone in making new planes with this profile (and oh how I wish Philly would make one too) which means that a vintage example is really the only way to pick one up any time soon. Now, this sort of complex moulder does occasionally crop up on Ebay, or tool forums, for sale. What has stopped me putting down my hard earned cash down so far is that buying vintage tools from Ebay is something of a crap shoot. It is possible to get a real gem a low price, but there is also the potential to buy a complete mutt which will take an inordinate amount of time to rehabilitate (although I am full of admiration for people who do put in the hard yards refurbishing an Ebay or fleamarket find).

_DPP2201

Here you can see the four screws which hold the slip in place – remove this and the plane can be snugged right up against other moulding details.

So when Patrick emailed out the May 2016 Super Tool list I was delighted to see that he had a 19th century 3/8 square ovolo moulding plane for sale at a very reasonable price. Even better, when I emailed Patrick to enquire about the plane, it transpired that he was due to be in the UK this week for the David Stanley auction, and would be in my home town on Friday. I’m not sure he hand delivers every tool ordered off the list (this is my first time ordering from Patrick), but I can’t say for sure that he doesn’t (there’s only one way to find out really, isn’t there).

So this Friday I found myself meeting Patrick over a cold beer to collect the plane and to talk handwork, the Studley tool chest, parenthood, and trade schools. Patrick is a fascinating, and incredibly knowledgeable chap, and I only wish we could have spent longer talking about any number of subjects.

_DPP2185

The boxing is clear on this picture, as well as the owner’s stamp for E.W Sparkes

The plane itself is an excellent user grade tool, and although it is certainly not a collector’s item it is very interesting. The boxing on the sole suggests that it was originally a beading plane that has been converted to cut a square ovolo profile. The right-hand side of the plane (as you push it) is secured by four screws, and this slip can apparently be removed so that the plane can be used to cut part of a wider and more complex moulding profile. There are also two owner’s marks on the toe – one of which is too faint to read, and the other belonging to an E.W Sparkes, who was so keen on the plane he (or she) also stamped their name into the heel. The sole was clean and the boxing in perfect condition, without any chips missing or wood pitch gumming up the profile. And the wedge fits snuggly without being over tight.

_DPP2195

The blade prior to cleaning with a rust eraser and sharpning with Arkansas slip stones

The blade had some light rusting, but cut reasonably well without any sharpening or cleaning up. I gently removed the worst of the surface rust with a Garryflex rust eraser, and polished the back with a drop of oil and some 1 micron and 0.3 micron Scary Sharp papers. I prefer to use Scary Sharp rather than my oil stones for this sort of work as replacing a torn paper is a lot less heartache than flattening a chunk taken out of the oil stone but an out of condition blade. The bevel was easily touched up by holding the blade upside down in a vise and polishing the edges with a series of translucent Arkansas slip stones – fortunately my set of slipstones included one curve which perfectly matched the radius of the plane blade. All of this took no more than 20 minutes, following which I took another series of test cuts. Even with such a limited and swift fettle, the plane cut a beautfully crisp profile across a range of hardwood test pieces.

_DPP2200

A crisp profile cut after only a few minutes spent cleaning up and sharpening the blade.

I’ll be pressing this plane into use on some special projects later this summer, so regular readers can expect to see more over the coming months. Even more so, I’ll be scouring future tool lists from Patrick safe in the knowledge that his reputation for selling only high quality used tools is well deserved.

It’s… Hammer Time

IMG_3074

Issue 245 of Furniture & Cabinet Making is now in print, and carries my second article on the problem of “dancing about architecture”. Dancing About Architecture… Part 2 discusses solutions to the problem of “dancing about architecture”, and as an example features the excellent hammer John Switzer of Black Bear Forge mde for me, as well as some fascinating suggestions from Raney Nelson of Daed Tool Works.

Also included in this issue is Raney’s account of the opening weekend of the Lost Art Press store front, and an article on building folding library steps by fellow Anarchist’s Tool Chest survivor Matt Morse.

Down the workbench rabbit hole… part 2


Plate 11_bench

An excerpt of Plate 11 from Roubo’s L’art du menuisier, showing the iconic workbench (with leg vise removed), photo courtesy of Benchcrafted

I’ve been on holiday in Devon this week, so I’ve not had an opportunity to make any wood shavings. But I have had plenty of time to think about woodwork, as well as taking the apprentice to the beach for the first time and getting her paddling in the sea. And slowly the details of the new workbench are starting to coalesce. There are plenty of question marks left, and some design choices left to resolve, but since my last post I have a firmer idea of what the bench should look like, and I thought that a series of blog posts charting the evolution would help direct the design process (as well as recording it for posterity).

I think it is fair to say that the two most totemic symbols of the furniture maker’s (or luthier’s) craft are the tool chest and the workbench. These are the items which we build ourselves, or at least have the skills to do so, in order to practice our craft and build other things. I’ve written plenty about the importance of my Anarchist’s Tool Chest previously, both in terms of how it provides a safe home for my tools but also for the ideas it represents. Similarly, the workbench is an expression of the sustainable and ethical life I seek to lead – the reliance on my own hands and skills rather than big-box stores in order to create an environment in which my family can live and flourish

What it is…

That does not mean that the new workbench should be kept in a perpetually pristine condition, far from it. But it should be indicative of my approach to woodwork – the solid workmanship, refinement, and lack of ostentatious ornamentation, that I hope my guitars achieve. And above all, the workbench should facilitate many years of working with wood.

So what exactly will this bench look like? As I started out by saying, I’ve not got there quite yet, but the details are falling into place. So this post is an examination of what the bench design currently is, and what it is not.

The decision I reached at the end of my previous post was for a Roubo style bench, and that is very much still the basis of the design. That being said, the proliferation of Roubo inspired designs means that simply saying a “Roubo bench” is not in itself a precise description – there were two “Roubo” designs in the second edition of Chris Schwarz’s Workbench Book, not to mention the split top design developed by Benchcrafted. And Mark Hicks of Plate 11 offers three different twists on the Roubo bench (all of which are stunning). So more precisely, my starting point is the iconic Plate 11 bench from Roubo’s L’art du menuisier, (as seen at the top of this post) with a couple of twists which I cover below – all of which are still in keeping with modern interpretations of the “Roubo bench”.

Whenever you start a new project you inevitably draw on what you have done before. In terms of settling on a workbench design, my recent Moxon vise build has been particularly thought provoking. Prior to my Moxon build my only experience working with oak was in 1/4″ to 1″ thicknesses for some of the internal fitout of my tool chest, and so the Moxon build was my first proper experience using oak in any real thickness (oak, it must be said, is not a typical lutherie timber). To my surprise, oak is a real joy to work. The Moxon was also my first encounter with Benchcrafted hardware. So now I know two things – that I want to use oak for this bench, and that I’ll be using Benchcrafted vise hardware.

Yes, oak will push up the build costs, but will also stand the test of time, and feels very English. Should that matter? Probably not, but a nice solid bench combining the best of 18th century continental design with a quintessentially English timber does appeal. As I found on my Moxon build, oak goes very well with the sand cast finish of Benchcrafted “C” type hardware, and so a Glide “C” leg vise will be fitted to the left leg of the bench. Speaking of work holding, I’m going to depart from the Plate 11 brief by adding a Benchcrafted wagon vise (again the “C” type with the sand cast finish). I use the dog holes in my Sjoberg end vise as a make-shift wagon vise and this method of working has become second nature, so a wagon vise currently feels like an essential addition rather than a luxury.

My final addition to the Plate 11 design will be a sliding deadman. Again, this isn’t a radical alteration, but it does add some functionality which is essential for my lutherie work.

Despite the additions, the bench will be recognisably “Roubo”, and will definitely include the iconic sliding dovetail joint attaching the legs through the benchtop, because after all, surely one of the main attractions of building a Roubo style bench is cutting this joint?

RouboLegDetail

The iconic sliding dovetail leg joint as drawn by Roubo, photo courtesy of Popular Woodworking

…and what it is not

First off, I’m going to jetisson the crotchet. With a good quality leg vise I’m not sure the crotchet adds anything, and I can see it fouling any attempts to secure my solera in the leg vise when assembling acoustic guitars. So the crotchet goes. More radically, I’m also undecided about the planing stop. This can always be added later if necessary (it is after all simply a chuffing large mortice through 5″ of oak benchtop filled by a friction fitted post), but with a wagon vise it feels a little superflouous. The elegance and simplicity of a planing stop and doe’s feet does appeal, but the wagon vise appeals more right now. Maybe I’ll see the error of my ways, but for now I think the planing stop might go.

There are still some major design decisions left to resolve, the most significant of which are the length of the bench, and construction of the top. My current bench is 6′ long, which is a reasonable size. Ideally I’d like an 8′ bench, so it is a case of seeing how comfortable the shop will be with an extra 24″ of bench length. My shop is 17′ long, so it will fit, but the far end has my sharpening station, bandsaw and go bar deck, so things may get a little crowded if the bench gets too long (which is sadly why I’ve had to scotch the glorious idea of building a 10′ long beast of a workbench).

With the top, I’m still torn between a slab top (comprised of a single, or maybe just two oak pieces), or a laminated top of 3″ wide oak. The laminated top involves a great deal more jointing than the slab top, but would be significantly cheaper. But if I’m honest, one of the real attractions of the Roubo form is the “Dreadnaught” slab-top design in Schwarz’s book, and as built on the French Oak Roubo Project for the past two years. So I’m leaning towards the slab top. If the slab top ends up being two-piece (which all really depends on what oak I can source) then I am strongly considering using loose pegged tenons (as demonstrated by Richard Maguire) to provide a mechanical joint in addition to the bucketload of epoxy. That should hold everything together for a couple of hundred years.

Where the slab top gets complicated is installing the wagon vise. Richard Macguire has previously sawn the wagon vise chanel into the slab top, and bolted an end cap to the slab. That works very nicely. But (and there is always a but) there is something very classy about a dovetailed end cap, which would require building a slab top with a laminated edge to dovetail to the end cap. Again, perfectly do-able, but it adds an extra step for no structural benefit – this is purely decorative. Jeff Miller’s stunning oak Roubo was built this way, and looks lovely.

So the impasse I’ve currently hit is whether to go with a pure slab top (with no dovetails), or slab top and edge laminate for a dovetailed end cap. What say you, dear readers?

Moxon, because my biggest vice is history… part 3

_DPP2126

With construction of the Moxon complete, the final stage was to apply a finish. I always enjoy projects which introduce me to new techniques or materials, and building the Moxon vise introduced two new finishes – Danish Oil for the oak, and liquid gun bluing for the metal hardware.

I ragged on three coats of Liberon Superior Danish Oil to every surface of the oak, save for the inside faces of the jaws. The Benchcrafted kit comes with enough suede to line one of the jaws (assuming that like me you build a vise with 24” between the screws). Ultimately I intend to line both jaws with suede, just as soon as I can locate a supplier of quality suede large enough for the rear jaw. And so prior to applying the first coat of Danish oil I covered all four edges of both jaw faces with blue painter’s tape to guard against any oil build up, as this would prevent the suede from successfully adhering to the oak jaws. I left each coat of Danish oil for a minimum of 6 hours, before briskly rubbing down with 0000 grade steel wool and wiping clean with a spritz of white spirit. Three coats gave a good build-up of Danish Oil, and really brought out the figure of the oak, especially the medullary rays on the top edge of the jaws.

IMG_2933

The Danish Oil has really picked out the detail of my maker’s mark stamp

Finishing the hand wheels and nuts was an entirely new experience. I followed the very useful video on the Benchcrafted blog to apply a single coat of Birchwood Casey Super Blue (which by happy coincidence Chris Schwarz also wrote about on his Popular Woodworking blog a couple of days after I had tried out the gun smith’s brand of chemical warfare). Essentially, after cleaning the hardware with denatured alcohol, I liberally brushed on the bluing and put to one side for a couple of minutes. A quick wash in clean water, followed by buffing with 0000 grade steel wool and a final clean with white spirit and I was done. The bluing has darkened the metal a little (although I think the sand cast finish of the Moxon handwheels makes the effect less noticeable than the machined Glide handwheel shown in the Benchcrafted video) and will protect from the horrors of rust for years to come. The bluing was straight forward, although the dash to peel off the slowly dissolving tips off my nitrile gloves added some unexpected excitement (memo to self: invest in better quality safety kit when playing with chemistry). And who would have thought that an Early-Modern text would introduce me to modern gunsmithing finishes!

IMG_2941

Yes, more beading shots – showing the detail on the rear jaw and the stabiliser bar.

All that remains now is to press the Moxon into use, and I fully anticipate that it will be as useful for fine detail lutherie work (particularly shaping guitar headstocks at a comfortable height) as it will for the standard dovetailing duty.

Moxon, because my biggest vice is history… part 2

IMG_2886

I’m back from a field trip to the Auriou forge in France (more of which in an issue of Furniture & Cabinetmaking later this year), and so progress on the Moxon vise has continued.

At the rear surface of the back jaw is a stabiliser bar made from 2″ x 1 3/4″ oak, which I trimmed square and to length with the mitre box and Bad Axe mitre saw. The stabiliser bar provides a means to clamp the vise to the benchtop, and also helps add mass to the back of the vise and so offset some of the weight of the iron handwheels. Because the stabiliser bar is used as a clamping surface, the top corner is likely to take some abuse over the years. Similarly, the back top corner of the rear jaws will also be at risk of knocks when laying tail boards an top of the vise when transfering dovetail layout to pin boards held in the vise. To provide protection (and because I don’t really need any excuse) I beaded both corners with my 3/8″ Philly beading plane.

_DPP2054

I’ll probably never get bored of photographing the profile left by my 3/8″ beading plane

I decided to fix the stabiliser bar to the rear jaw with Titebond and four very nice 6d cut nails by the Tremont Nail Co, the position of which were stepped off with dividers (far easier than measuring with numbers!). The nails are partly to add extra hold, and partly for decoration – although this is a workshop appliance rather than fine furniture there is still no reason why it should not look good. And having taken delivery of a selection of cut nails from Tools for Working Wood I was keen to make use of the (frankly gorgeous) wrought head nails as soon as possible.

It is critical that the stabiliser bar is fitted flush to the bottom of the rear jaw, and so to drill the pilot holes for the cut nails I fixed the rear jaw between two sets of bench dogs, along with a large piece of scrap against the bottom edge of the jaw. The stabiliser bar was then clamped in position, snug up against the scrap, and the pilot holes for the four cut nails drilled with an egg beater drill. The stabiliser bar was glued and nailed in place, and and once the glued had cured, trimmed flush to the underside of the rear jaw with a No.3 smoothing plane.

_DPP2062

The stabiliser bar and wrought head 6d cut nails

I also took the opportunity to carve a lamb’s tongue chamfer to the top edge of the front jaw, although you’ll have to wait for an issue of Furniture & Cabinetmaking later this summer to read about that part of the build. I cleaned up all of the show surfaces of the vise with a card scraper, just to remove any remaining tool marks and fuzz, in readiness for finishing.

The final touch before applying finish was to mark the front jaw with my new maker’s mark from Buckeye Engraving. After experimenting I’ve found that a 24oz mallet gives a good crisp impression from this 1″ stamp.

_DPP2068

Maker’s mark stamp by Buckeye Engraving, and 24oz joiner’s mallet by Blue Spruce Tools – the perfect combination