Day 5: “Faster you dogs, there shall be no mercy!”

And we’re done. After five days of hard work, culminating in a day-long sprint to the finish line, it is hard to believe that that the course is now over. Not that work on the tool chest has ended; I still have the lid to build, milk paint to apply, and the internal gubbins to fit out. But still, the course proper has finished, and after such a phemonenal week there is a lot to absorb, a lot to reflect on.

Work on the tool chests continued apace today, with Chris, Paul and DJ assisting students on the final push. The top and bottom skirts are now glued on to my chest, and the bottom boards have been nailed in place.  I didn’t get to start work on my lid, but on an ambitious course like this (where only one of the 18 students left with a completed lid) completing the project within class time is less important than learning the skills and techniques being covered. And after all, I do have the Anarchist’s Tool Chest book to follow when completing the build (I will of course detail the rest of the build on this blog). Despite the fast pace of the day, I did learn some new techniques, most notably overhand ripping, which is something I had previously only read about (but never witnessed).

Doing such an intensive course has a very real and noticeable impact on your basic skills. By mid-week I was much more efficient with my sharpening – getting a razor edge and mirror finish on my chisels after only a couple of strokes. Similarly, sawings and paring accuracy was much greater by the time I had finished dovetailing the case. It is an important reminder that the best (and sometimes only) way to improve so many of the fundamental skills in woodwork is with constant and repeated practice.

Learning how to build the Anarchist’s Tool Chest under the tutelage of Chris Schwarz has been a dream come true – this has been an incredibly important project for me since I first read the book several years ago. And to spend a full week doing intensive joinery with other passionate woodworkers is not only a real joy, but very humbling.  The course also provided the opportunity for some very valuable networking, and I hope to be able to announce the outcome of that on here soon.

Once I have finished reflecting on the past five days I will post some further thoughts, but for now, I shall leave you with a rogues gallery from this morning (from left to right, Derek Jones of New English Workshop, fellow luthier Sue Johnson, myself, Chris Schwarz, and Paul Mayon of New English Workshop):DSC_0039

Day 4: “…It’s alright Ma, I’m only bleeding…”

Two things have to happen before I start to believe I’m working on a “real” project; I have to bleed on the stock, and there has to be one significant mistake. Otherwise it feels like I’m just playing at woodwork. Today was the day on which my Anarchist’s Tool Chest became a real project.

The sharply relieved sides of Lie Neilsen chisels? Yup, they’re sharp. To the extent that the next time the cutting edge of my 1/2″ chisel becomes dull, I’m going to turn the chisel side on and pare my dovetails with that edge. Still, milk paint will cover up the trail of blood I left across the side of the case. Milk paint hides all manner of sins.

The first part of the day was spent flattening and smoothing the rest of the casework. Although the No.4 and No.8 Lie Neilsen planes I had borrowed from Paul were useful for this operation, I remembered how much I love my No.9 1/2 block plane for removing tearout and achieving a finished surface. The block plane is incredibly comfortable to use for extensive periods of time, and being smaller than a smoothing plane it can work very localised areas. The interesting thing about flattening the case was the extent to which I had to switch off my luthier’s training. Because of the gnarly stock we are using, the time constraints of the course (which are increasingly constantly) and the fact that the tool chest is by necessity a rough piece of furniture which is going to get knocked about in the workshop, I had to keep reminding myself that the purpose of flatting was to achieve a surface that is flat enough to glue on the skirts, and not to achieve complete flatness in the way that you would for an acoustic guitar soundboard. And this is a universal lesson which I think can be lost in the heat of working on a project – all work is done to tolerances, but the tolerances will change with the function and nature of the project.

DSC_0035

But what of the significant mistake I mentioned earlier? It was, predictably, a result of trying to hurry too much and feeling the slowly ratcheting pressure as the course comes to an end. Having carefully dovetailed two opposite corners of the lower skirt, I marked off the correct length for the two other corners, cut to length and set to dovetailing the stock. Which was all going fine until I hogged out the tails, and not the waste, on the tail board. Clearly swapping the tails to the sides (unlike the carcass where the tails are on the front and back) had confused me. Silly boy (and again, slow is smooth and smooth is fast). Still, with able assistance from Matt of Workshop Heaven (who was visiting the workshop) I was able to replace the ruined board.

And you know what? I’m not going to beat myself up about this mistake. They happen, even to the best woodworkers. And with the pressure to stick to the schedule mounting, most people in the class are starting to slip in a couple of mistakes here and there. It’s all part of the learning curve.

And as important as it is to learn from the mistakes, success must also be celebrated. Somehow this week I appear to not have goofed half as much as I expected to in front of Mr Schwarz. Getting starstruck is a terrible curse, and there are times in the past when I have been reduced to a gibbering wreck upon meeting my heroes (I still have nightmares about the time I asked HHJ Humphrey Lloyd QC to be my dad, seriously not cool). But either I’m more coherent than I exected, or Chris is used to fanboyish behaviour. Either way, I’m chalking this one up as a win.

Tomorrow I will glue the skirts to the case, nail on the bottom boards, and build the lid. So plenty to get done, but we’re almost at the finish line.

Day 3: “…This is my dovetail saw, there are many like it but this one is mine…”

You know, the thing they never tell you about woodworking classes is what an emotional roller coaster you will experience. This week’s course is my first woodworking class since I was at Totnes, and in the intervening 7 years I appear to have completely forgotten the emotional twists and turns I experienced. These days when I think about that summer in Totnes the memories are of a halcyon time of carefree workshop fun. And yes, it was hella fun, but there was also a full gamut of emotions to be experienced, from elation to despair and all points in between. This week, all those memories came flooding back.

I am loving this course. Loving it. The Anarchist’s Tool Chest is a project I’ve wanted to do for three years, and learning how to build it in a class taught by Chris Schwarz is a dream come true. Additionally, woodwork has been a solitary activity for the past 7 years, so to be in a workshop with 17 other students, all working on an ambitious project is so exciting. The way in which your skill set accelerates as you progress (I think it would take several months of hard practice to improve my dovetailing as much as it has improved this week), the wealth of knowledge just waiting to be imparted by the tutors, the camaraderie, and the awful (truly awful) jokes. This course is the most fun I’ve had since Clive taught me the R.A.T.

But yes, it has been an emotional roller coaster (and we are only 3 days in). If I’m honest, yesterday finished leaving me feeling a little glum. Today however, all the previous day’s hard work started to produce results. All of my corners were test fit, and apart from the one corner which pressed close, the other three were good and tight, with no crumbling tails. A couple of gaps, but nothing too noticeable (especially not after the chest gets milk painted) and structurally solid.

DSC_0025

Gluing up the carcass represents the first significant milestone in the course, which is cause for good cheer. And having left the glue to set for 30 minutes, the clamps were removed to allow the next student to glue up their carcass, and my assembly added to the pile to cure for a further 90 minutes.

DSC_0028

While the glue was curing I busied myself dovetailing the skirts of the chest. The dovetails on the lower and upper skirts are rotated through 90 degrees, so that the tails on both skirts are on the sides of the case. This is in contrast to the carcass where the tails were on the front and back boards. This rotation gives added security in the event that the joints on the carcass fail, as the skirts will continue to hold the case together.

DSC_0031

Once the glue had cured it was time to put down the much used mallet and chisel, and plane the outside of the carcass flat. A No.4 smoothing plane took down the end grain of the protruding pins and tails, and a No.8 jointer (both gratefully borrowed from Paul Mayon) flattened out the two end boards of the case. Tomorrow I will flatten the front and back of the case and glue the skirts in place.

Day 2: “…Because it’s wood. And it hates you…”

DSC_0014

Today has been gruelling. Anyone who thinks that hand tool working is a gentle and quiet activity (a preconception I keep hearing) has clearly never chopped dovetails. Today we have been cutting the pins on each end of the side boards for the carcass. Eight pins per side gave us a total of 32 pins that had to be pounded out of uncooperative yellow pine. That is a lot of hammering and paring. I cannot understate how tough the yellow pine stock is. In the long run this will ensure that (along with robust joinery) the tool chest is pretty much bomb proof. But in the short term? This is not nice stock to work with.

DSC_0017

The pattern of the day was to transfer the position of the pins on one edge of the pins board, securing the tailboard in place with a heavy weight (as pictured last night). Then cutting the pins, chopping out the waste front and back, and paring the space between the pins. Then repeat on the remaining 3 sets of pins. With plenty of breaks for sharpening, because damn but yellow pine blunts chisels. So lots of chopping, lots of paring, lots of sharpening.

DSC_0020

If I’m going to be honest, working to a good standard while also trying to get an ambitious amount of work done within the time frame felt like a challenge at some points. And there were one of two silly mistakes which I would have probably avoided if I’d taken a moment to stop and think. But that is part of the thrill and challenge of attending a course like this. And even after only 2 days I definitely feel like my saw and chisel skills are greatly improved.

Slow is smooth and smooth is fast. Slow is smooth and smooth is fast. Always, always, always.

DSC_0024

Before the workshop shut for the day I was able to test fit the first corner. And so far, so good. The fit is a little loose (press fit, rather than needing any “persuading” with a mallet) but far from disastrous. And all things being equal, the other three corners will be at least as good, if not better.

Tomorrow morning we will be test fitting the remaining three corners and gluing up. After which the top and bottom skirts will need to be dovetailed, and the chest bottom nailed on. It’s going to be a busy day, but I’m already looking forward to getting started.

Day 1: Anarchy in the UK

So it’s happening. Really happening. Today was the first day of the Anarchist’s Tool Chest course with Chris Schwarz. And so far it has been a real blast; hard work and a fast paced course, but so much fun. So. Much.

The order of the day has been dovetailing (I knew those practice joints would come in handy). The yellow pine stock for our tool chests had already been processed by the students at Warwick College, so all the panels were glued up, squared off, and ready for joining. So, after a quick reenactment of an iconic scene from Full Metal Jacket (“This is my dovetail saw, there are many like it but this one is mine…”) we dove right into rabbeting the tail boards and cutting the tails on the front and back panels (7 a-side, so 28 in total which was made swifter work by gang-cutting the tails). A quick stop for lunch, and then back to chopping out the waste, paring and working up the first of the pin boards. All accompanied by in depth demonstrations and explanations by Chris on both the operations at hand, as well as a crash course in sharpening (featuring the now legendary Lie Neilsen sharpening jig, which is as lovely as the internet rumours would have you believe).

No course would be complete without a trip to the pub for refreshing beer, huge burgers, and good chat. Tomorrow we will cut the other pin boards and start to assemble the carcass. And I will update on the day’s progress tomorrow evening. But for now, I leave you with some pictures of today’s work.

DSC_0007

Cutting the tail board – 7 tails per side, on what is the largest board I’ve worked to date (2′ high and 4′ wide).

DSC_0009

Luthier (great chap, and very dear friend) Mikey Royce chopping waste from between his tails.

DSC_0011

The best way to avoid your tail board shifting when laying out the pins? Large weights, apparently. I’m hoping that after we’ve finished building the Anarchist’s Tool Chest we can all do some Anarchist’s Kettle Bells.

Pins and tails, tails and pins

As I’ve mentioned a couple of times recently, my focus over the past 6 weeks has shifted from lutherie to more traditional joinery, specifically dovetailing. For a number of years now I’ve been nurturing a growing interest in furniture making (in no small part thanks to Chris Schwarz’s blog and the excellent books he publishes at Lost Art Press), and although my main workshop pursuit will always be lutherie, I’m starting to branch out into other ways to make sawdust.

With the Anarchist’s Tool Chest course  now only 2 weeks away, I’ve been busy reading my copies of The Joiner and Cabinet Maker and The Art of Joinery and cutting practice dovetails to prepare for the high number of dovetails I’ll be cutting on the course.

My original plan was to cut 30 dovetails throughout June and July, and although rather predictably life got in the way on occasions, I still managed to cut 12 practice joints. Which is a decent amount of preparation considering the course (in theory at least) open to complete beginners.

DSC_0961

My first joint was (as you’d expect) far from brilliant. In fact it was downright awful, managing to somehow be impossibly tight to fit together despite having more gaps than the proverbial beaver with a meth habit. Which (to my mind at least) defies all the laws of physics. With the second attempt I switched to the tails first method and tried to be braver in cutting right against (but not on) the line for my pins. And the resulting joint was better, still nothing to shout about, but definitely better.

DSC_0965

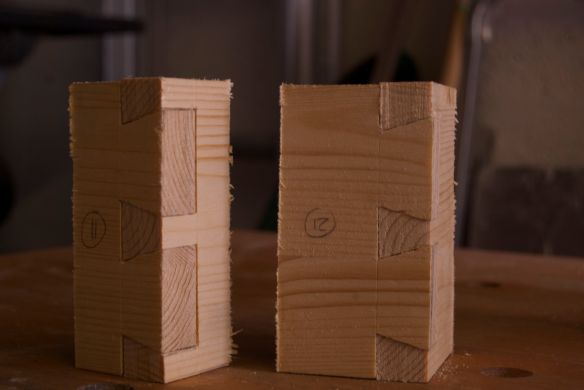
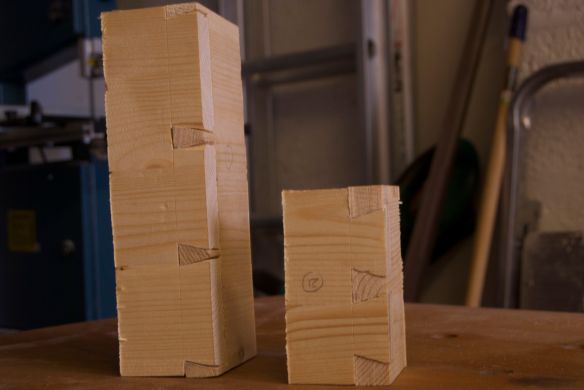
So I persevered. And with Nos.11 and 12 (pictured above – the dark edges of the pins are no gaps, those are remnants of the pencil lines) they started looking like proper joints. Now there is still a way to go before I would want my dovetails on display, but the improvement in only 12 joints gives me cause for cheer. And I don’t think there is any mystery or secret techniques to getting a good dovetail; probably 90% of the joint is in (at least, in what I have seen to improve my own work) accurate sawing – the ability to cut straight, and just to the waste side of the line. And that’s where the Night of 100 Cuts comes in.

Hopefully by the end of the ATC course I’ll be dovetailing like I know what I’m doing…

DSC_0968

Above, practice joint No.1 and No.12, showing the improvement so far.