No project is complete until I’ve taken some beauty shots and the workpiece is in its final home. So, before I moved the bookcase into my study and loaded it with books, I took a couple of photos of the finished project.


No project is complete until I’ve taken some beauty shots and the workpiece is in its final home. So, before I moved the bookcase into my study and loaded it with books, I took a couple of photos of the finished project.

for th enailsThe final stage of the boarded bookcase build involved fitting the backboards. The outermost pair of boards are glued to the sides of the bookcase, and then nailed to the shelves. The rest of the shelves are nailed only, to allow for seasonal wood movement. Before fitting the boards I applied several coats of blonde shellac by hand – it is much easier to do this before they are installed, and also helps to wipe off any squeezeout when gluing the outer boards in place. I adjusted the width of the middle board until all five fit snuggly in the casework, and then held them in position with a cam clamp holding each against the top rail. That allowed me to mark and drill the pilot holes for each nail. Cam clamps don’t offer endless gripping power like Bessey K clamps do, but for delicate clamping operations such as this they are perfect. Before fixing the shelves in place I also planed the top rail flush to the sides.

I fixed the shelves in two batches. The first batch was the outermost shelves, which I glued and nailed in place in the kitchen as the workshop was getting too cold for the hide glue to flow properly. One day I will have a heated ‘shop, but that day is not yet here. The sides of the bookcase had bowed slightly, so I used clamps to pull them into the edge of the backboards. Once the glue had cured, I moved the bookcase back into the workshop and nailed the remaining backboards in place.

I had left cleaning the outside surfaces of the bookcase until it had been fully assembled. I started with cleaning up the front by smoothing the edge of the shelves and sides with the Holtey No985. Once the front of the bookcase was clean and pretty I then smoothed each side, with the bookcase standing on a thick moving blanket to protect it from acquiring more workshop rash. Once each side was smoothed I drilled pilot holes for the nails, drove the nails home, and then applied several coats of shellac. This also helped to protect the freshly smoothed surface when the bookcase was turned over.

With both sides smoothed and all the nails fitted, the only tasks left were to plane the backboards flush to the toprail using a blockplane, and make pretty. I broke all the sharp edges to prevent them from splintering in use, using the Philly Planes chamfer plane for all accessible edges – this tool is far from essential but is an excellent way of cutting repeatable and quick chamfers. For the shelves I used a Veritas scraper shave, which works well right into the corner where the shelf meets the side. A final hand rubbed coat of shellac on the sides and front of the bookcase, and the final finishing touch was to apply my maker’s mark to the top end of a side (the stamp works best on end grain). Yes, nothing beats taking a lump hammer to a newly completed piece of furniture.


And after 7 months’ work, the boarded bookcase is (as of two minutes ago) complete.
It’s too late to do a full write up of the final stage of the build tonight. So I plan to pour a whiskey, and catch up on the writing next week. But it feels good to have this project finished.

I’ve been hard at work preparing the backboards so that they can be fitted to the boarded bookcase – this is the final stage of the build, so that all will be left once they are fitted is to make pretty and then apply shellac. I got the backboards dimensioned last weekend; there isn’t much to say that’s new about that process. I am using 5 backboards, subtly graduated in size and orientated so that with the widest two boards go at each end of the assemvbly, with the narrowest board in the middle. The variations in width (other than the middle board, the others are grouped in pairs of corresponding widths) is partially determined by the maple I have in stock, and partially to allow a good fit in the casework. Instead of working to any measurements, the overall width of the backboards will be determined by the width of the bookcase, and using the arrangement I currently have allows the middle board to be trimmed until I have a good snug fit across the whole assembly. For that reason, I have not yet cut the middle board to final width, as I want room to trim it.

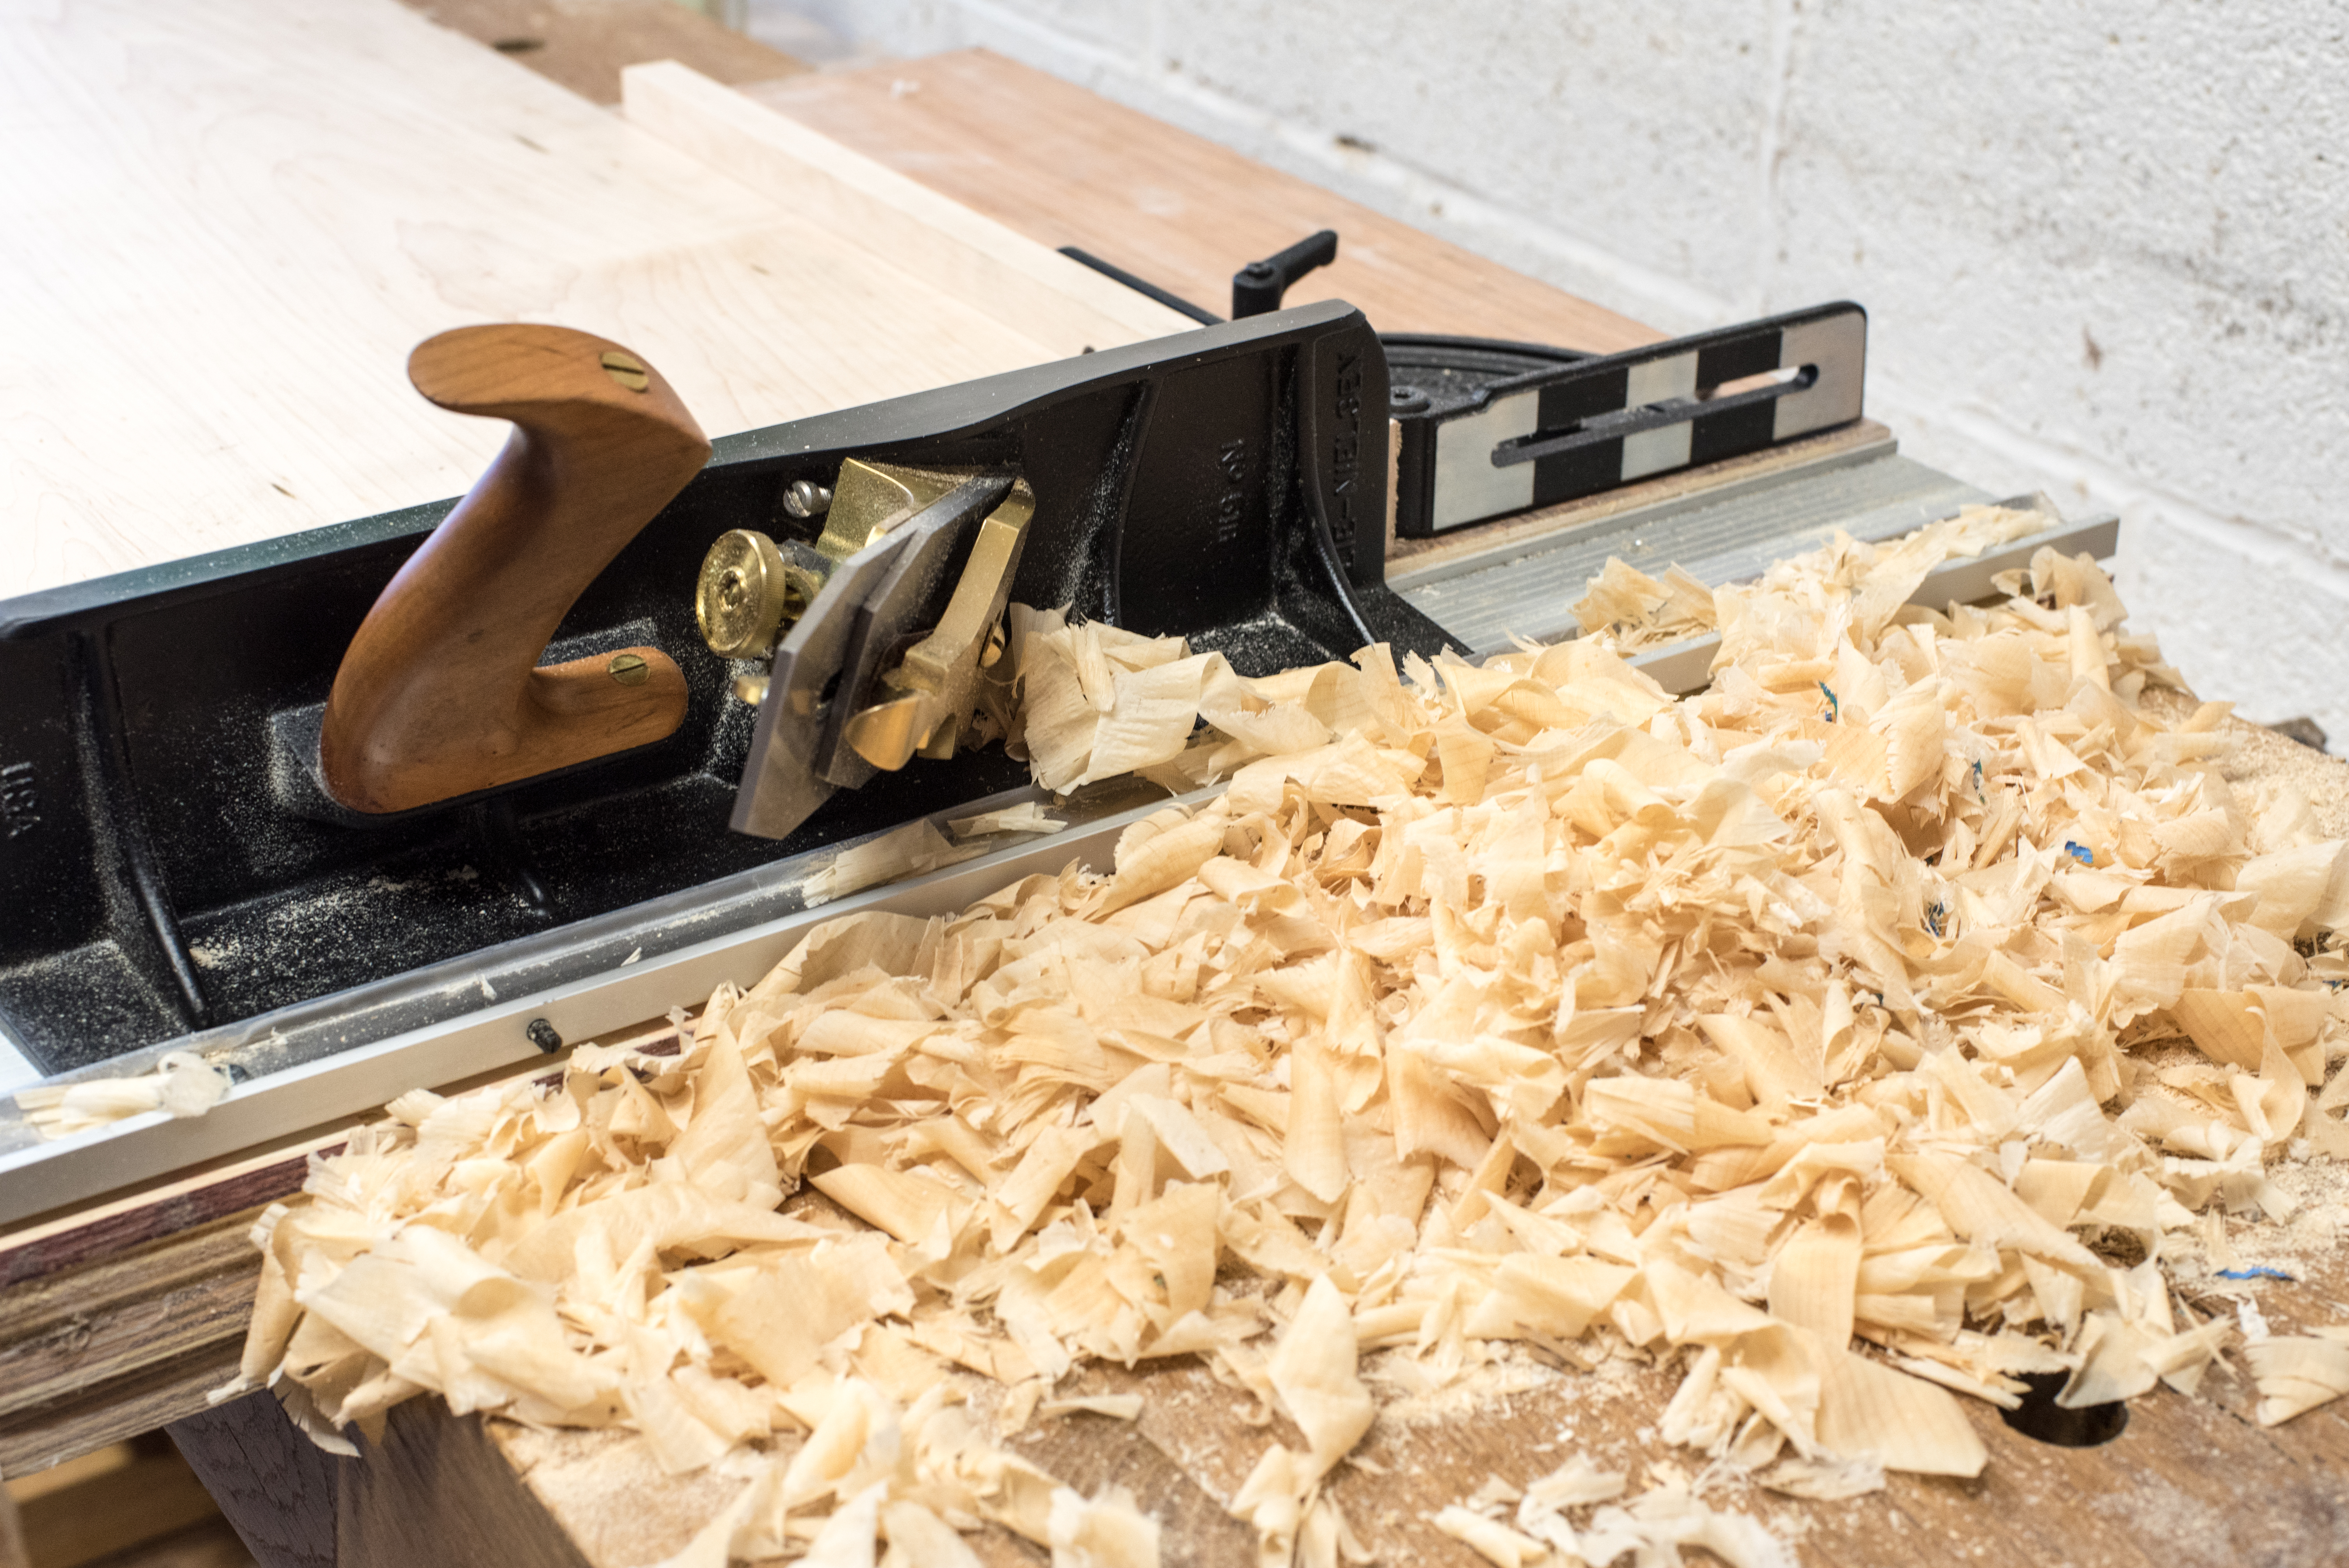
The backboards are joined to each other with tongue and groove joinery, and nailed to the rear edge of each shelf. The outermost boards are also glued to the sides of the casework. I really like tongue and groove joinery for backboards and other situations where boards need to be joined but still allowed to move, such as the shelf for the Roubo workbench. A dedicated joinery plane (I use the Lie-Nielsen No.49 for 1/2″ thick boards) means that cutting this joinery is swift and repeatable.

The other reason I like tongue and groove joinery is that it provides a good opportunity to use a beading plane, which adds a little visual interest to otherwise plain components. I’ve had this Philly Planes 1/8″ beading plane for five years, and don’t get to use it as often as I would like. But it is perfect for adding a shadow line to tongue and groove boards (which is why it has made an appearance on the Roubo workbench, the Policeman’s Bootbench, our Boot Bench, and the Saw Cabinet, to name a few projects). This maple required a fine cut to achieve a good finish, and once dialed in the Philly beading plane siwftly cut a sweet little bead.

Finally, I eased the fit of the tongue in the grooves – off the plane the joint is “squeaky-tight”, and I don’t want to run the risk of snapping the delicate tongue when test fitting and dissassembling the backboards. A couple of swipes with a small shoulder plane is enough to ease the fit and minimise the risk of joinery implosion.

When I’m next in the workshop I will fit the backboard assembly to the casework, and glue and nail it in place. At this rate the bookcase will be complete and in use by the end of the month.

And with that, the bookcase is assembled. Well, now quite just like “that“. And there is still the matter of the top rail, kick, and backboards to fit. But the main glue-up is now concluded and what was a collection of five boards now starts to look like a piece of furniture. So that’s a good step in the right direction.

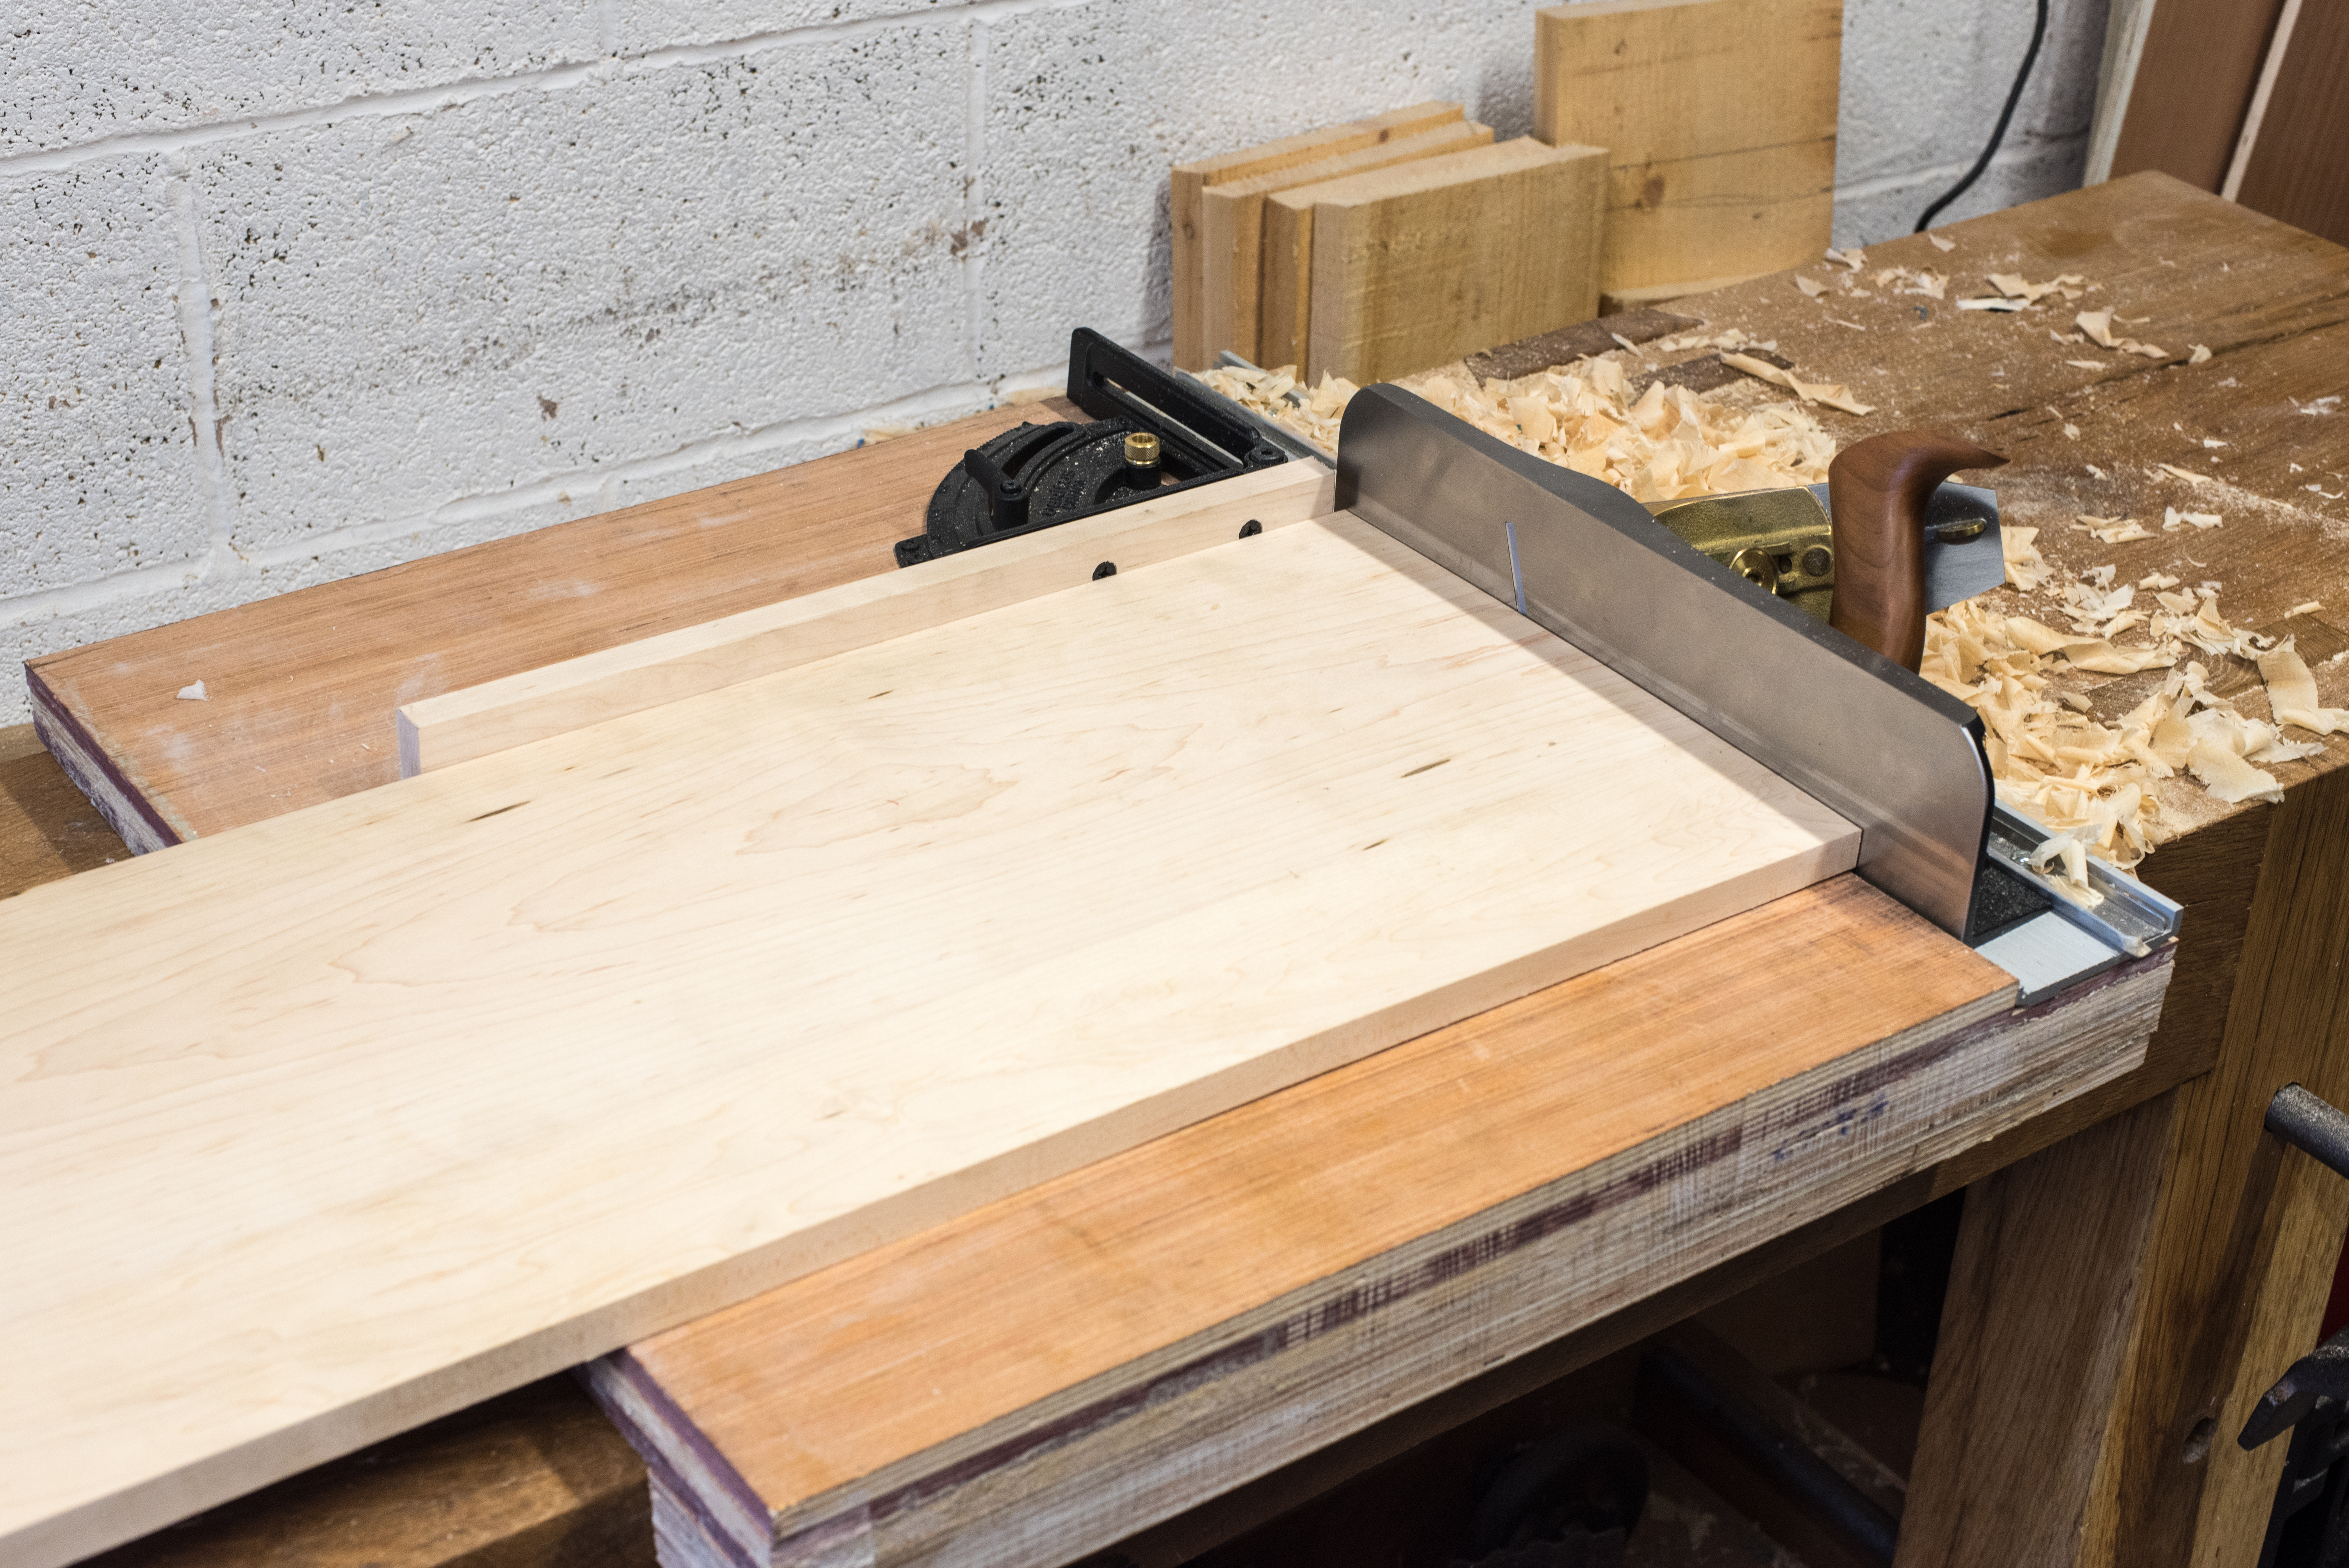
I never like to rush into a glue-up – that is the path down which catastrophe lies. So today’s session at the workbench was spent working at a steady but leisurely pace, with the focus being on working towards a smooth and incident free glue-up. Maple can be a beautiful timber, but tends to discolour and pick-up workshop grime very quickly. So the first step in my glue-up preparation was to lightly dress the interior faces of the components to remove any workshop rash and discolouration, using the Holtey 985 (it will break my heart whe I need to return this plane to Karl in a month or so). I was aiming to remove as little material as possible as I didn’t want to introduce any slop into the joinery, but just remove grime and dings and return the surface finish to straight-off-the-plane fresh.

The next step was to preserve that fresh and clear surface finish with a coat of blonde shellac. I mixed up a fresh 2lb cut batch of blonde tiger flakes (from Tools for Working Wood) yesterday, which also provided an opportunity to give a science and polishing lesson to the Apprentice. The magnetic mixer mixed the shellac perfectly with none of the residue at the bottom of the jar that I normally get, no matter how diligently I stir by hand. Is it an essential workshop purchase? Probably not, but for a very small outlay it made mixing up shellac very easy. The other benefit of pre-finishing the components with shellac is that it makes cleaning up glue squeeze-out very easy, as the glue won’t adhere to shellac.

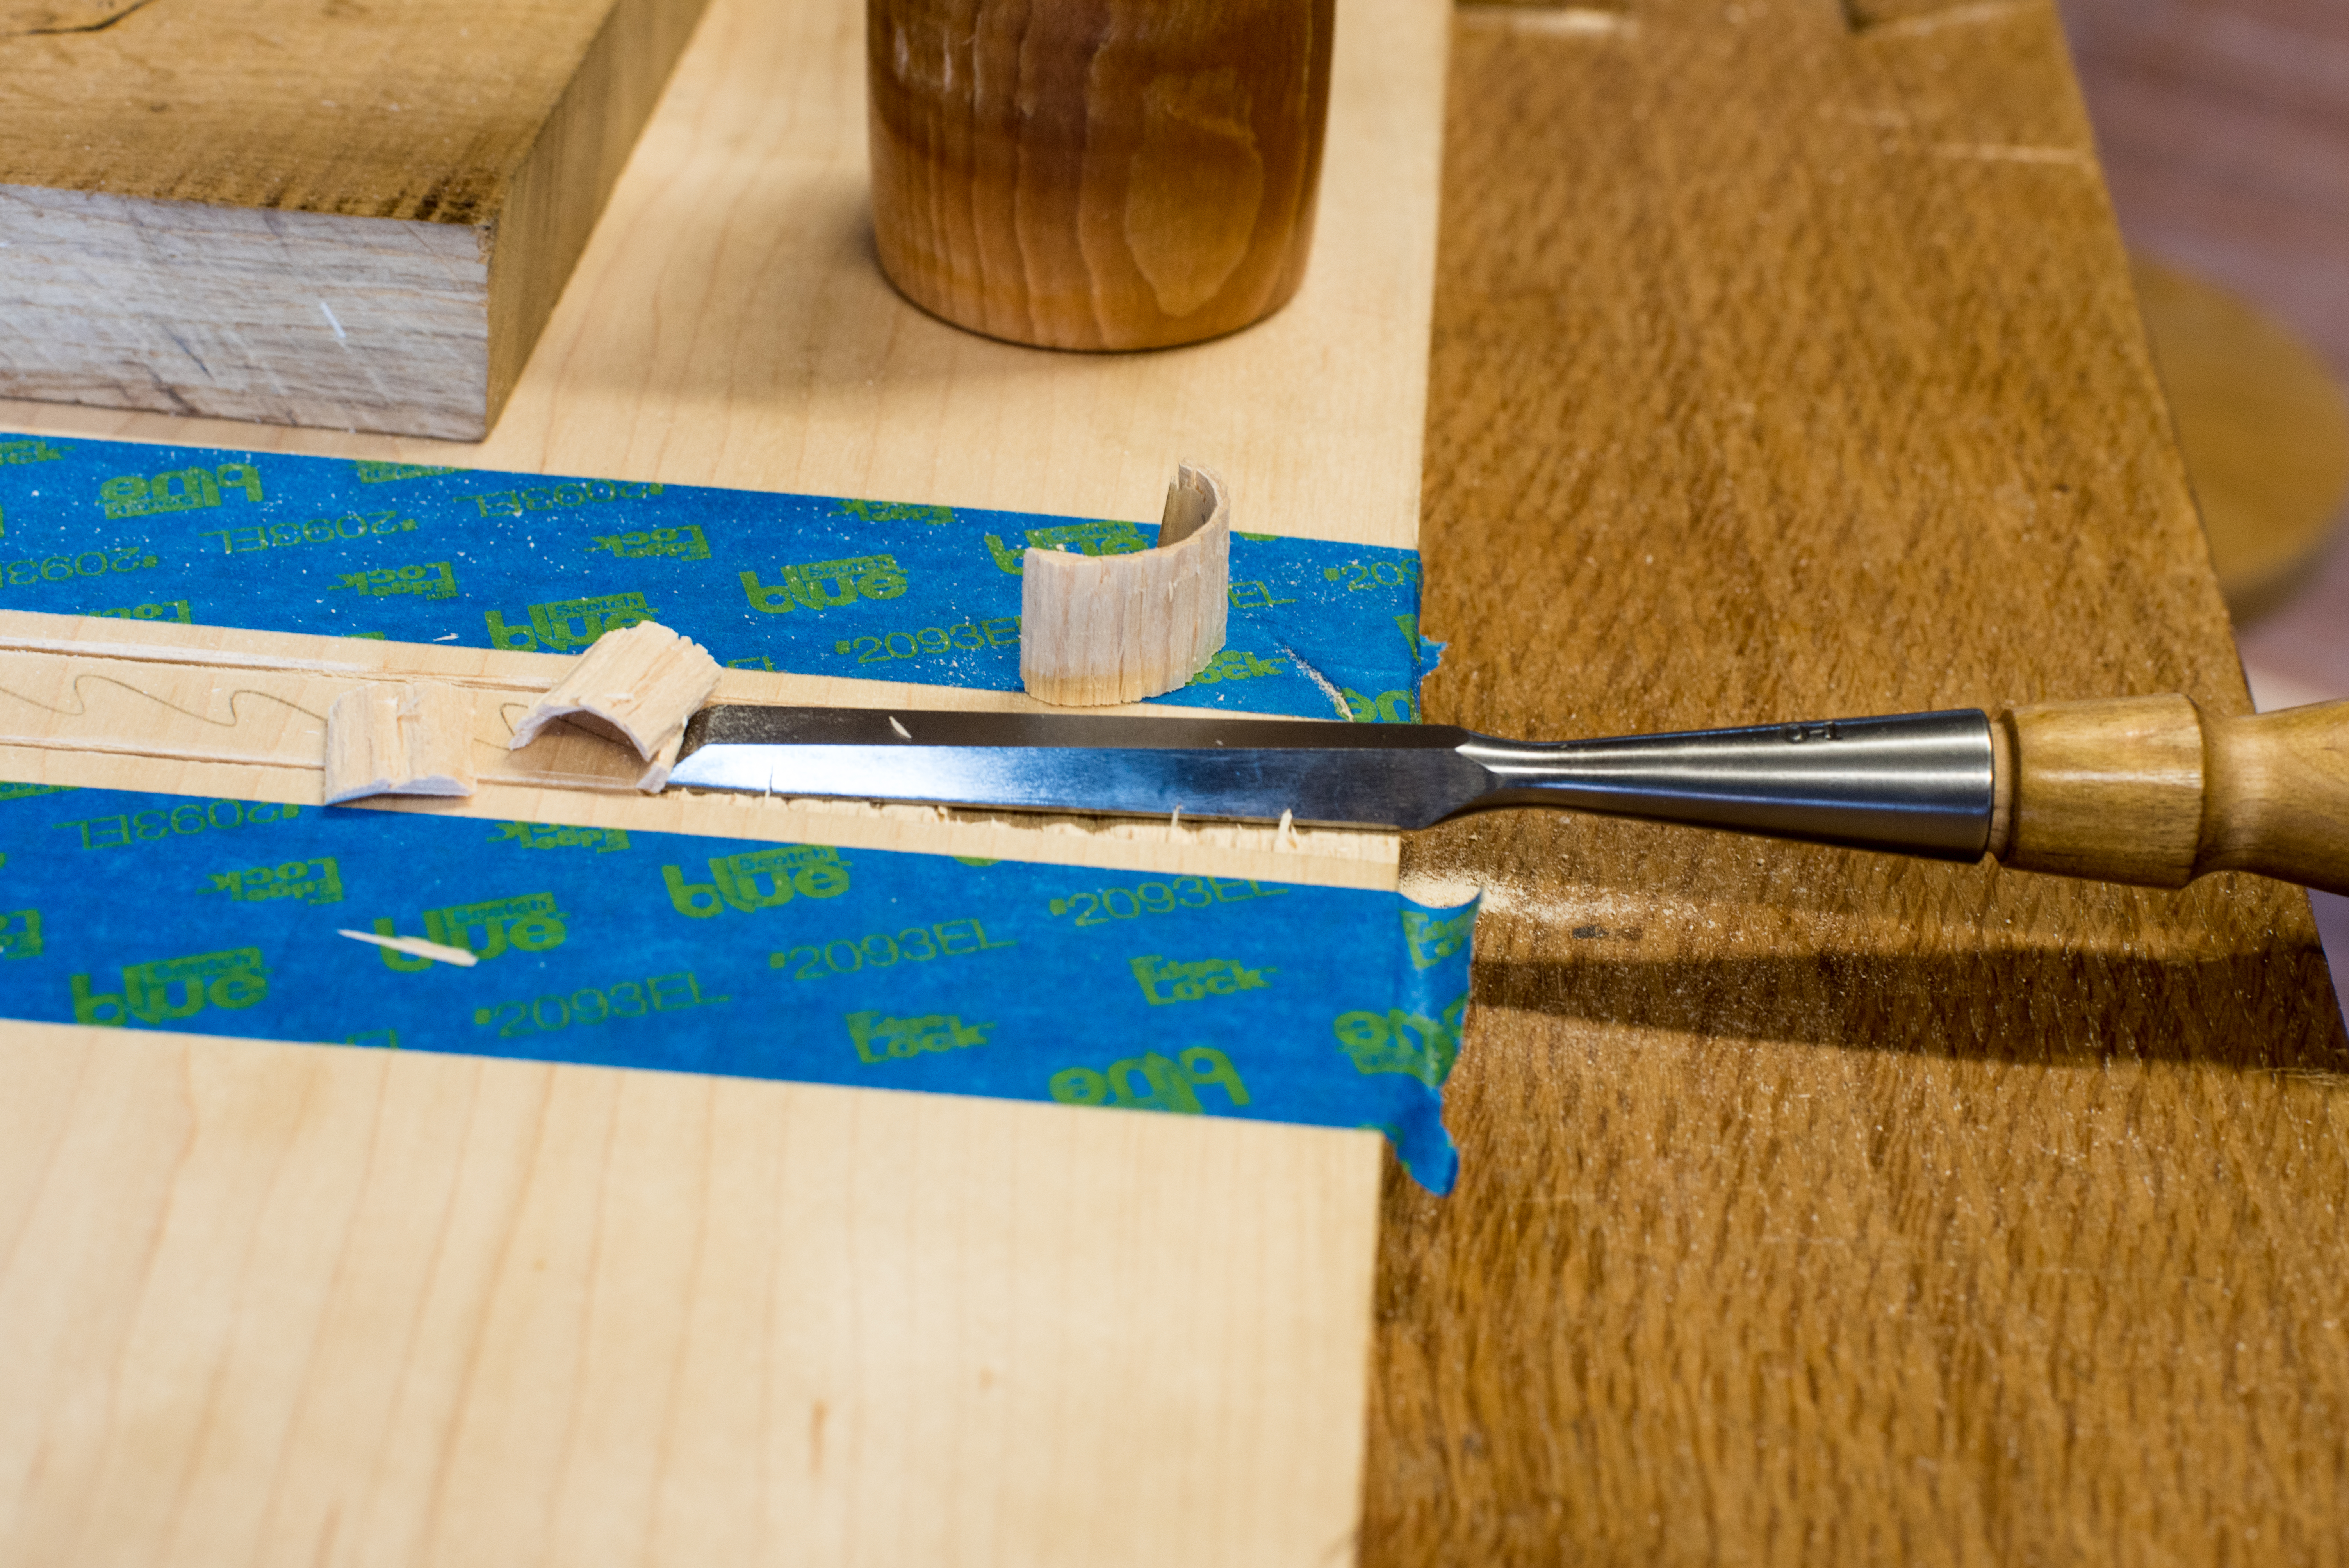
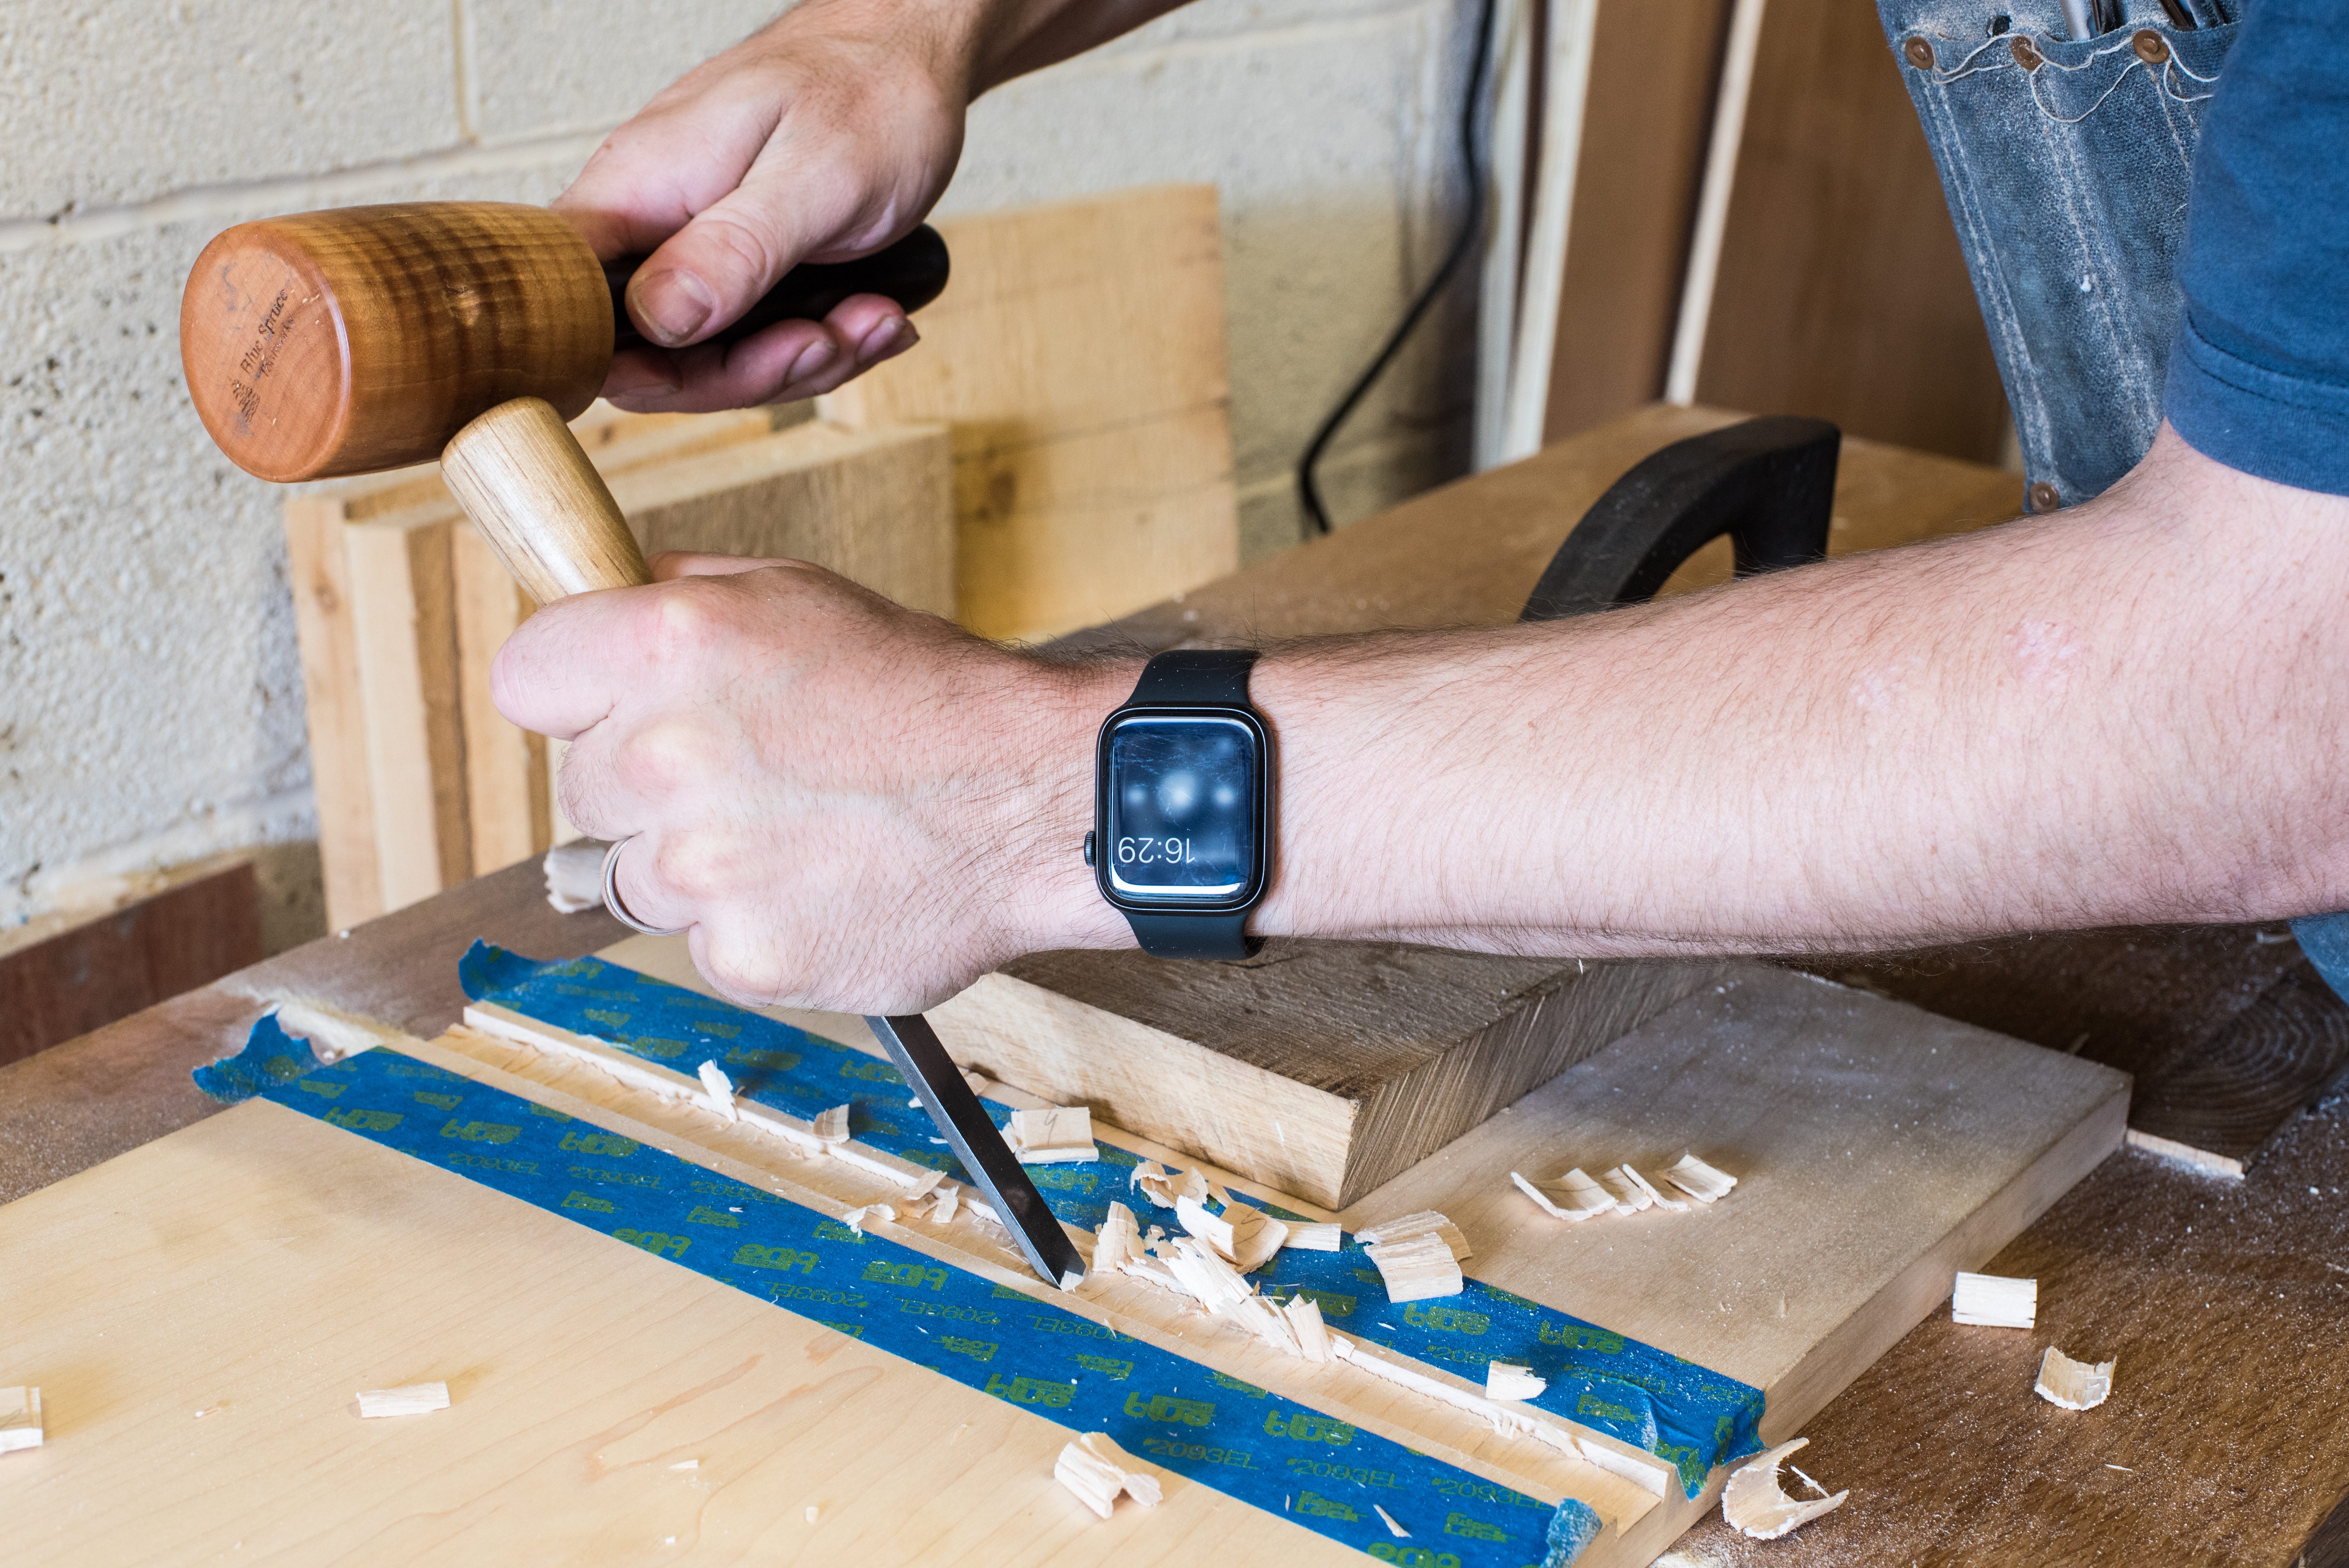
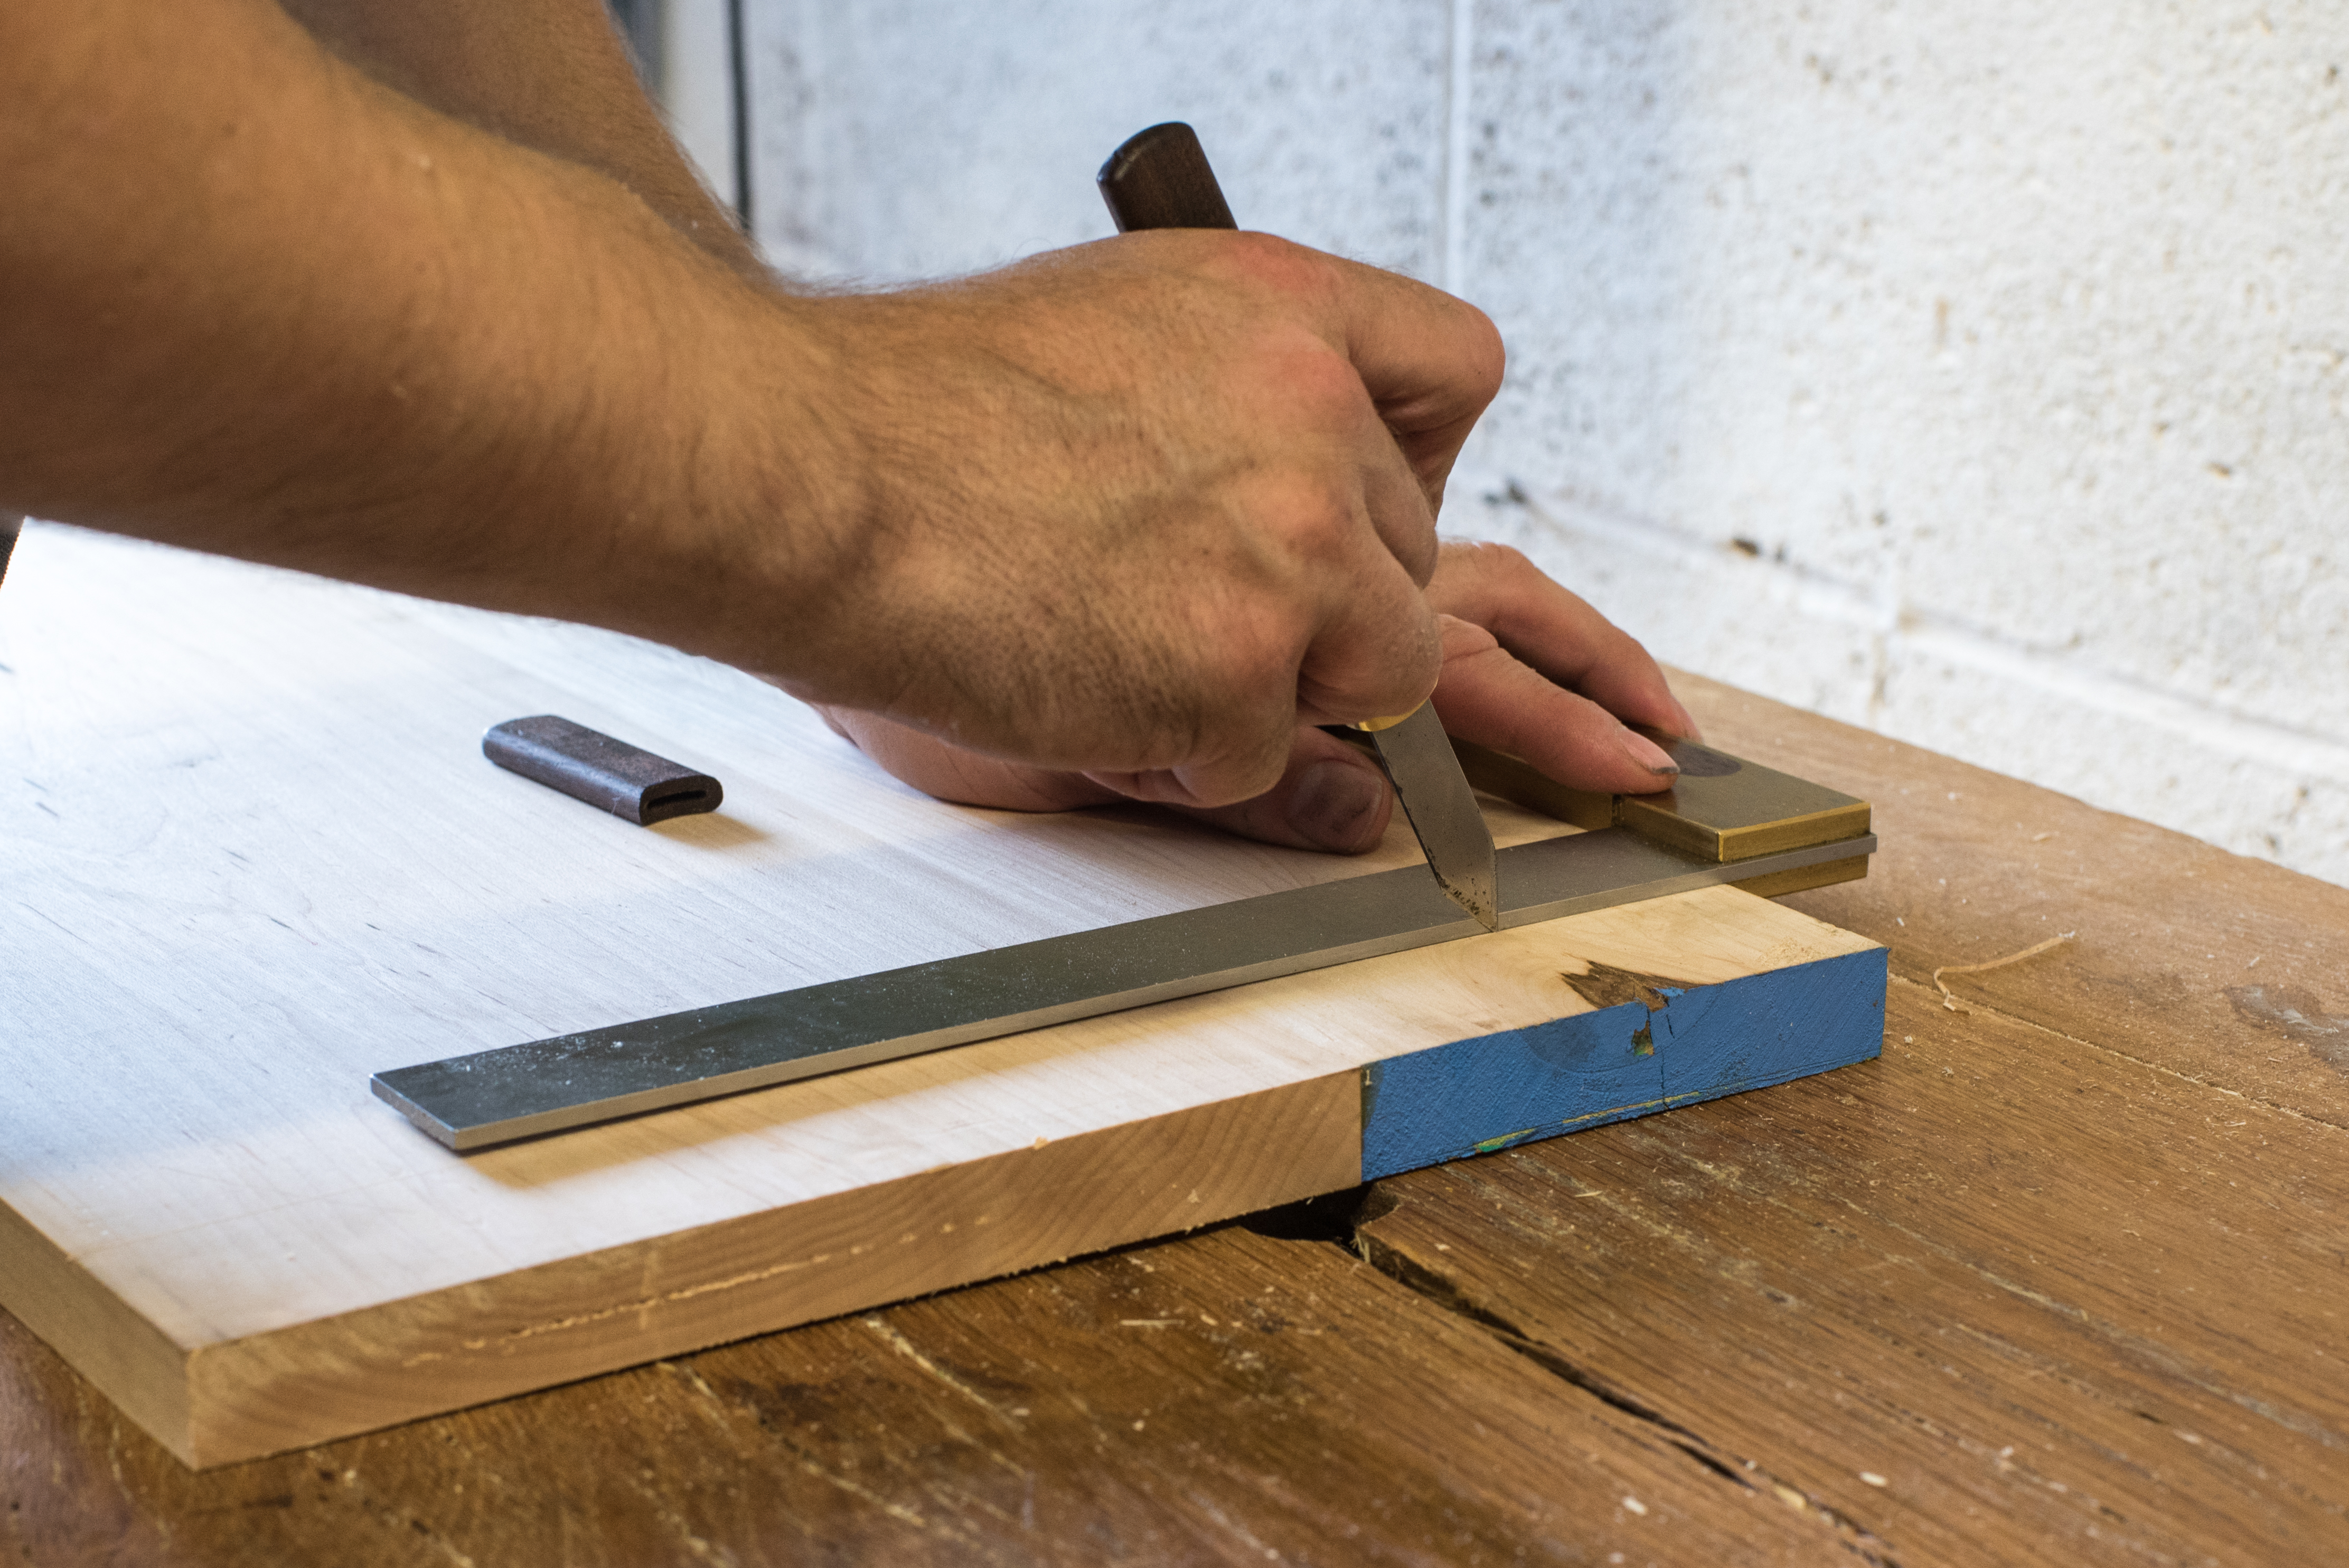
Of course, I don’t want shellac on the surfaces which do need to be glued, including the ends of the shelves and the rear 1/2″ strip of the sides (which will be glued to the backboards). To protect these, I laid down a strip of blue tape and then used a sharp making gauge to cut the tape to the right width, before peeling off the excess. This is easier and faster than trying to lay the tape down to a precise line. With the glue surfaces taped up, I applied three coats of shellac, using a cotton pad stuffed with wadding. The shellac cures very quickly, so I was able to apply one coat to each component and then go round for a second, then a third time, without pausing. Blonde shellac does not add too much colour to maple, but does bring out the figure, and is the same finish I applied to my staked desk (which the bookcase will stand next to).

The final preparatory step was to cut clamping cauls for each dado, set up the clamps, and warm up the glue to ensure it would flow nicely in the autumnal chill. Assembling the bookcase is not as straight forward a task as you would expect – the lack of mechanical fixings in the joinery mean that until all three shelves are in and the clamps are tightened, the structure is pretty unstable. This is contrast to a dovetailed chest (for example) which is effectively self clamping if you’ve done a decent job of cutting the joinery. Fortunately Dr Moss was on hand to provide able assistance, and thanks to our dry-run last week and today’s preparation, it went together smoothly and with only minimal bleeding on the casework – the good news is that blood wipes off shellac easily too! With the casework assembled I cleaned up squeeze-out with a toothbrush and plenty of warm water. Once the glue has cured I’ll remove the clamps and dress the outer surface of the sides before applying shellac and installing the nails which will provide both decoration and a mechanical element to the joinery.


It has been challenging to get any real shop time since late August. First the workshop door (an “up and over” garage type) failed and I was locked out for two weeks while I waited for an engineer to instal new parts and service the mechanism. As soon as that was done, work pressures at the day job meant that I was chained firmly to my desk for a couple of weeks. But ggainst all odds, the joinery for the boarded bookcase is now cut and I did a dry assembly of the casework today.
The final elements of joinery were the rabbets for kick and top rail. These require a slightly different approach to the dados for the shelves, partly because of grain direction (rabbets run along the grain, dados run across it) and because the rabbets do not run the length of the workpiece. The rabbet for the kick runs into the bottom dado, but the rabbet for the kick is stopped, which brings with it a few challenges for the handtool worker.

I cut the rabbet for the kick first, as this is easier than the stopped groove for the rail. Because the rabbet for the kick runs into the shelf dado I was able to prepare a first class cut and gently saw the walls, being careful not to overcut the workpiece, or to kink my saw on the opposite wall of the dados. I warmed up by sawing the inside wall of the rabbet, which won’t be seen once the kick is installed, and then cut the show edge second. With the walls cut I then weakened the waste by chiselling across the grain, and then popped it out with a half inch chisel working bevel up. Once I was close to the final depth I moved to the router plane to clean the bottom of the rabbet.

There are several ways to cut a stopped rabbet. Where the end of the rabbet will be hidden then sawing the walls can be very quick. However I did not want to leave signs of overcutting on the bookcase as the end of the rabbet will be visible. So the approach I took was similar to chopping a mortise. After scoring deep layout lines with a marking gauge to define a clean edge for the rabbet, I chopped across the grain with my 1/2″ chisel, followed by gently paring the edges with a 2″ wide chisel. Paring the edges is delicate work, as hitting the chisel hard can cause the grain to split. But after a few rounds of chopping across the grain, paring the side walls and popping out the waste in between, the rabbet was ready for the router plane to bring to final depth.

With all of the joinery cut I tested the fit of each shelf individually, and used a large shoulder plane to adjust the fit of the shelves where needed. Then it was time to do a dry assembly of the maim casework. After processing stock since April, this was the first time that I had seen the components come together and indicate how the finished piece will look like. The dry run also helps to identify any potential difficulties for glue-up.

Next weekend I will clean up the interior surfaces of the bookcase and then glue up the main assembly.
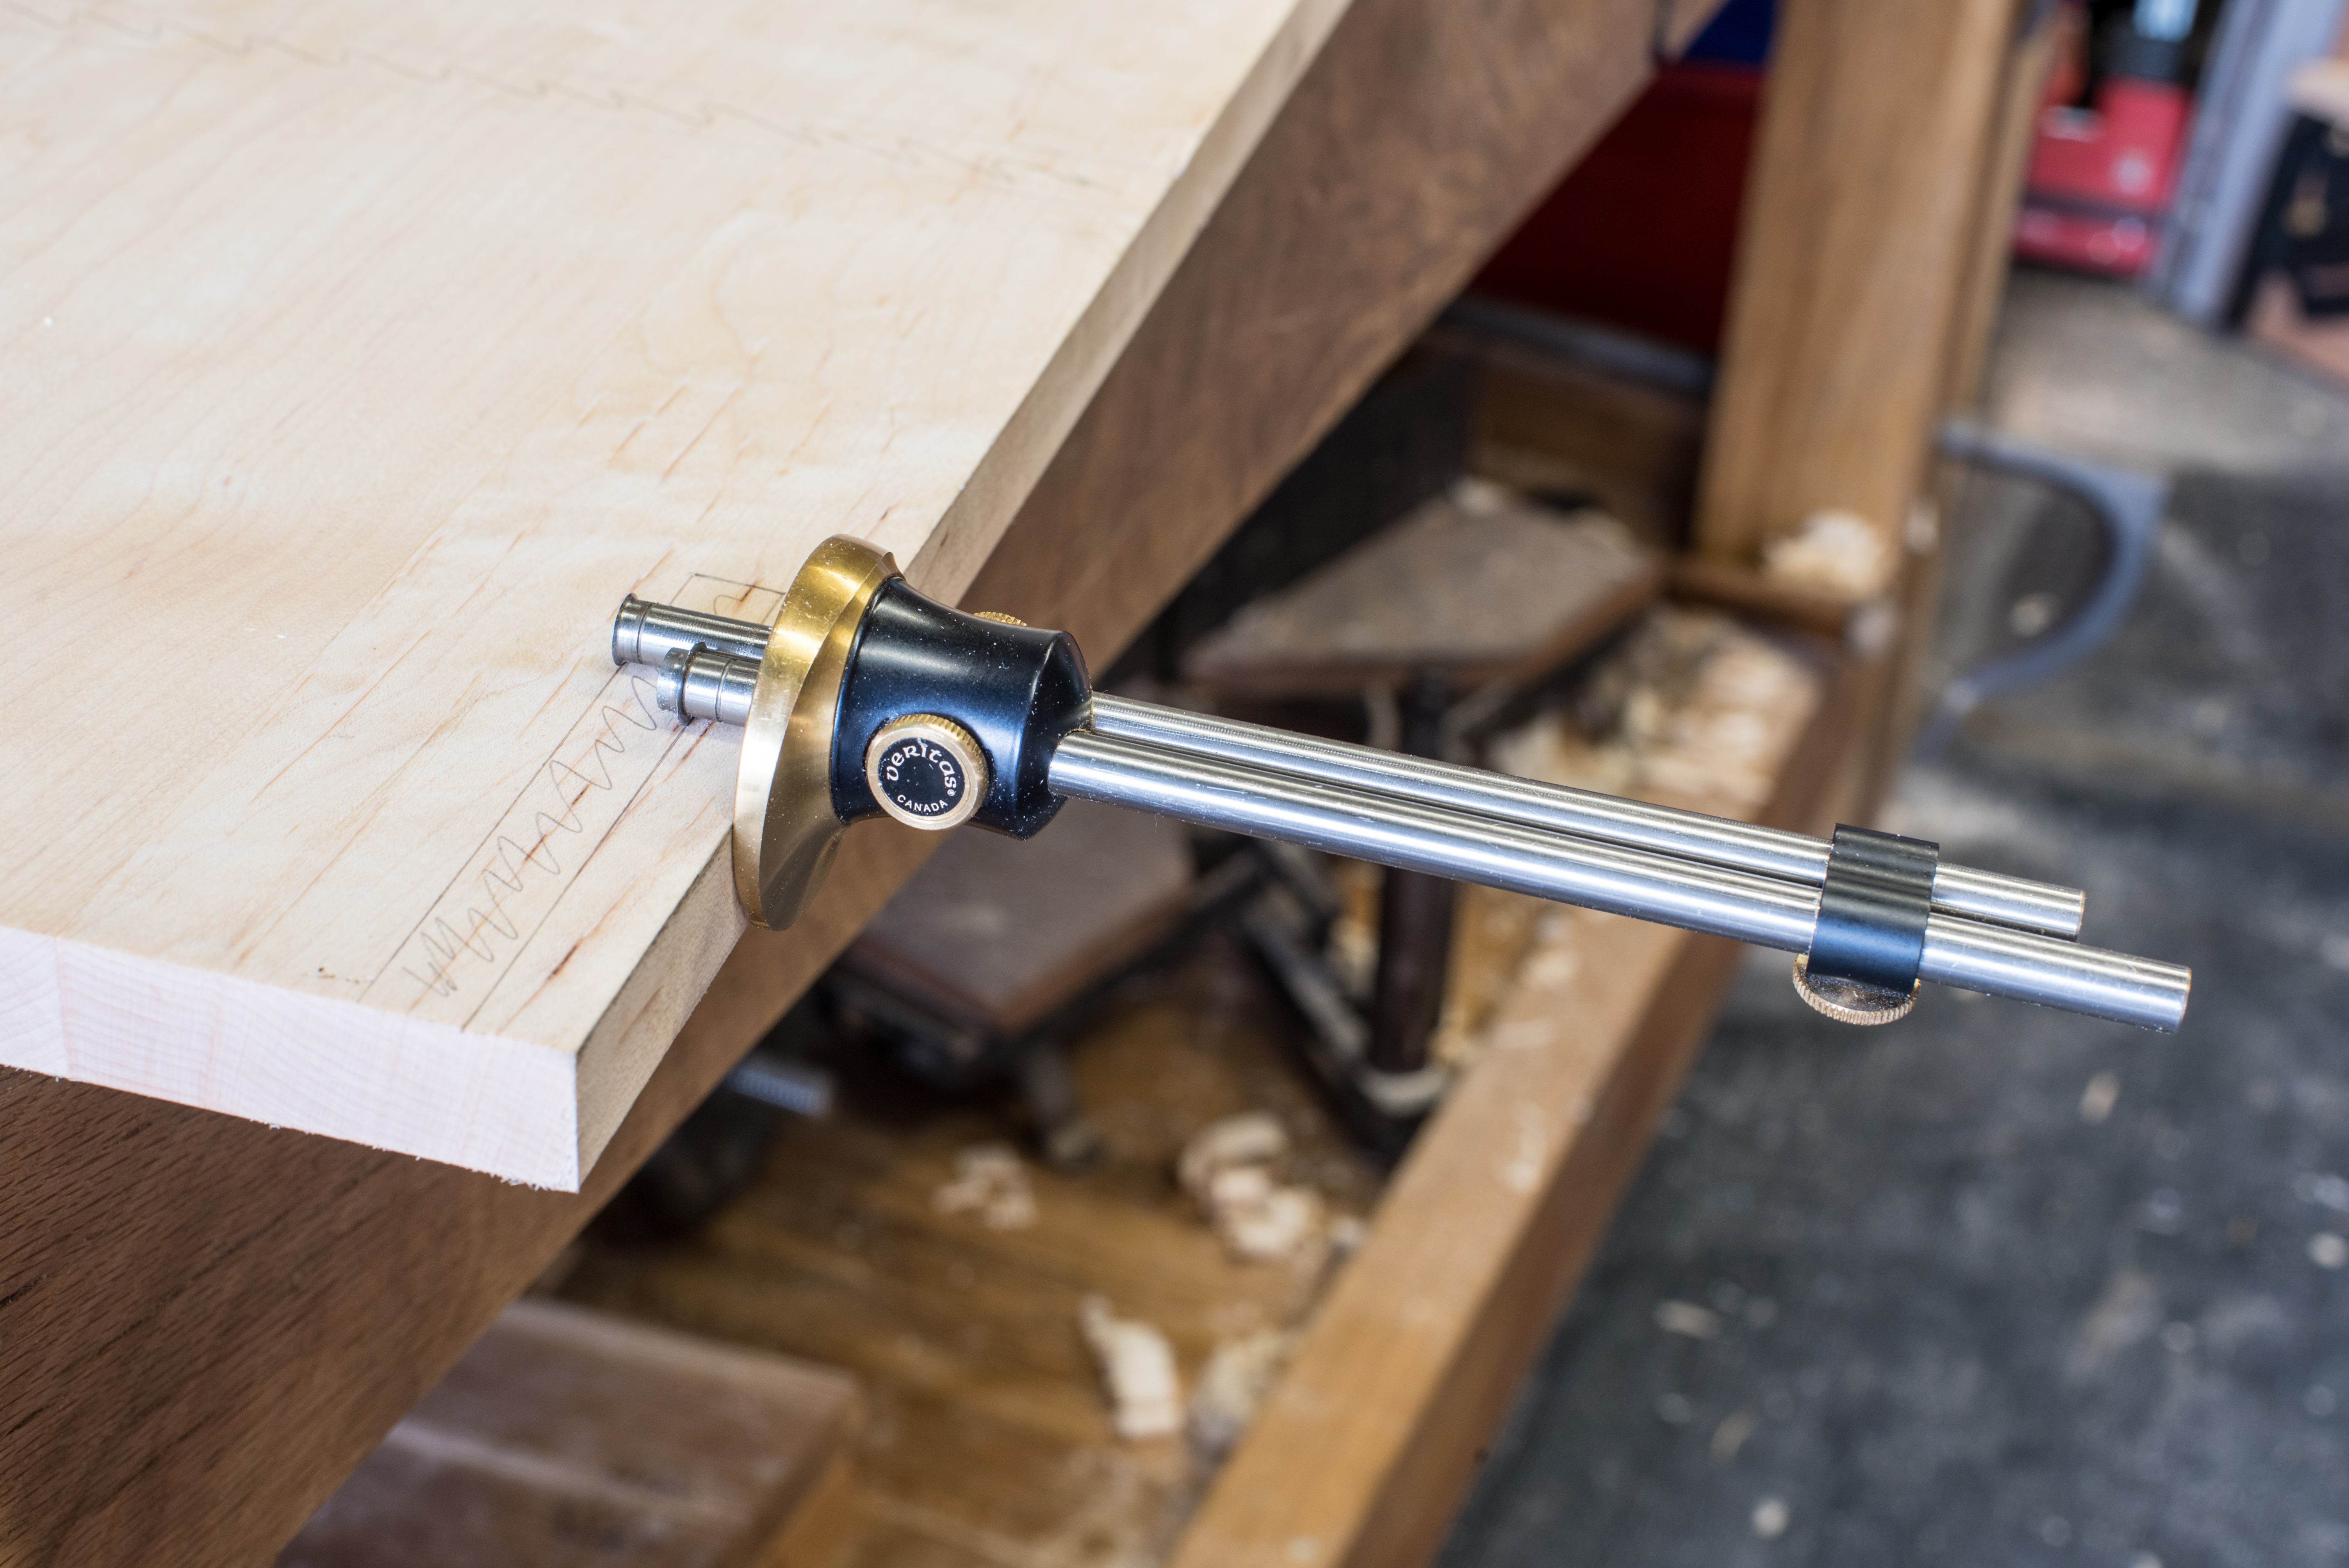
Marking the rebates with the Veritas mortise gauge
I like dados for fitting shelves to casework – its an easy joint to cut, and especially when paired with cut nails, makes for very solid joint. The boarded bookcase calls for three pairs of dados to house the shelves, and a rebate for the top rail. Because I use dados quite frequently I keep thinking about picking up a 3/4″ HNT Gordon rebate plane, but cutting dados the way I describe in this post is quick (each dados takes less than 20 minutes) and fun, so a dedicated plane feels like an extravagance, no matter how pretty they are.

Setting a marking gauge from a chisel provides a quick and repeatable setting
I started by laying out the dados on both side pieces, ensuring that all layout was done from the reference edges. Once the shelf dados were layed out I placed the two sides against each other to check that each layout line was in precisely the same place on both pieces – this prevents layout errors and wonky shelves at a later date. The top rail is set 1/2″ in from the rear edge of the sides, and instead of using two marking gauges (one for each side of the rebate) I used the Veritas mortise gauge, with the two beams set to define the edges of the rebate at the appropriate distance from the edge of the side. The casework also features a kick underneath the lowest shelf. I don’t think Chris fixes this into a rebate when he builds the bookcase, but while I was in a grooving mood I decided to layout a rebate for this element too.
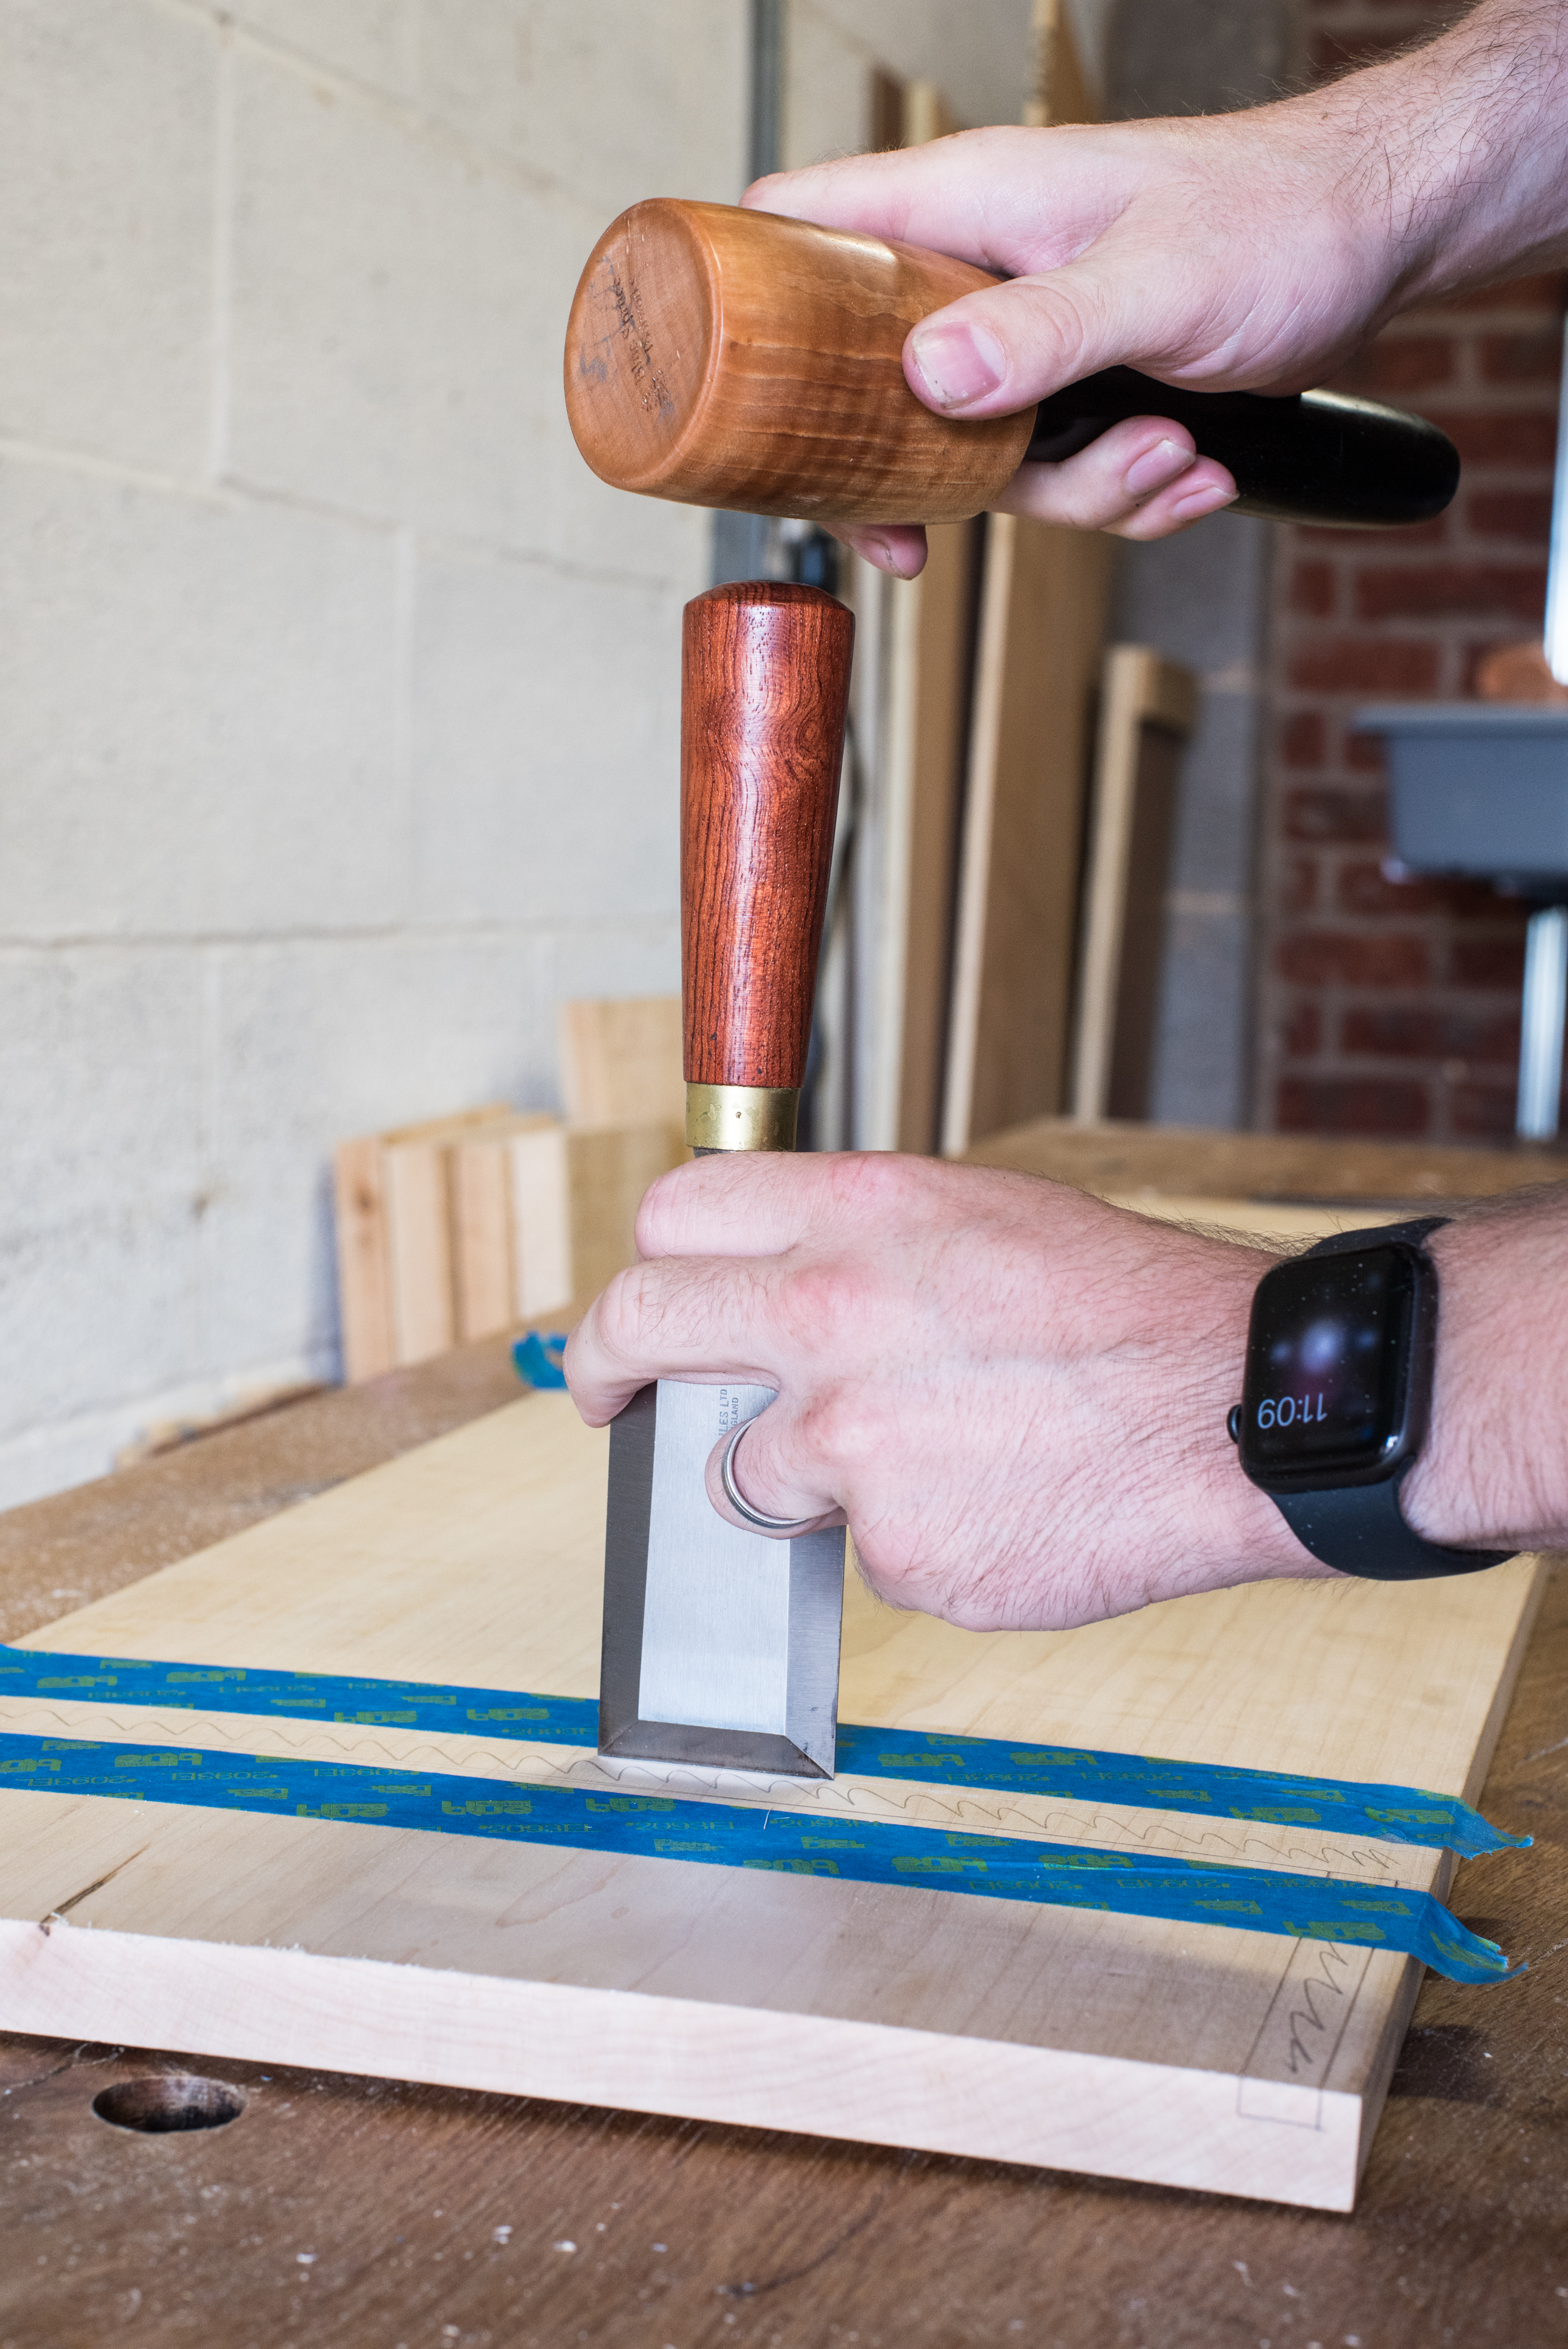
Deepening the layout lines
Once I was happy with the layout on the inner faces of the sides, I transfered the dados onto the front and rear edges so that the depth could be marked out. Where possible I like to set my marking gauges by reference to an object of known thickness rather than trying to line up the cutter with graduations on a ruler – this can be a component of casework, or in this instance a chisel of the right width. This reduces the opportunity for error, and makes for a repeatable setting.
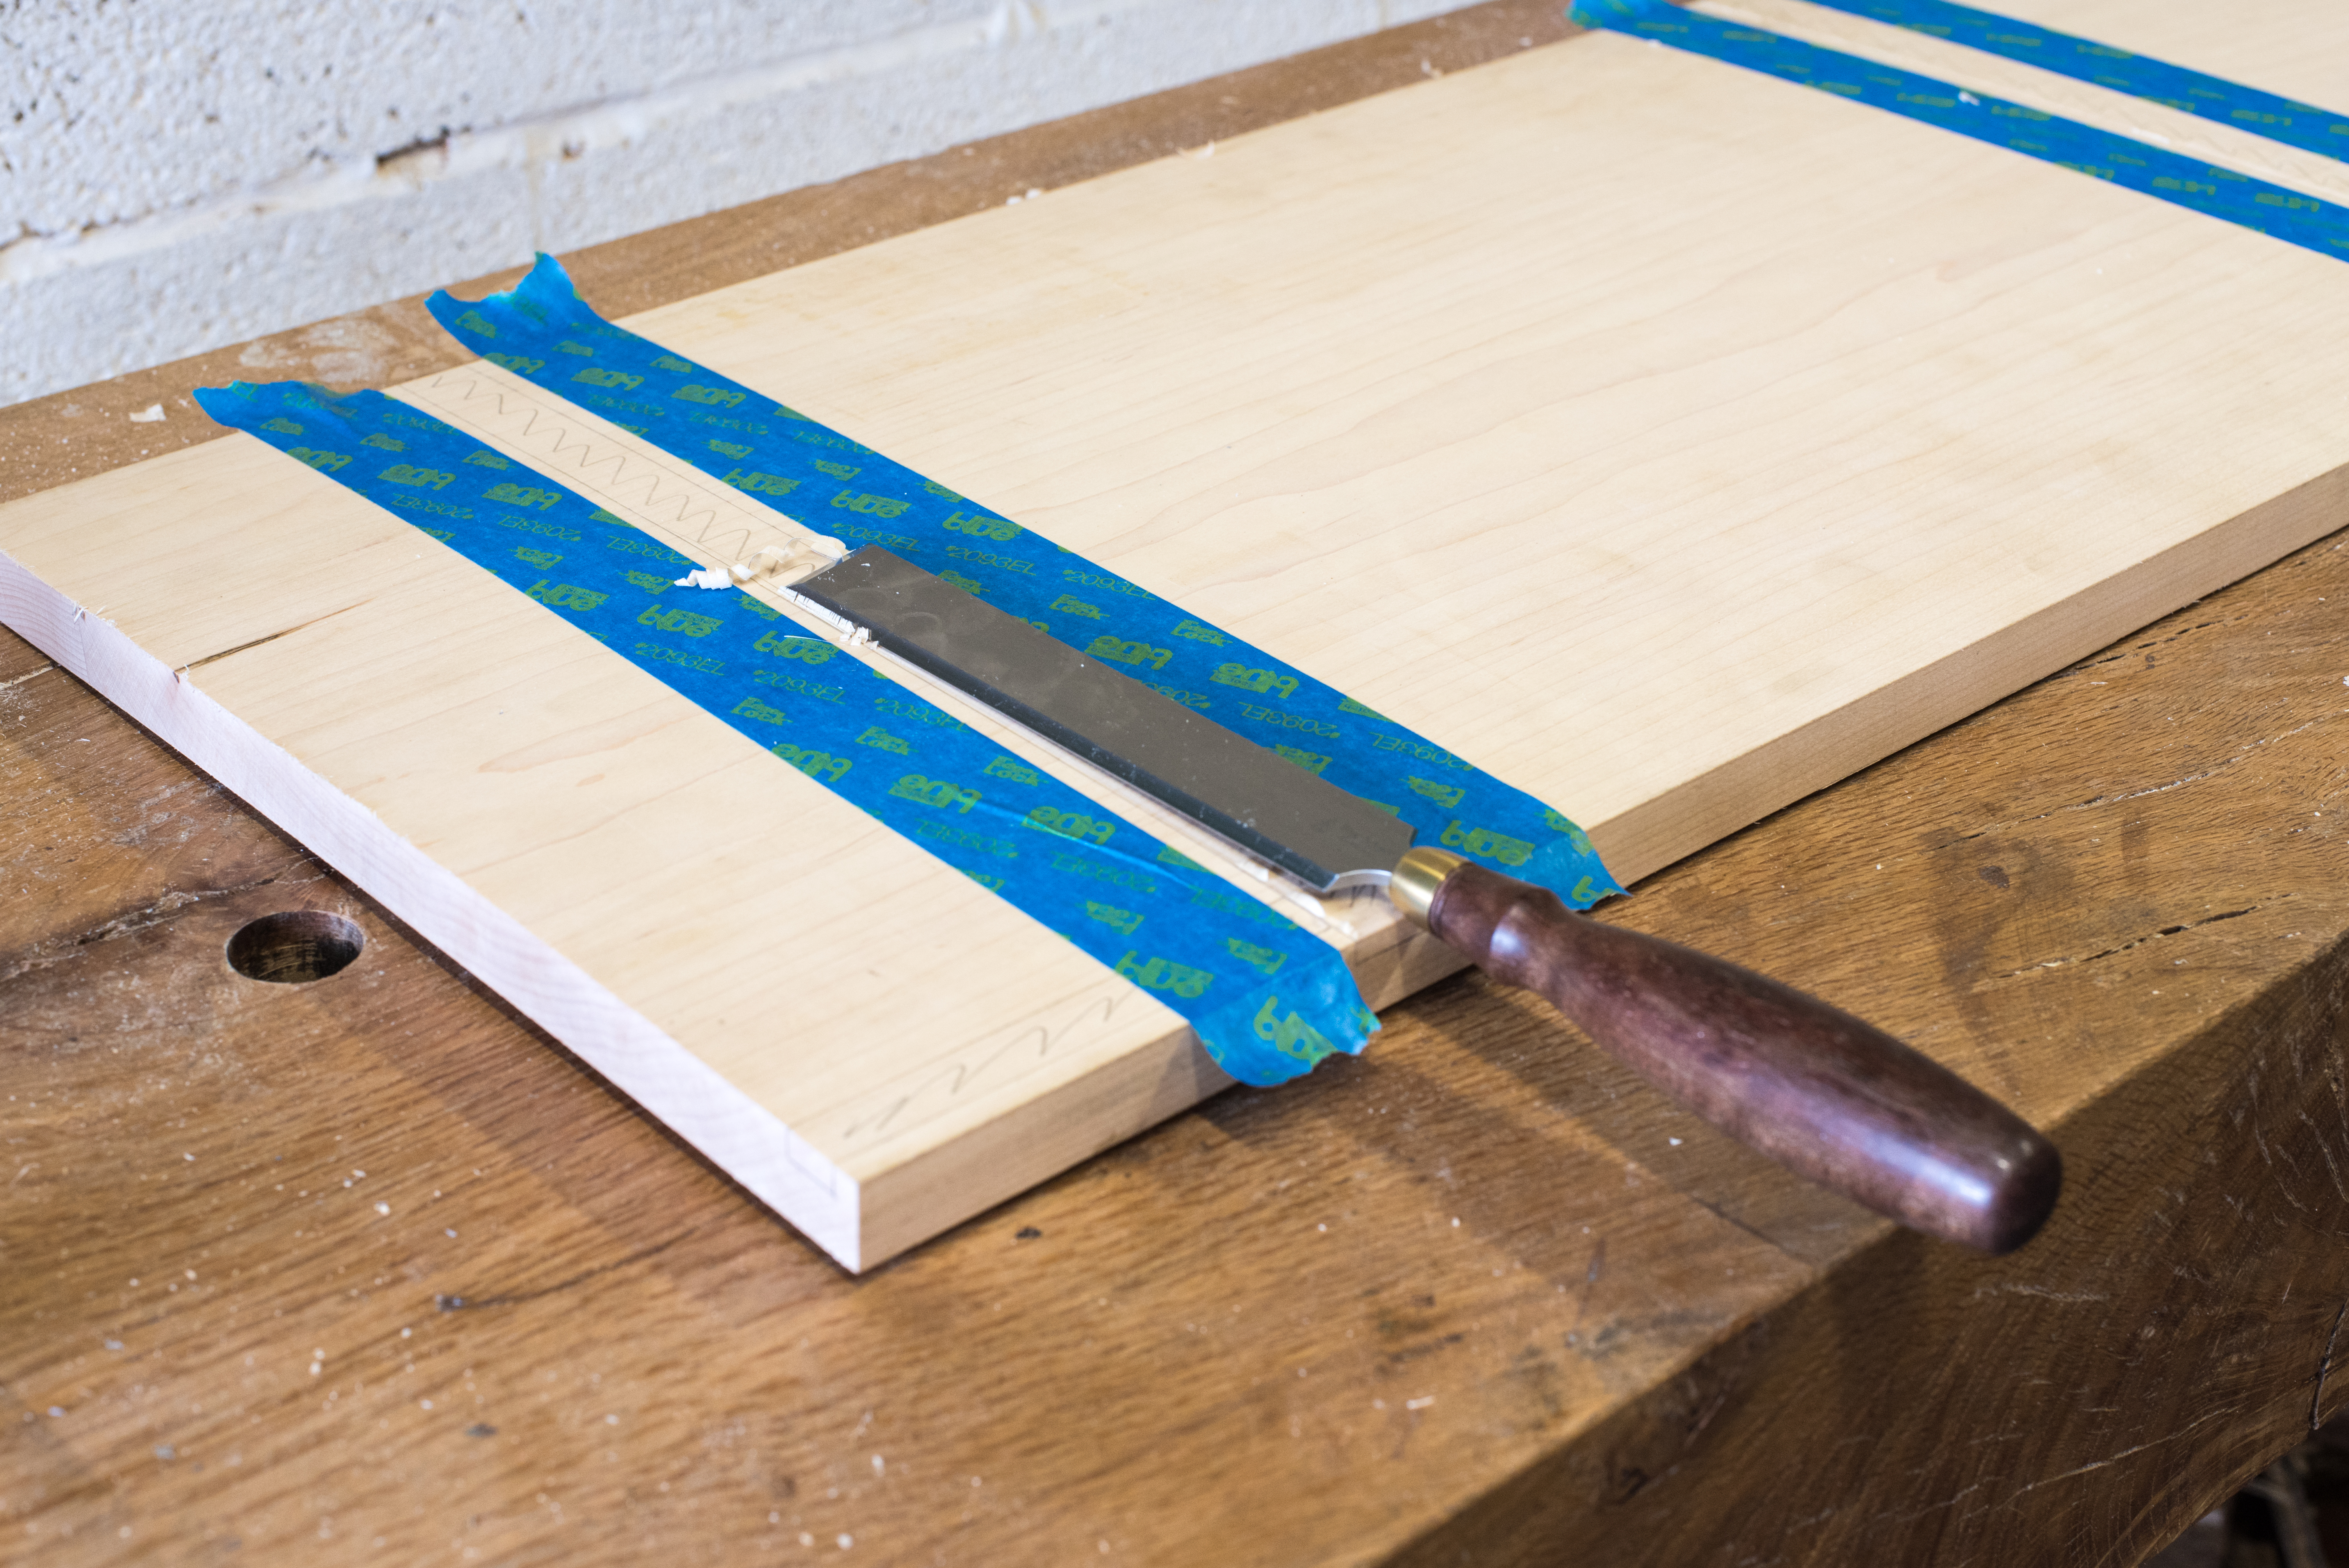
Preparing the first class cut
To cut the dados I use my Bad Axe Bayonet saw, filed hybrid. This saw has been specifically designed for cutting joinery, and the 14″ saw plate and fine kerf make it ideal for dados and other fine joinery. You can read a more detailed review here. Reaching straight for the saw might work, but you may also find the saw plate wandering across the workpiece and marring the surface, which is less than ideal. In the Anarchist’s Design Book, Chris describes using a batten and push stick as a guide for dead nuts straight dados, which is a nice approach. I go about it slightly differently, which shouldn’t be a surprise as there’s at least 17 different and effective ways to undertake any single woodwork operation.
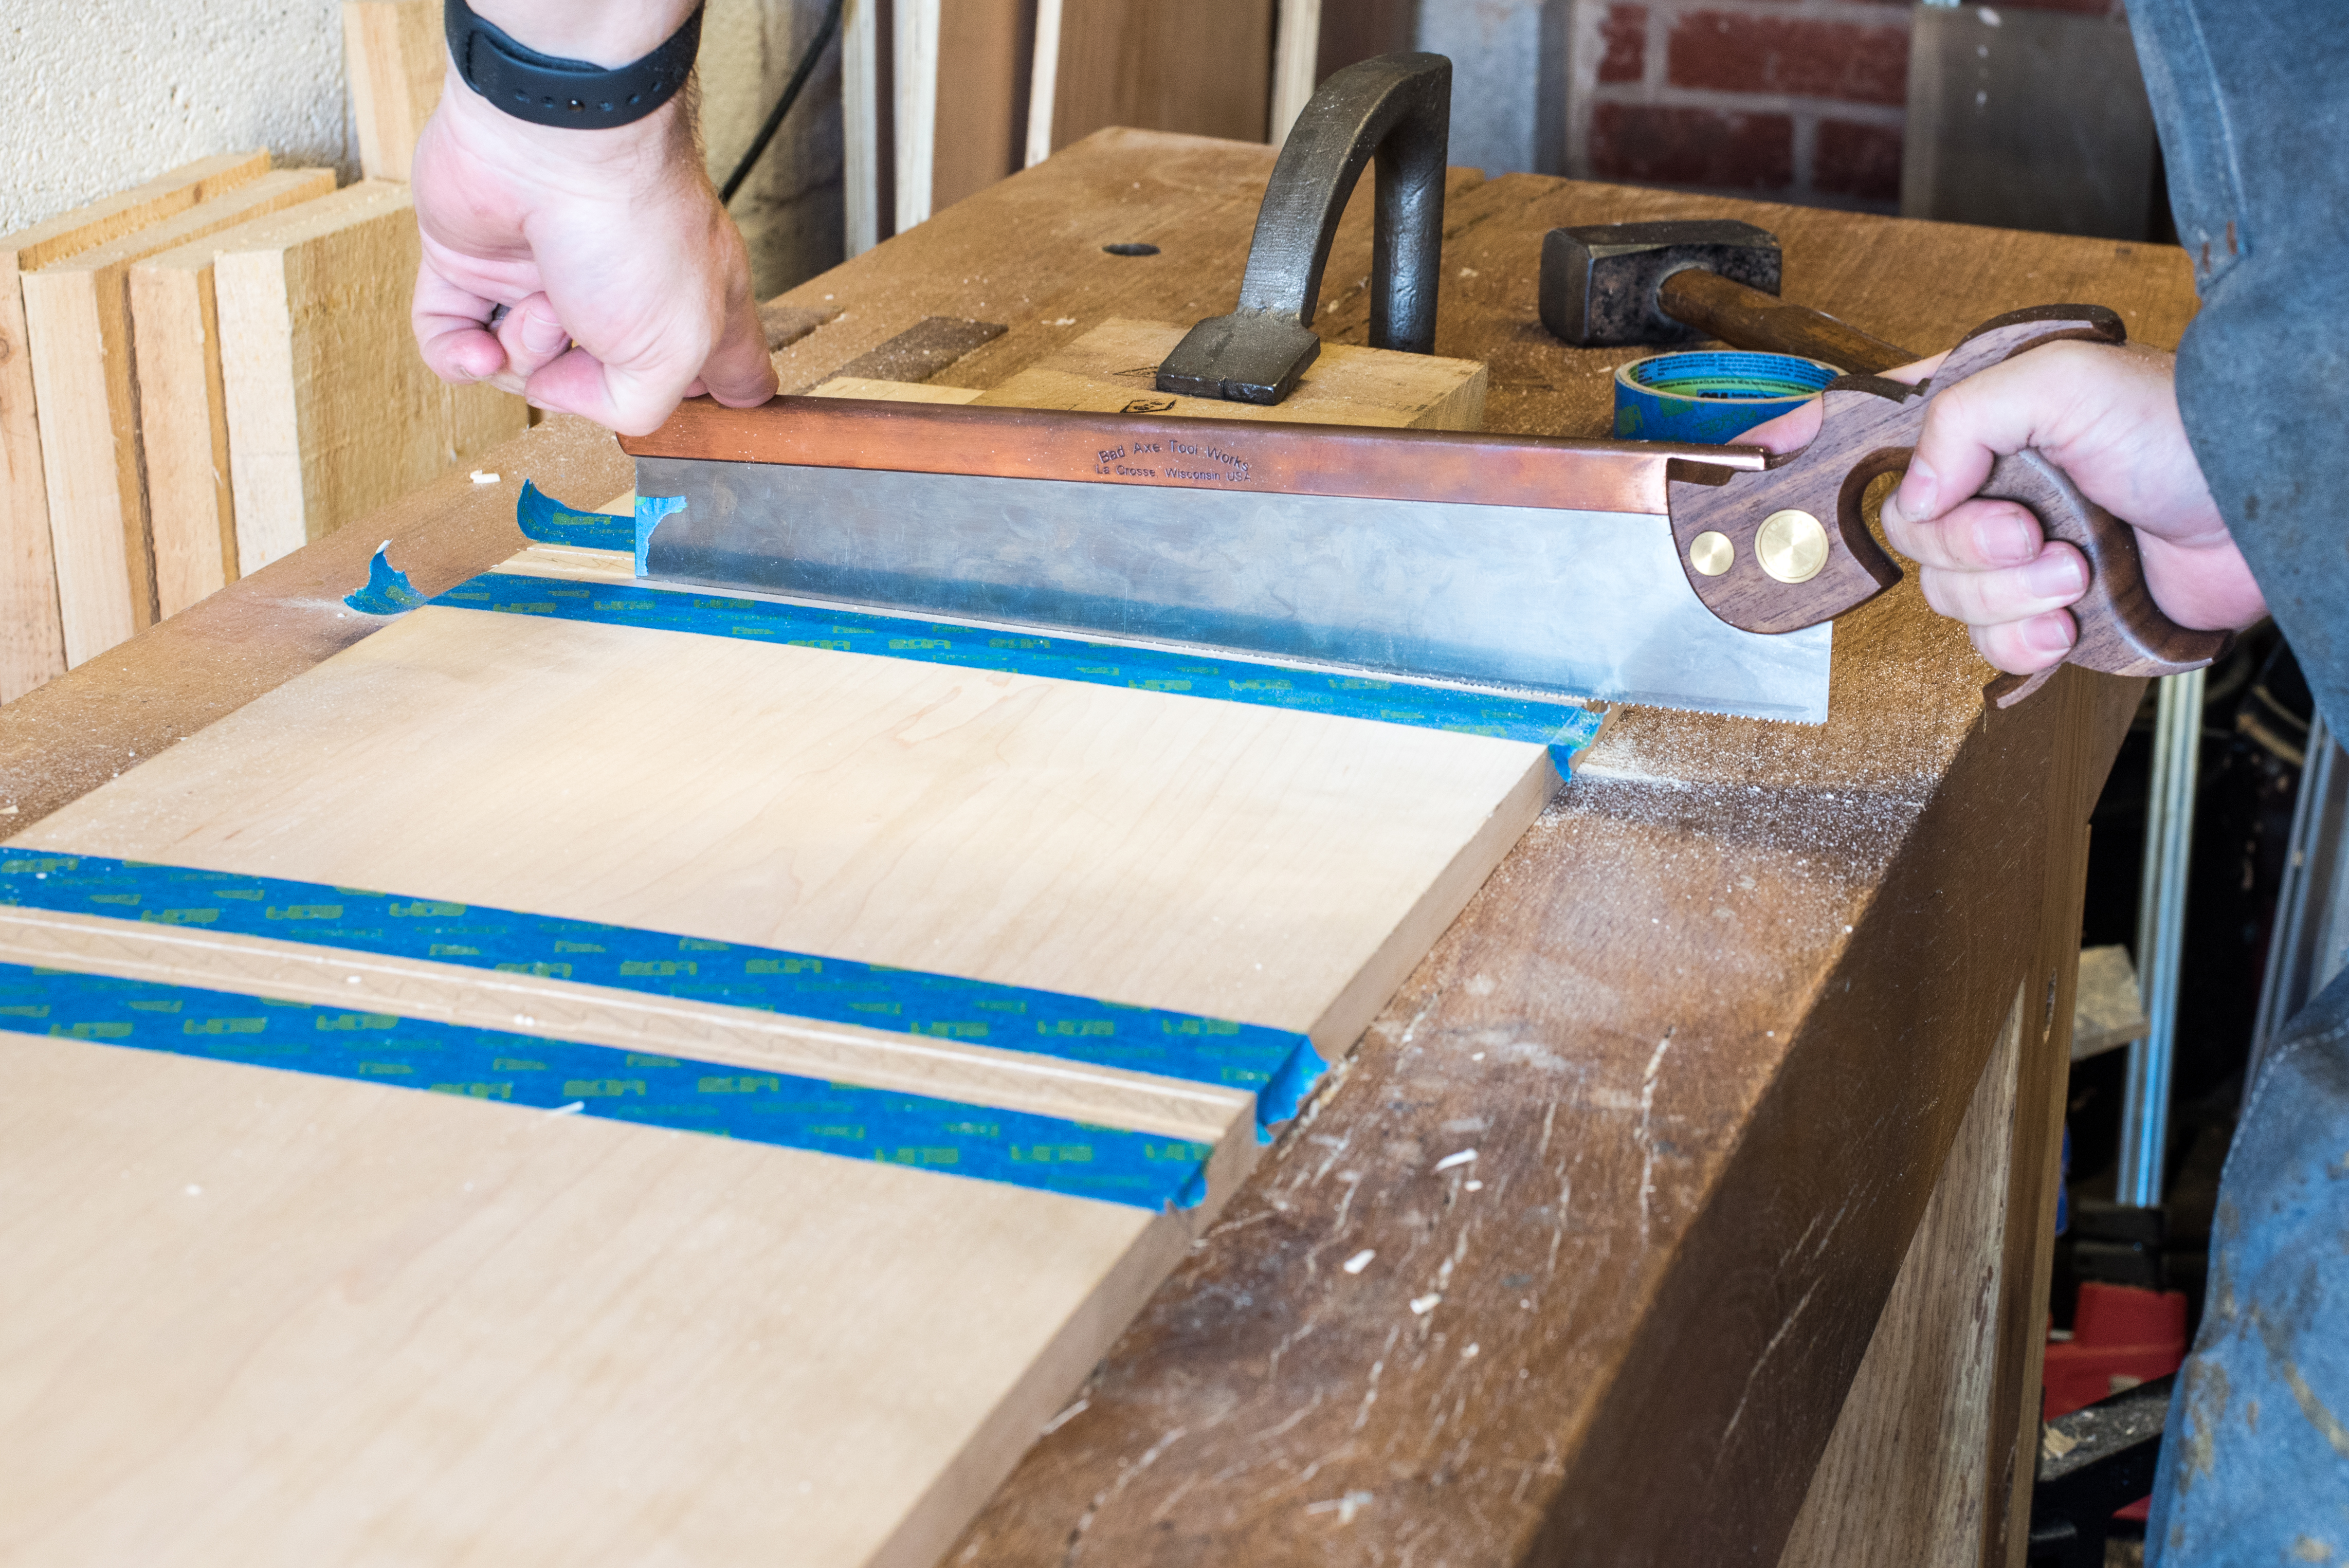
Cutting the walls of the dado with the Bad Axe Bayonet
I use a typical approach for a “first class cut”. First I deepen the knife line with a gentle tap from a mallet on a wide chisel – I keep a 2″ butt chisel precisely for this sort of work and for paring tasks. With the line deepened, a long paring chisel can then cut a trench on the waste side of the line – the aim is to remove a small amount of waste with the layout line providing one wall of a “v” shaped trench. The trench guides the saw, keeping it running true. The first few strokes are gentle, and I keep two fingers of my off hand on the toe of the saw to prevent it from jumping out of the cut. Some lubrication on the saw plate helps too, particularly when the saw is cutting along the full width of the workpiece. A piece of blue tape on the saw plate helps to mark the full depth of the dado.
The majority of the waste can be removed with the chisel bevel-up
Once the saw is cutting at full depth along the length of the dado it’s time to chisel out the waste. Start with the bevel facing up – this is more aggressive and will knock out the waste quickly. It is vital to work from each end of the dado to prevent spelching at the ends. If you watch the saw kerfs it is possible to gauge by eye how much material needs to be removed. As you get closer to the bototm, switch to a bevel-down chisel orientation. Once I am close to the bottom I then move to the router plane to clean up. The router plane is not a bulk removal tool, so it really does help to have removed as much material as possible with a chisel. Placing blue tape either side of the dado helps to avoid marking the surface with the router plane.
Using the chisel bevel down is less aggressive, which is useful as you approach the bottom of the dado
I had limited shop time this weekend, so have a bit of work left to do on one side, but then the joinery will be cut and I can look at assembling the main structure of the bookcase.

Cleaning up the dado with the router plane
Laying out the shelves to avoid bad knots and splits
I had a final push this weekend to finish dimensioning the main components for the boarded bookcase (the sides and shelves), ready for cutting joinery. This largely consisted of bringing the shelves down to the required width, and trimming all parts to final length. All straight forward stuff, although as with every step of this build I’ve found the hard maple means that every process takes longer and requires more frequent sharpening.
Shooting the ends square
I chose to dimension the shelves to their final 12.5″ width before triming to length as this meant that I had less end grain to trim. When carrying out the same process on multiple components I prefer to undertake each step for all of the parts before moving onto the next step. Here, that involved first planing a reference edge square and straight with the No8 jointer for all the shelves, and then marking the width with the Hamilton panel gauge, after which I ripped the excess width with my Disston D8 and then finished up with the No8 jointer plane. Batching up the steps across each board made for a very efficient process, instead of moving thorugh the full operation for the first board, and then starting again for the second and so on.
Once the shelves were down to width I shot one end of each square using the new shooting board, and then using that end to then measure the final length and mark off the opposite end. I trimmed the excess waste using a hybrid filed tenon saw – the shooting board makes a very efficient bench hook for wide pieces which my standard bench hooks would struggle with, and then shot the end square with the Lie-Nielsen No51. The new shooting board worked very well – the track keeps the plane travelling true with minimal friction, and the fence mechanism is solid and reliable. Shooting end grain square is a critical step, but can feel like a real chore if your shooting board is fussy or unreliable, but after putting in an extended shooting session, I’m pleased to report that the Veritas hardware feels reliable and sturdy (this is not an ad – I paid full price for the hardware, etc). Having a 24″ square shooting board has also proved to be very useful for these larger pieces – yes it is overbuilt, but I doubt I’ll ever find myself complaining that the desk does not support the workpiece sufficiently.
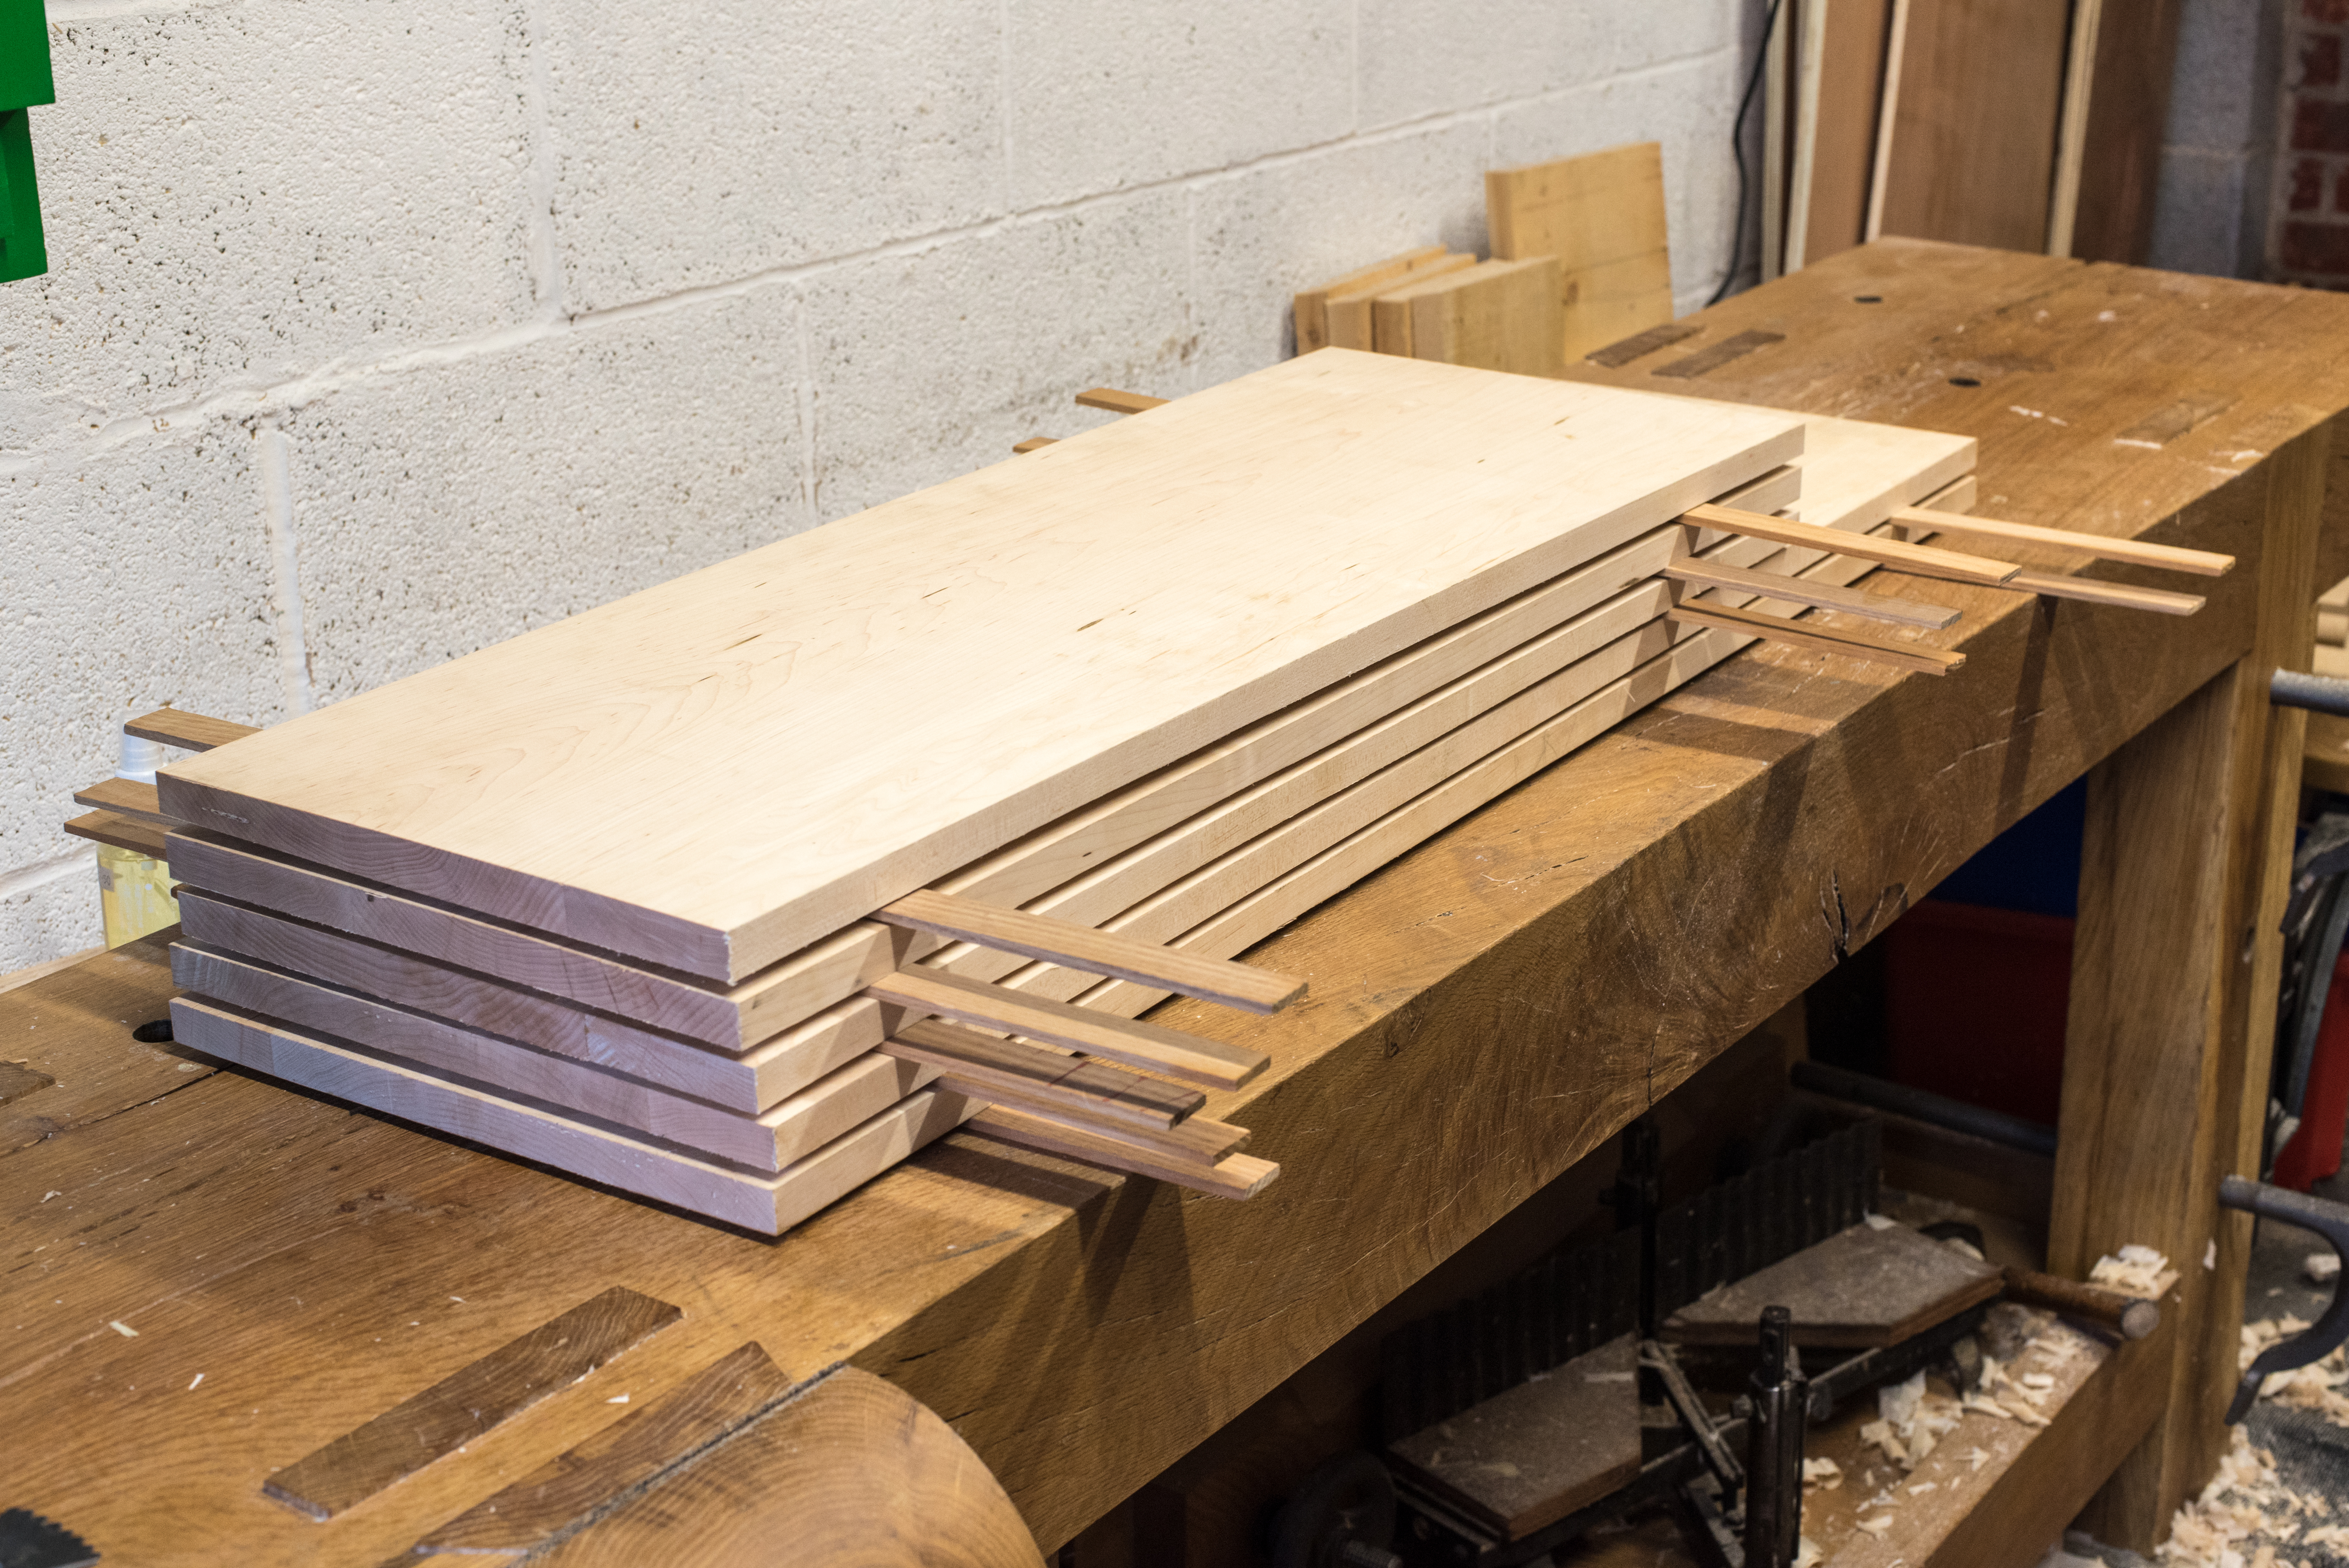
Dimensioned and ready for joinery
Once the shelves were dimensioned I then trimmed the sides to final length using the shooting board. These components are now lying in stick ready for the joinery to be cut. While that stack of boards doesn’t look like much, it has been a fair amount of work to glue up 6 panels and dimension them all by hand, especially in unforgiving hard maple. I’m looking forward to the fun stuff coming up (joinery!), and then gluing up the main structure of the bookcase.
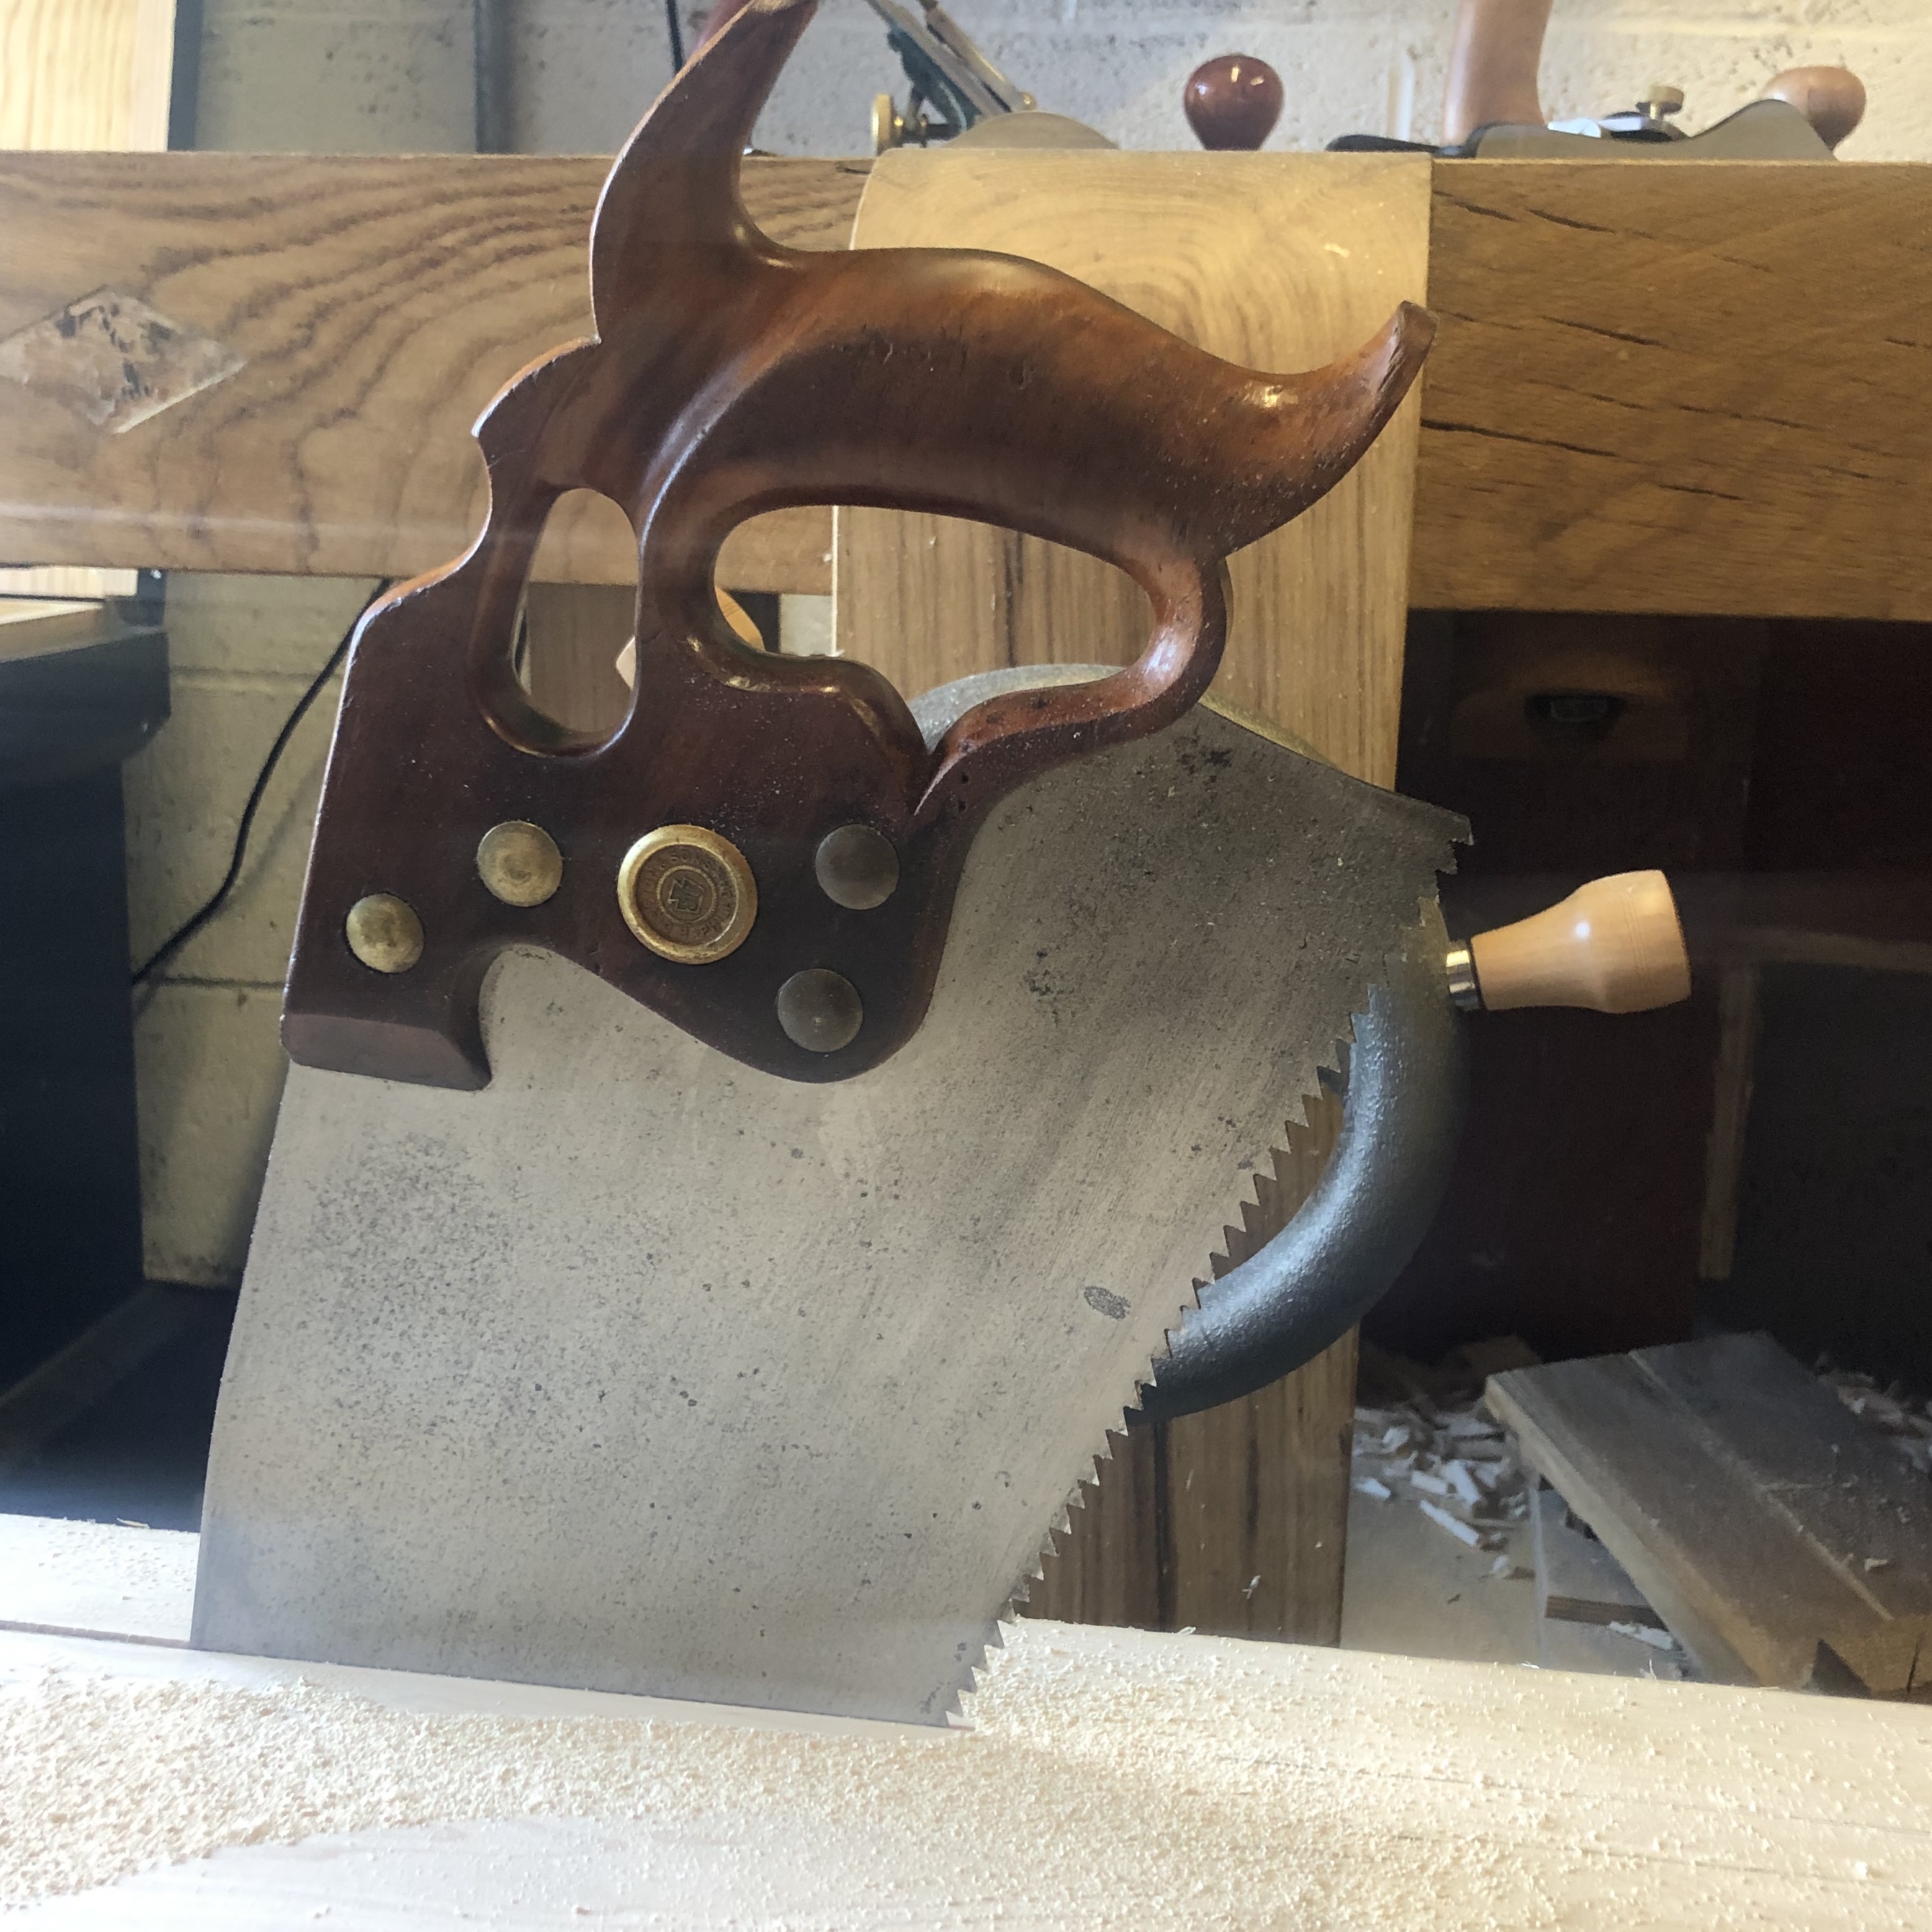
This old girl is 120 years old and still cuts the line like she’s on rails
I’ve now got one shelf left to process and then I’ll be ready to cut the joinery for the boarded bookcase. Processing the shelves has been a lot quicker thanks to only smoothing the show face (the top surface of the shelf) and leaving the underside scalloped texture from traversing with the No5 plane. This approach is consistent with how the furniture record shows historic makers treating secondary surfaces, and the change in texture offers a pleasant change for those who explore the finished piece.
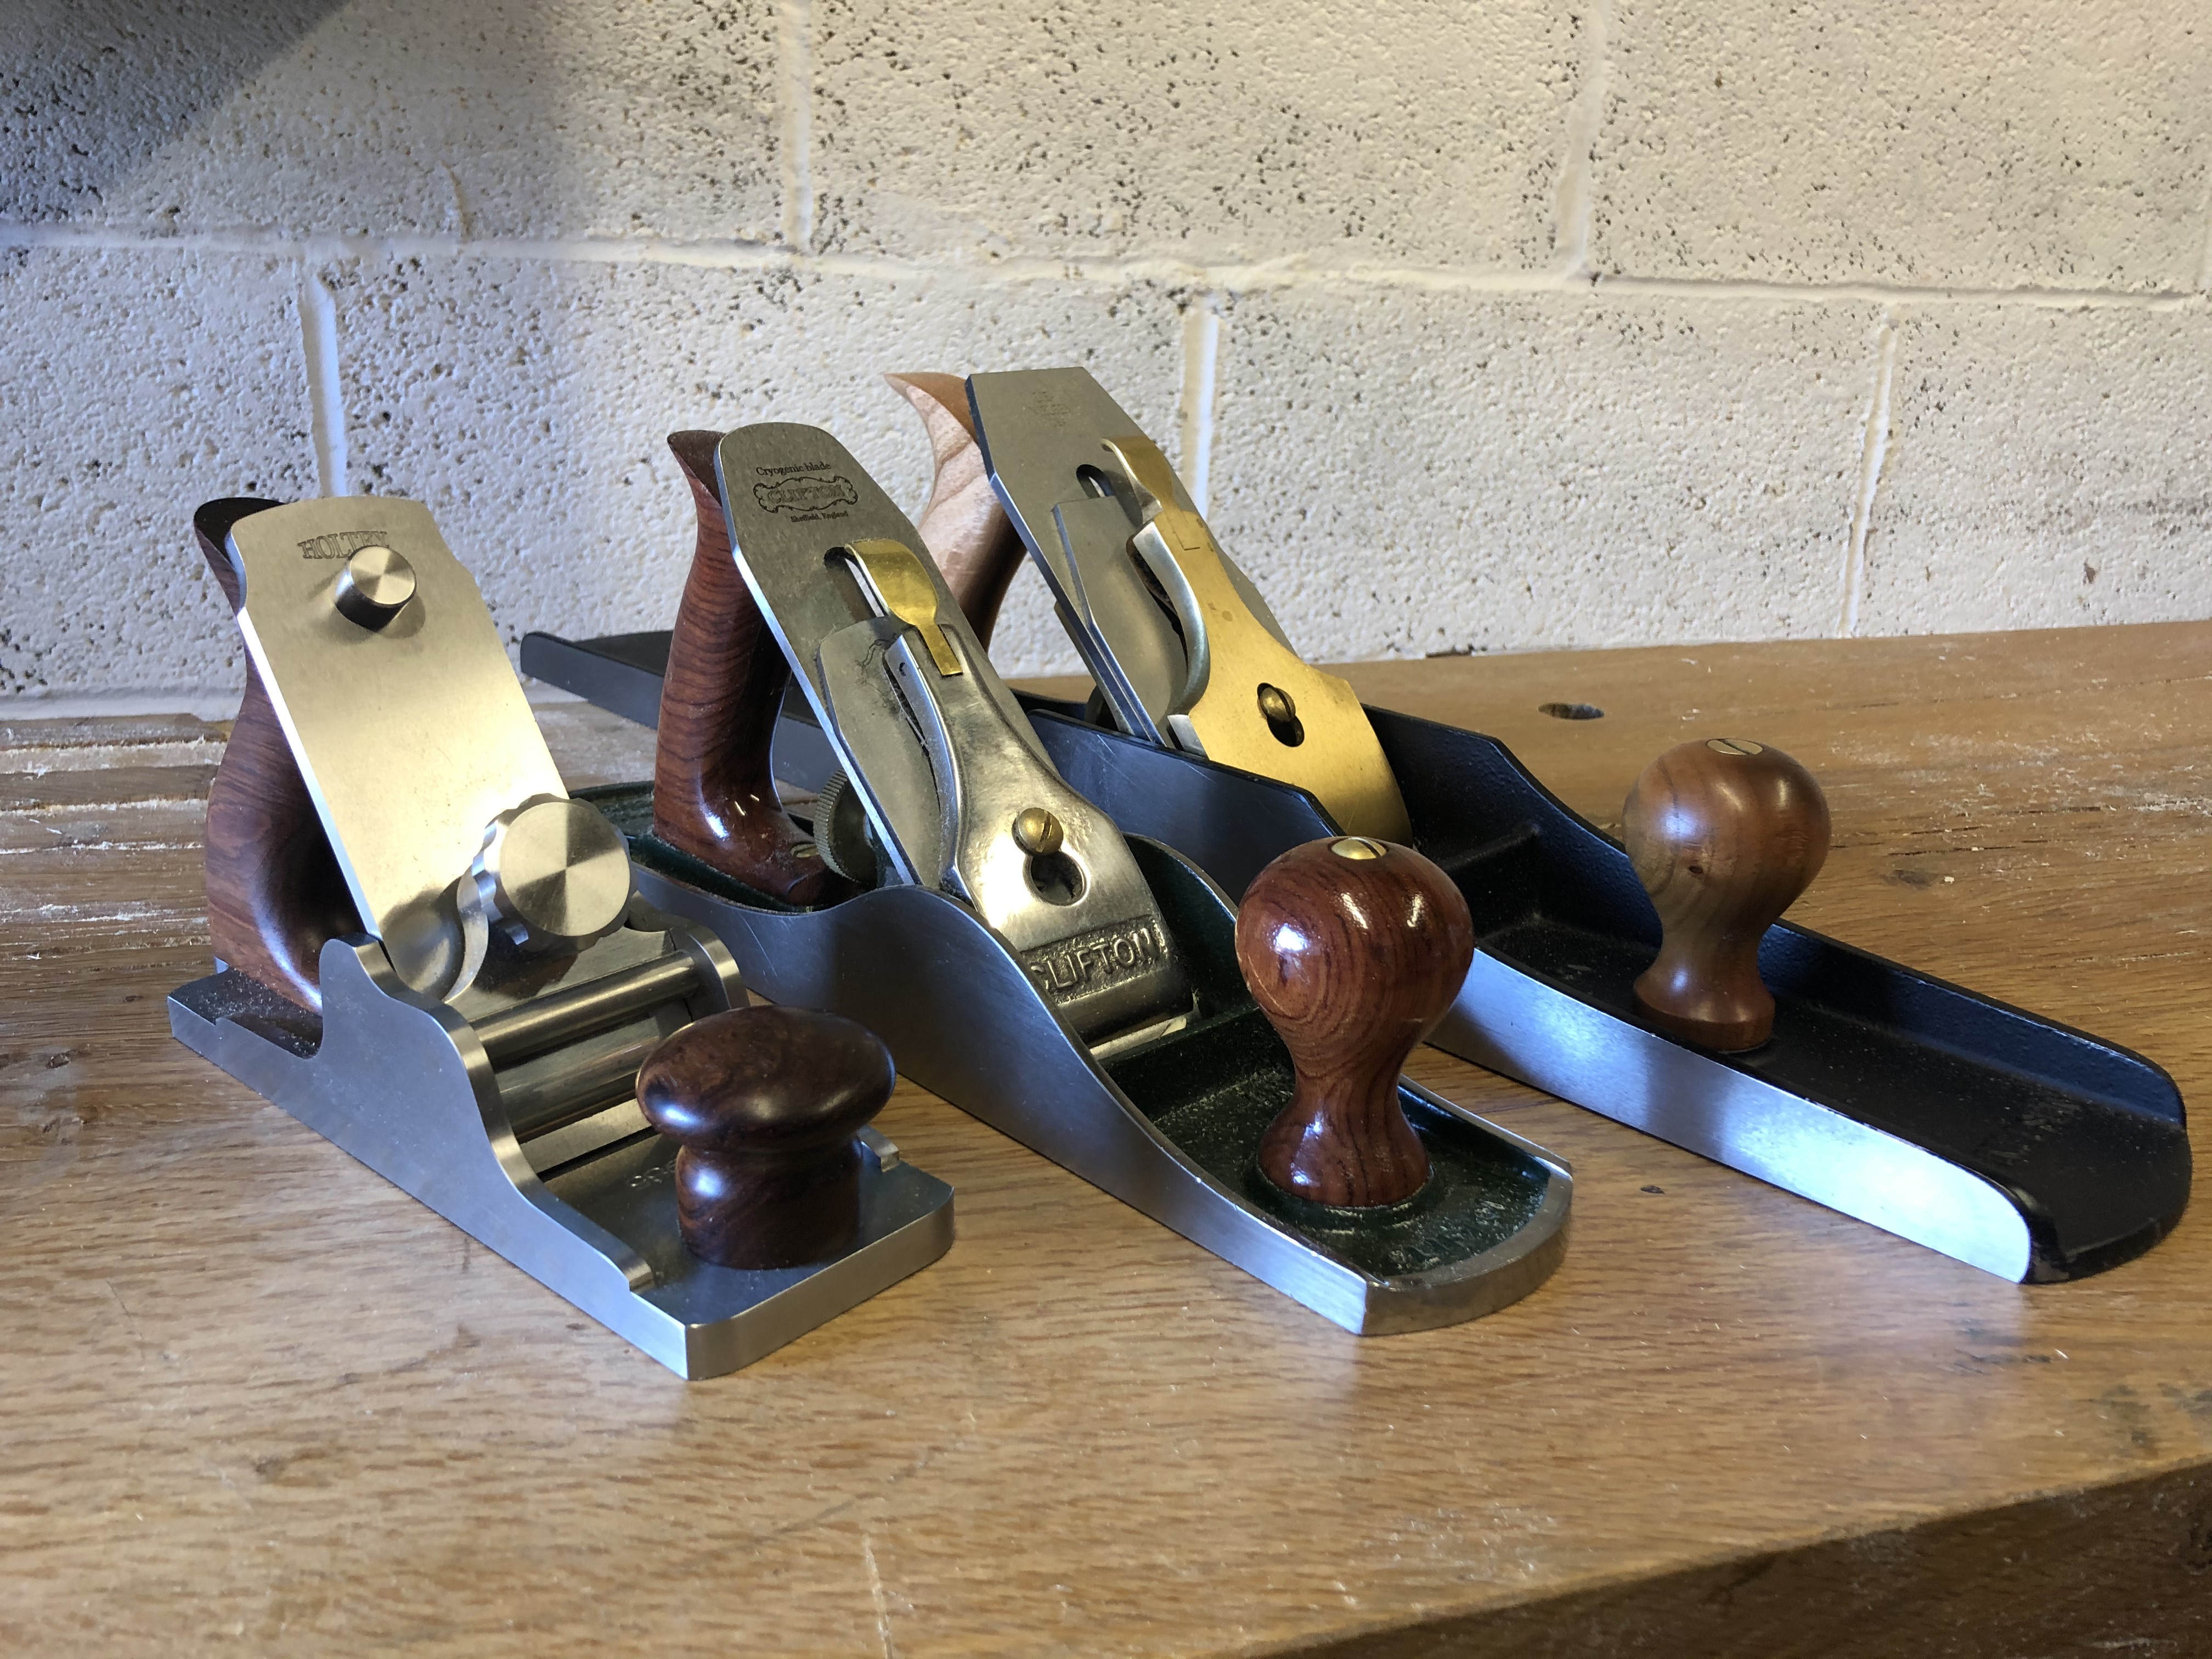
Workhorses
Not that smoothing and achieving a perfect glassy surface is a chore, but it does take time. At the moment I’m putting a Holtey 985 through its paces in readiness for an article which will be in print later this year. Sadly the plane will then be returned to Karl, but it’s been a very interesting experience using a high-end handmade plane. If you want to know whether a plane that costs more than a family car is worthwhile, and the design process of one of the greatest plane makers in the world, then stay tuned for more details soon.
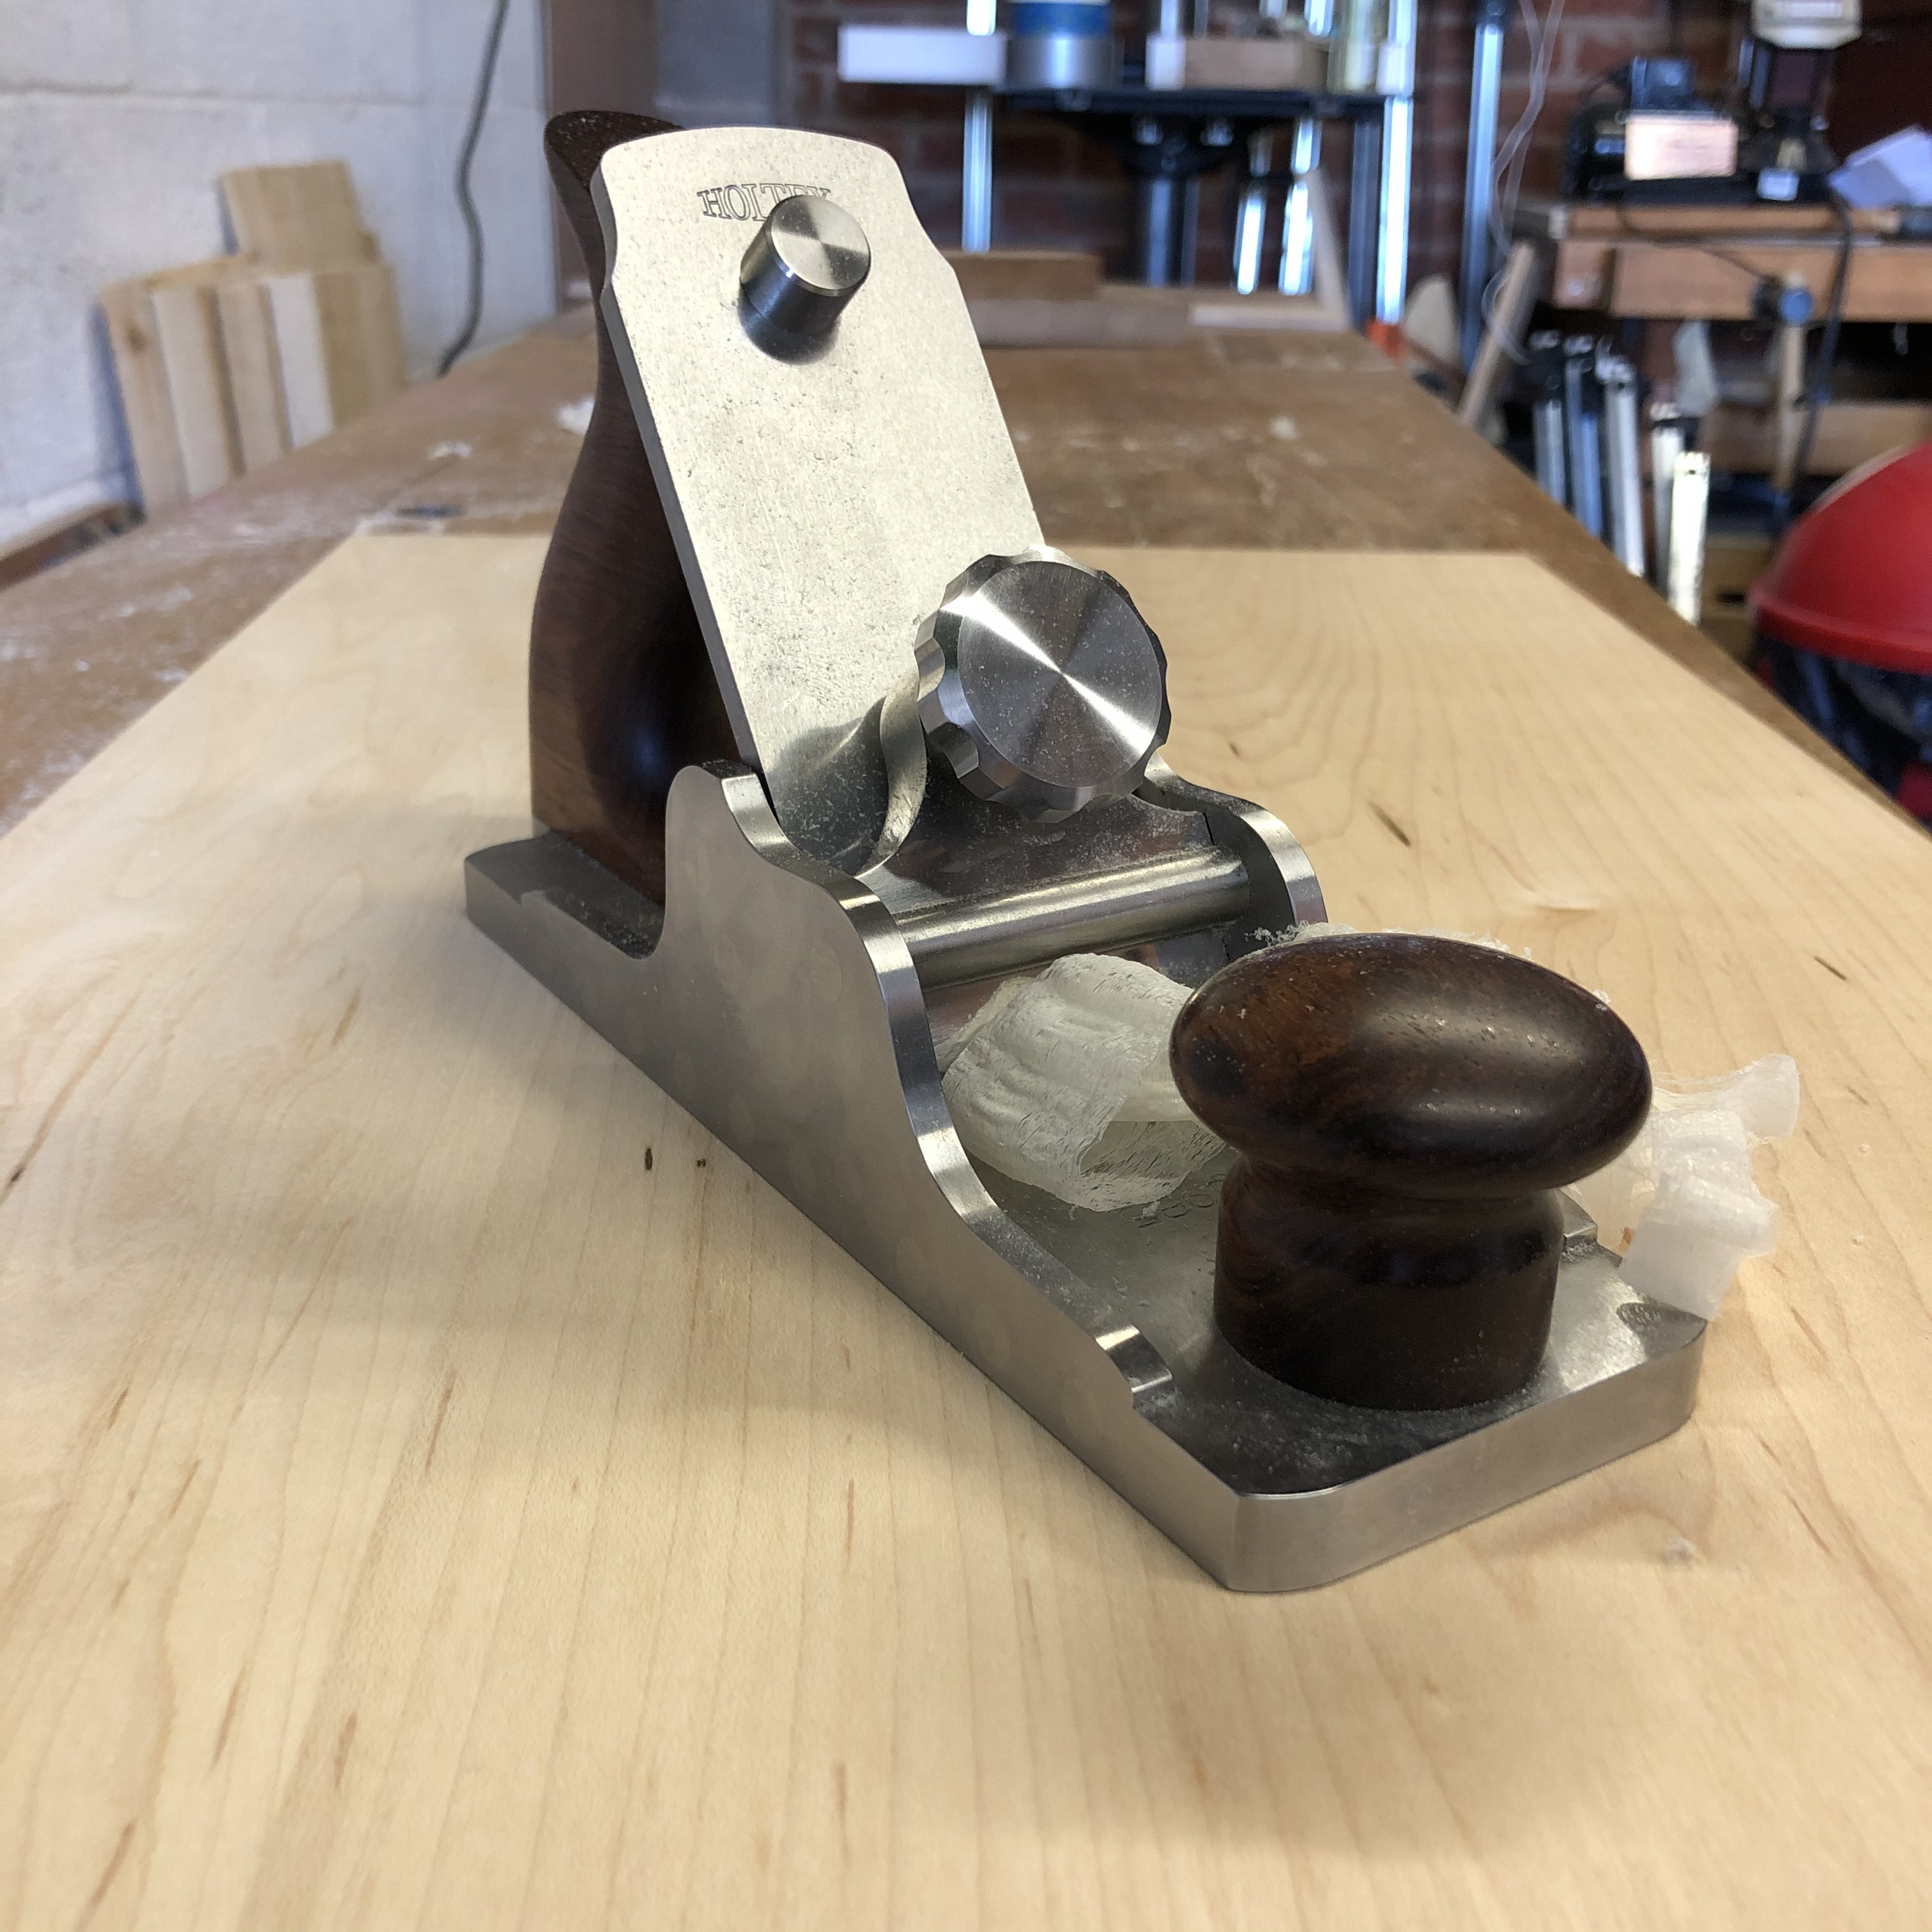
Flawless finish on truculent maple courtesy of Karl Holtey
My process for the shelves has been to joint the boards oversized, and then once the glue has cured rip them to 1/2″ over-width using my Disston D8 (which turned 120 years old this year). The shelves will be orientated so that the widest board of each is at the front of the bookcase. The shelves are then flattened and surfaced on the show face, and then thicknessed from the underside by traversing with the jack plane. Working to the layout lines when thicknessing the shelves means that shelves will be flat and straight from traversing, so no other work is needed. Then it is a case of jointing the edges. I’ve not yet shot the ends of any of the components square yet, because I have the Veritas fence and track for a new shooting board waiting to be installed, but need to venture down to my local timber yard for some baltic ply. Shooting the sides and shelves to length should be quite a quick task once the shooting board is assembled, and then I can get on with the fun work of cutting joinery (six dados to fit the shelves to the sides). There’s not been much to write about with this build so far, which is why the blog has been a bit quieter than usual. But that should change once we get to the joinery.
… you already know the answer.
When I cleaned up the first panel for the boarded bookcase (which I’d glued up back in September 2018) I found a joint that was structurally sound but the glue-line for which was far mor visible than I would have liked. This panel was for one of the bookcase sides, and so would be one of the most pominent components of the finished piece.
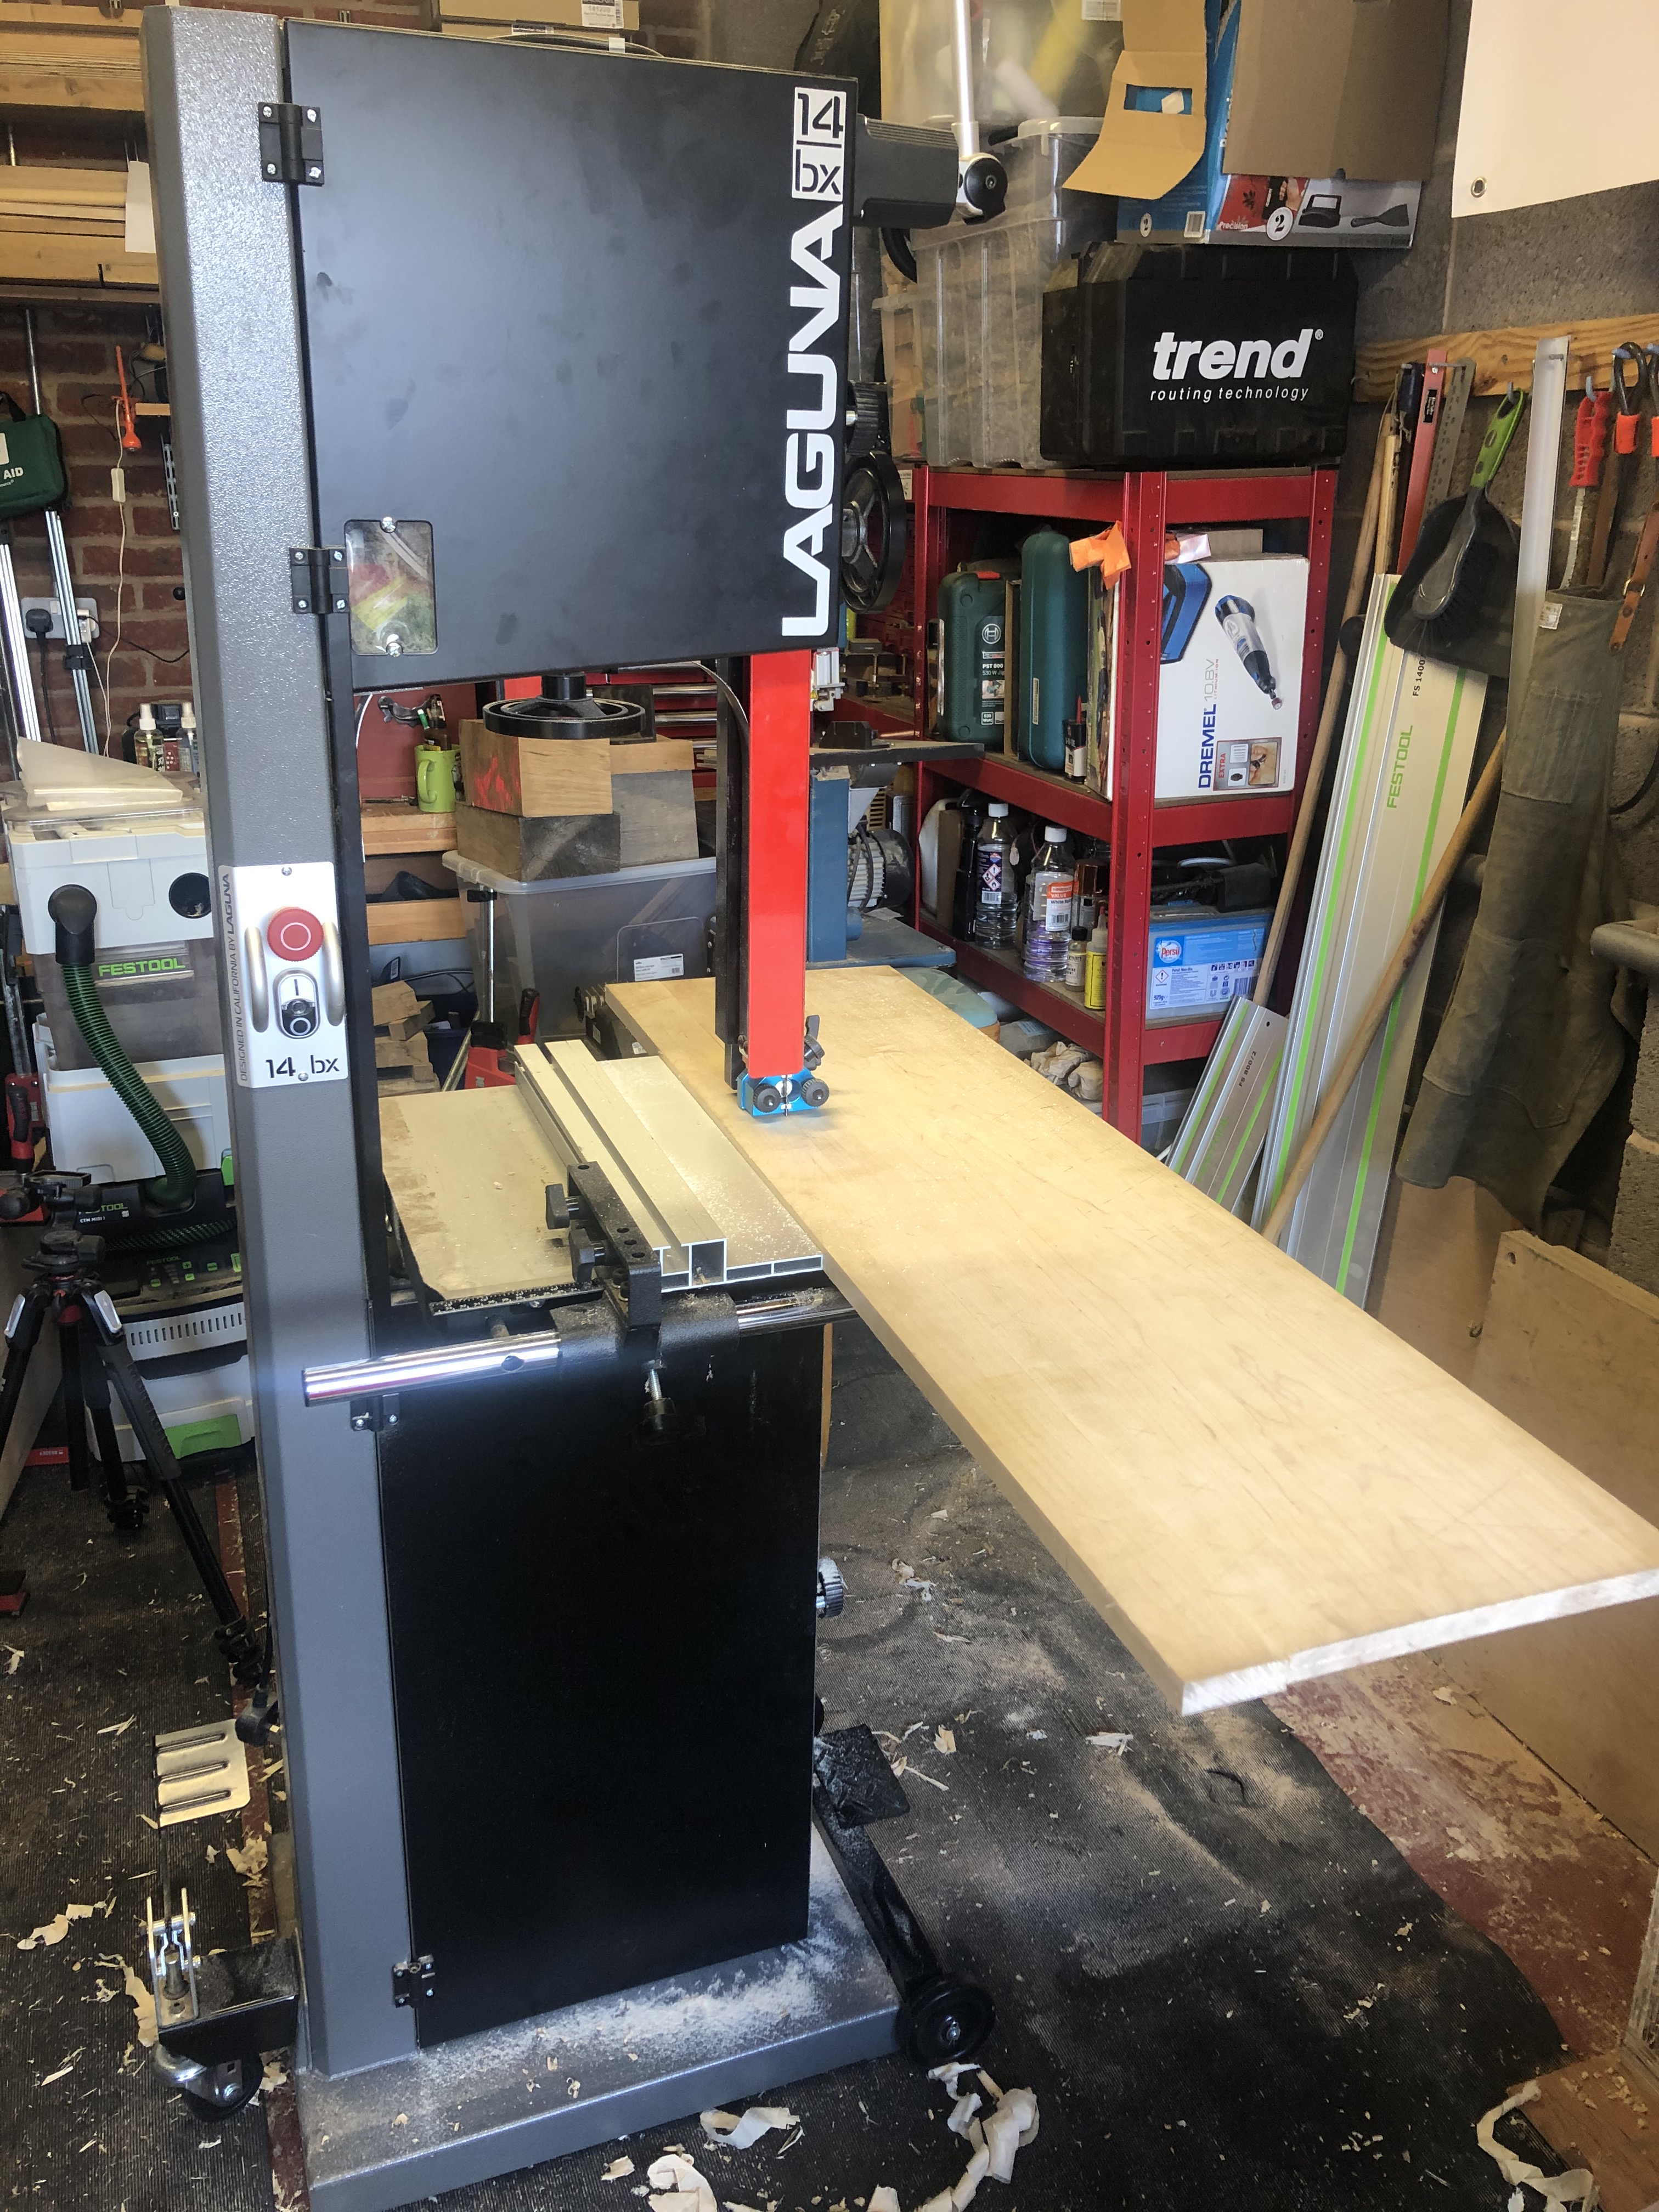
The bandsaw made removing the waste a precise and predictable exercise
What followed was hours of agonising:
In the end, I did what I should have done when I first cleaned up the panel and decided I wasn’t happy with the joint – I cut it down and re-jointed. Which all in all took a lot less time than the several weeks of obsessing over whether I could live with the original joint or not. If you have to ask the question, chances are you already know the answer.
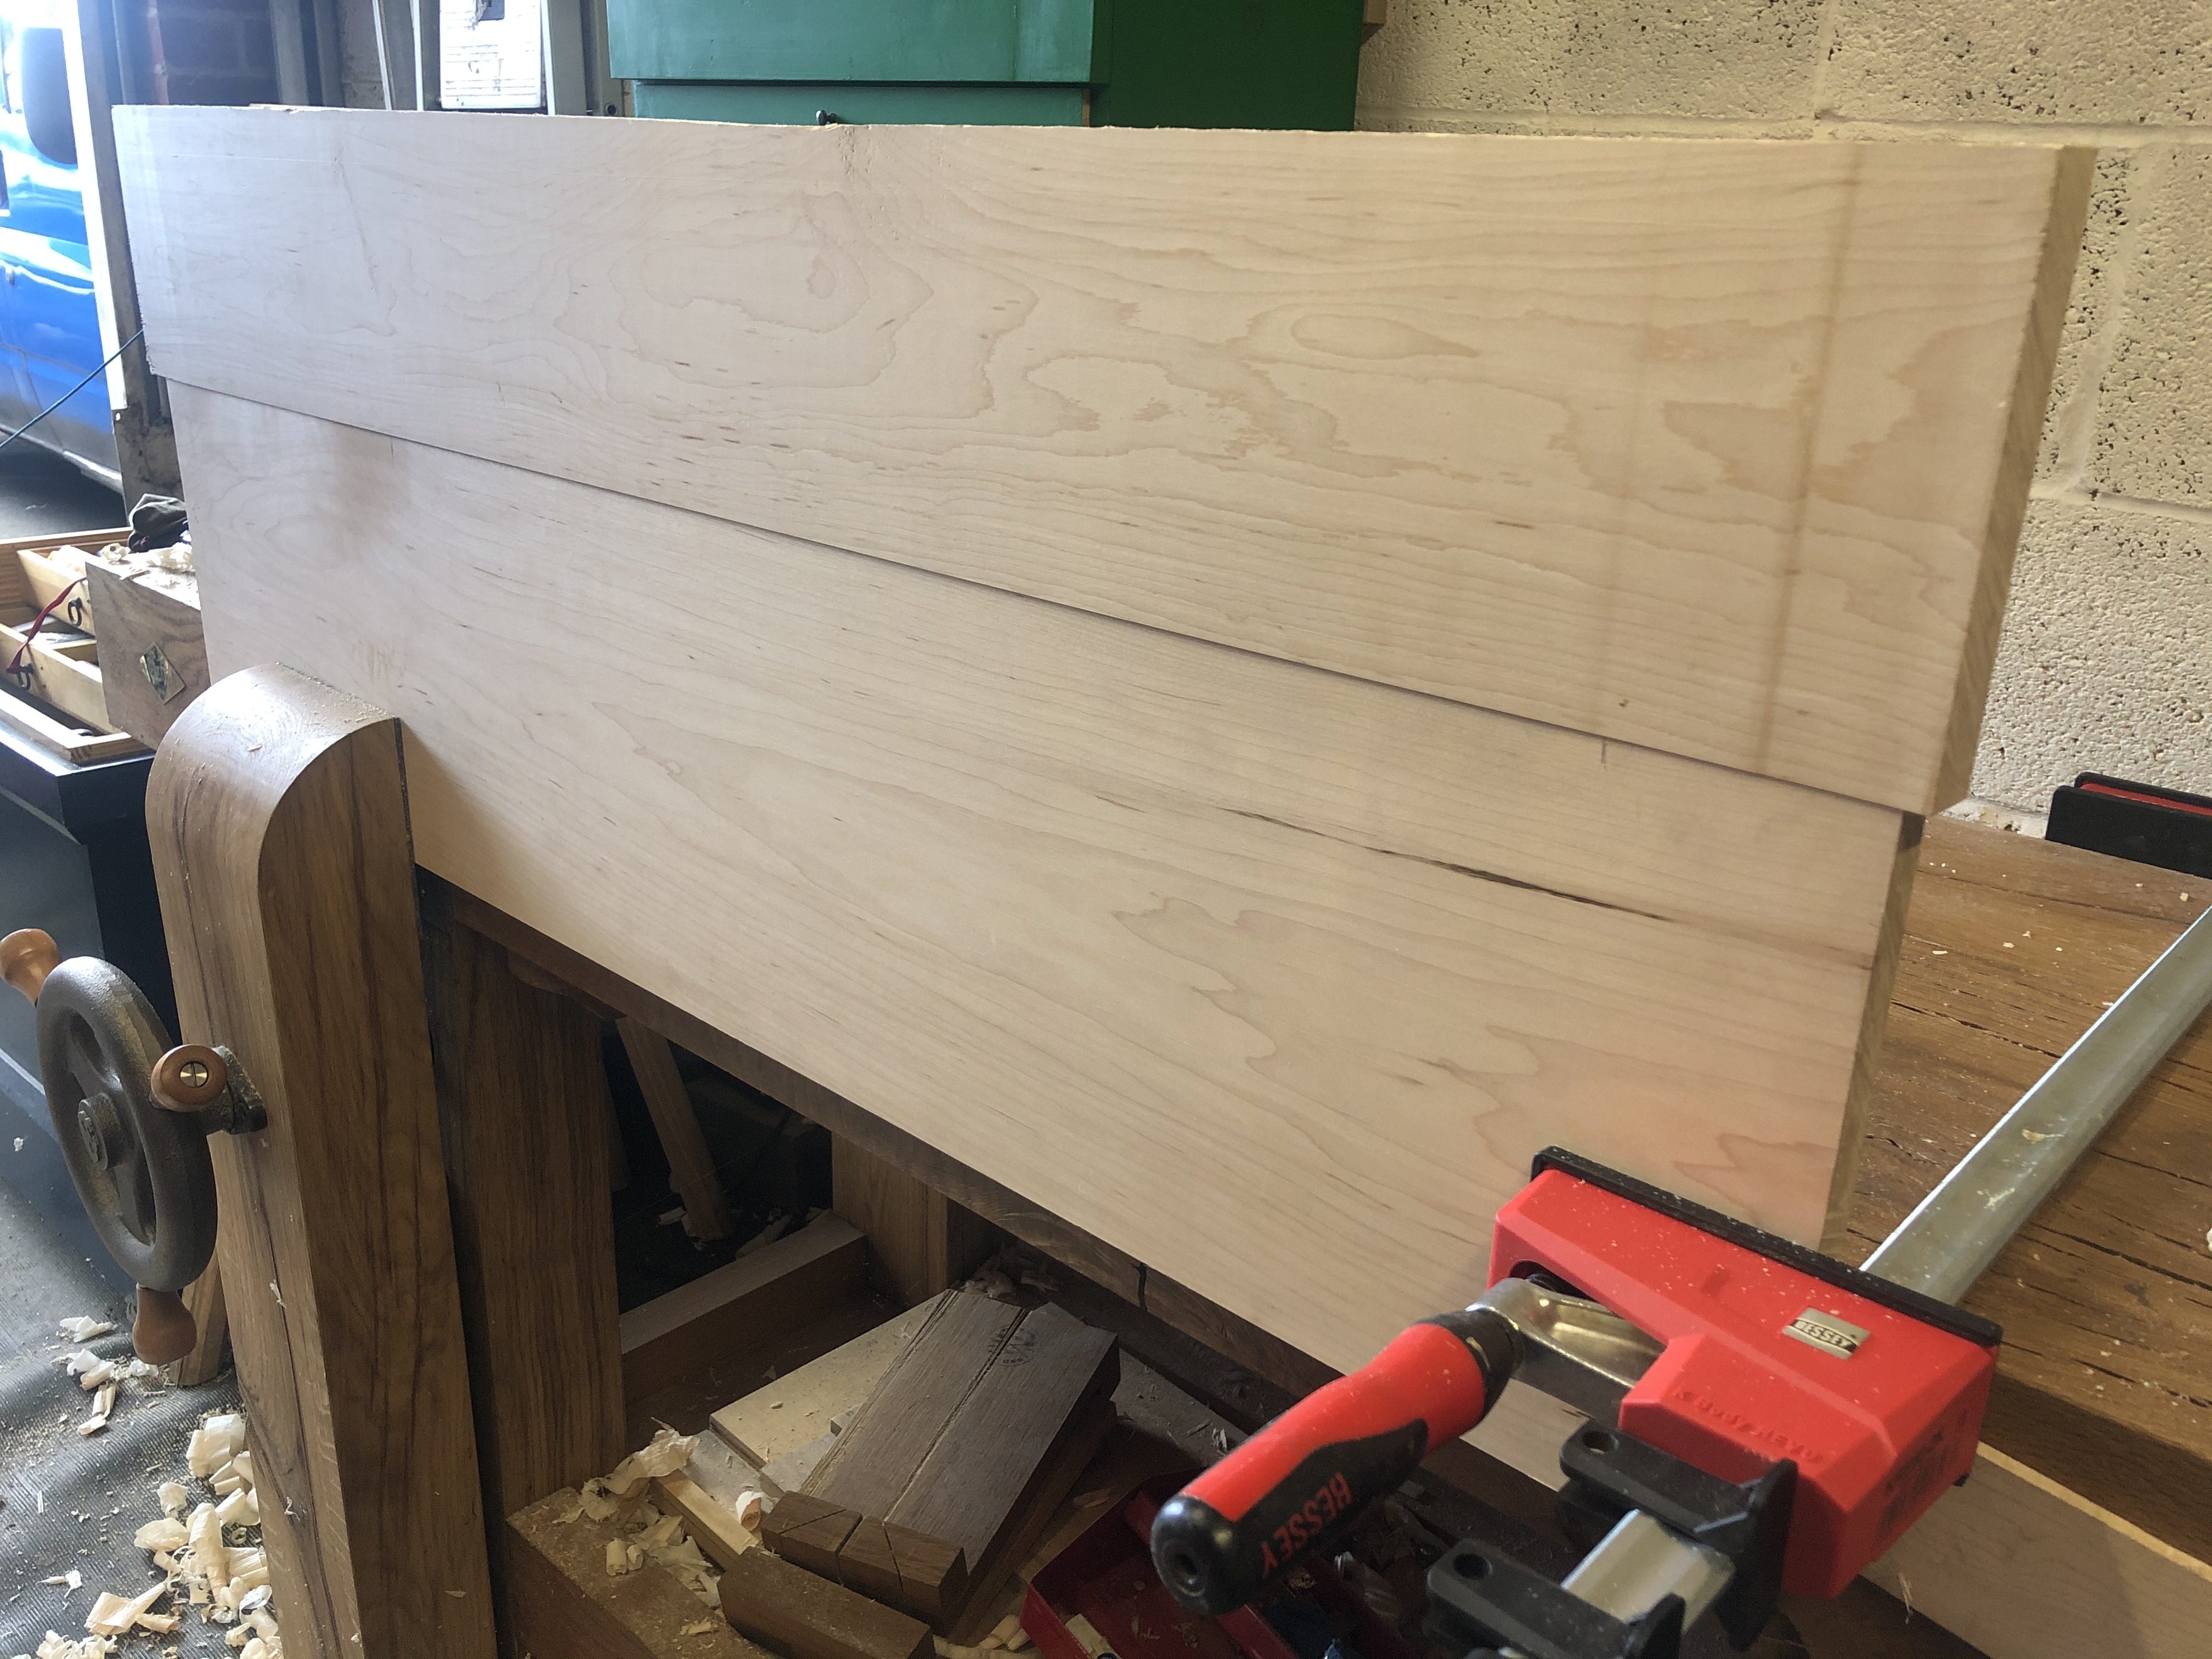
Preparing the new joint. The top-most component is over width, which makes flushing up after glue-up easier.
Having surfaced the panel and planed it to dimension, I wanted to ensure that breaking the panel down and preparing a more satisfactory joint did not result in any damage being inflicted on the finish surfaces. To remove the current joint, I ripped the panel on the bandsaw, cutting just to the waste side of the glue line. This ensured that I would preserve as much of the existing panel as possible. I then jointed both edges simultaneously with the No8 plane set to a fine cut, making sure that the entirety of the old glue was removed before test fitting the joint. The new piece being scabbed on was also left overwidth so that I didn’t have to worry about getting the faces of the panel coplanar during glue up. Once I was happy with the new joint I glued it using Titebond liquid hide glue, situating the new component so that the extra width created an overhang on both sides of the existing panel.

Flattening the new section
Once the glue had cured, I flushed up the new piece using my No5 hand plane, with the heel of the plane on the existing panel to act as a reference surface. Once the panel was just a hair off final thickness I moved to the smoothing plane to remove any tool marks and tearout. The end result is a much more acceptable glue line, and the return of my ability to sleep at night (this week at least).

Maple is unforgiving of glue lines, but this one I can ive with
Was I being neurotic over what was at the end of the day a relatively minor imperfection? Quite possibly, but I find that if a project starts off on the wrong foot it will haunt you for the rest of the build (and possibly beyond). And when it is something I know I can get right, I feel compelled to correcting the error before moving on with the project. For what was only a few hours work, I’m glad that I tackled this issue, and can now progress with the rest of the build with a clear mind. Next up is flattening the shelf panels and then cutting some joinery.
