How I “Met” John Brown

IMG_6182

I never got to meet John Brown. Truth be told, I didn’t hear of his name until several years after his death. But I’m starting to feel like I know the man.

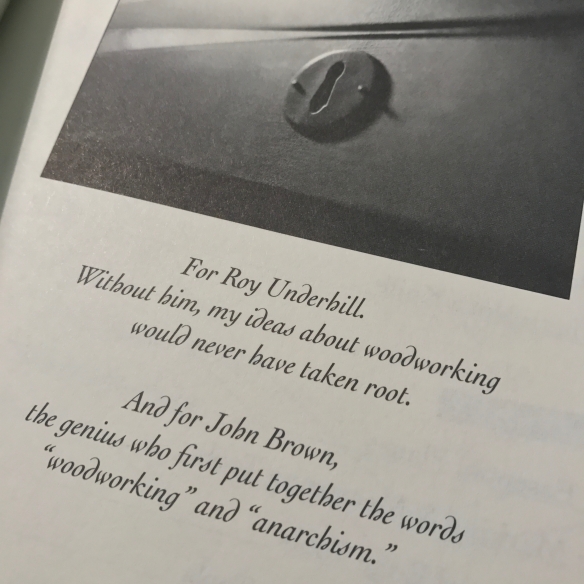
My first introduction to John Brown, and to Welsh Stick Chairs, was as I imagine it was for many woodworkers, a blog post Chris wrote. These unusual chairs were nothing like I’d ever seen before – theirs was a dynamic form, suggesting a feral energy coiled within the sticks, waiting to spring out. I was intrigued, but at that time focusing on lutherie, so I mentally filed the chair away for another day. A little over a year later and John Brown was again mentioned on the Lost Art Press blog, this time in the context of his influential, if hard to find, book Welsh Stick Chairs. Then I bought a copy of The Anarchist’s Tool Chest, and opened the cover to find a dedication to John inside. I was just starting to think about building furniture in addition to my usual workshop diet of lutherie, and my interest was piqued, but I still knew precious little about John or his chairs.

IMG_6238

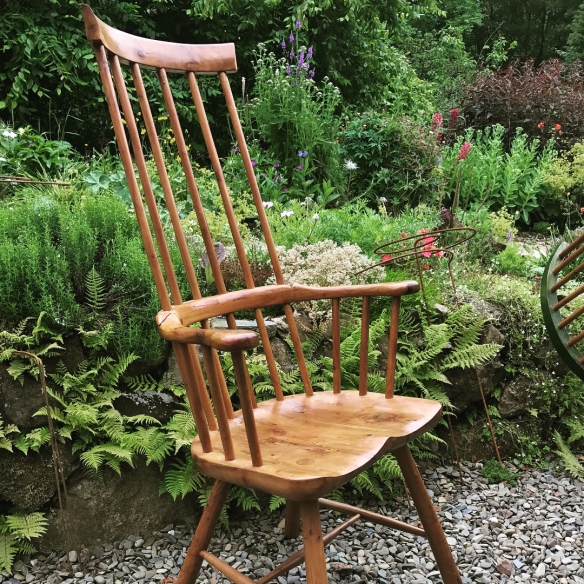
Welsh Stick Chair in yew, by John Brown

All of that has changed in the past twelve months since I joined the team for the Life & Work of John Brown. The chairs still fascinate me, and I cannot wait to start building some with my co-author Chris Williams. And I feel that I am starting to know John a little. Over the past year we have combed through all of John’s articles for Good Woodworking, his book (yes copies are still out there if you search for them, yes you will get gouged for a tatty second hand copy), his article for Fine Woodworking, and his correspondence. All of this is a great starting point for getting to grips with John’s passion for hand tool work, his vision of the Anarchist Woodworker, and the importance he placed in the Welsh-ness of his chairs. But all of that only presents half a picture – it tells you how John perceived himself and his work, a perspective which is incredibly important. But unless you have exceptional self awareness, your writing and correspondence will never tell the reader how other people perceive you.

IMG_6218

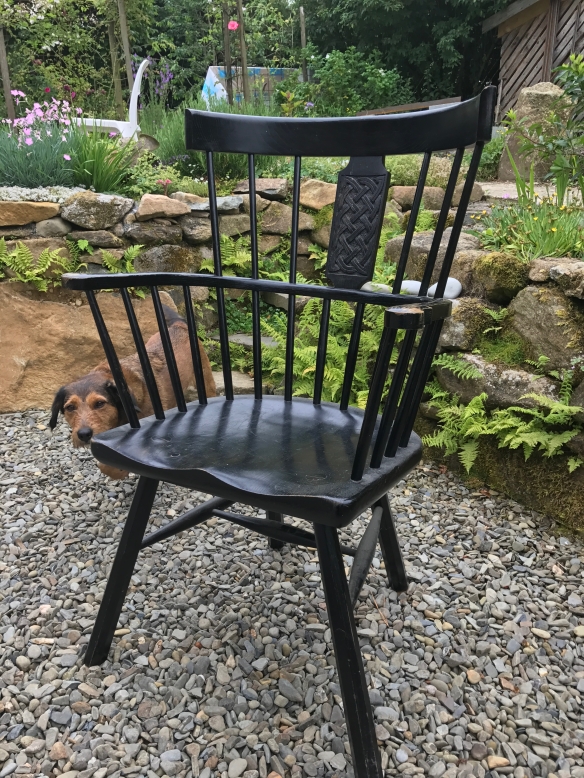
Welsh Stick Chair with carved back panel

And so I’ve spent the weekend on a research trip to deepest Pembrokeshire, where John spent many of his chair making years. This trip has been revelationary, giving my understanding of John context in terms of both space and relationships – we saw the house he lived in when he first started building Welsh Stick Chairs, and the countryside that he wrote so passionately about in Good Woodworking. We also spent time with some of John’s family and friends, talking about John’s path as a woodworker and chairmaker, and his motivation and philosphy in craft, trying to understand the man behind the 
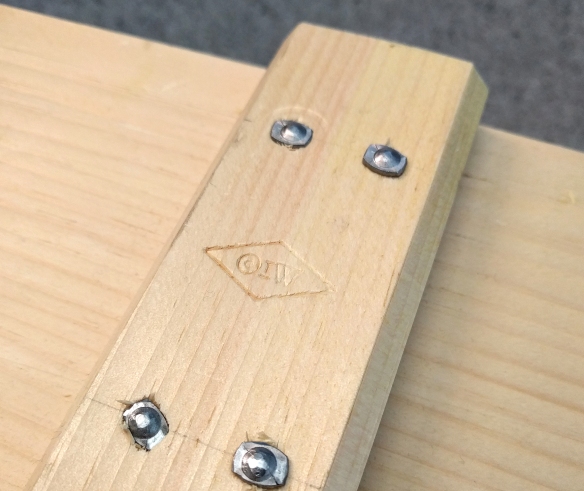
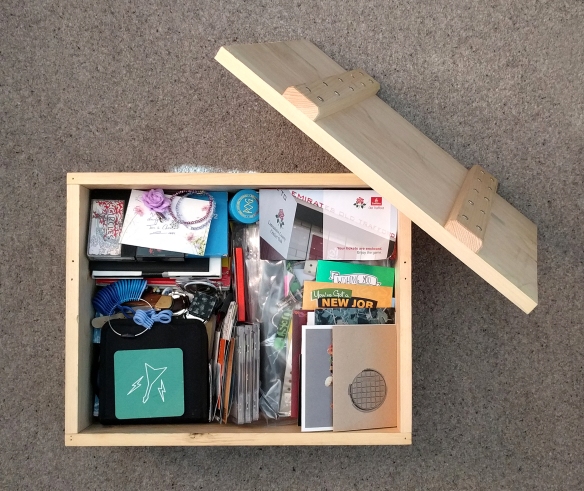
Anarchist Woodworker. One of the joys of carrying out interviews is not just answering the big questions you came armed with, but the incidental details, or stories that you never thought to ask. Yesterday I sat in a Welsh kitchen, enthralled while John’s first wife unveilled the very first thing John had made from wood – a simple lidded cotton box held together with small tacks, and which is still in use today. It was a powerful reminder that even great makers do not start out building masterpieces – they have to start with simple projects just like the rest of us.

IMG_6235

The first item John built as a woodworker – this cotton box is 61 years old. The path John took from this cotton box to his final chairs is a fascinating.

There is a responsibility when writing about someone other than yourself. To write with integrity, you must approach the subject both sympathetically and honestly, critically but without judging. Above all, it must be accurate. In many ways this is not dissimilar to researching and writing history (one of my very first loves), only in a much more modern setting. Tracking down answers to our questions, and uncovering what should be a rich and vibrant narrative, is thrilling. We won’t be writing a full biography of John Brown – that would take several volumes, and much of it is not relevant to John Brown the chairmaker. But as someone whose craft was more than just what he did with his hands, he is in many ways indivisible from his work. And so we are going to tell the story of Chairman Brown, and to hopefully prompt a well deserved re-evaluation of his impact on the craft.

IMG_6240

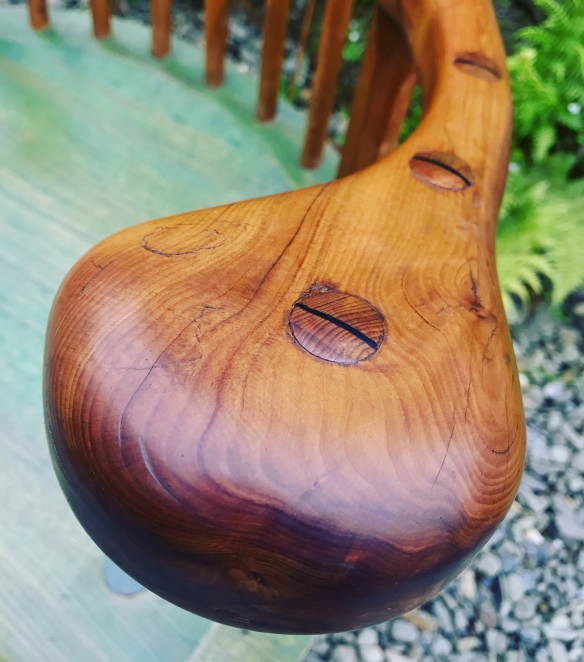
The domed stick ends are one of my favourite details on this chair.

Yesterday would have been John Brown’s 85th birthday – a fact that I did not learn until after we arranged the field trip several months ago. But it felt very apt that on what would have been his birthday, I finally saw several of John’s chairs in the flesh for the first time. Running my hands over the smoothed arms, feeling the rough-sawn surface of the underneath of the seat, and yes sitting in, John’s chairs transformed for me a lot of his writing from abstract concept to real craft. These chairs have power, very much like the words of the man who made them. This is a power, and an ethos, which we hope to convey in the Life & Work of John Brown.

I cannot wait to bring you all along for the journey.

IMG_6237

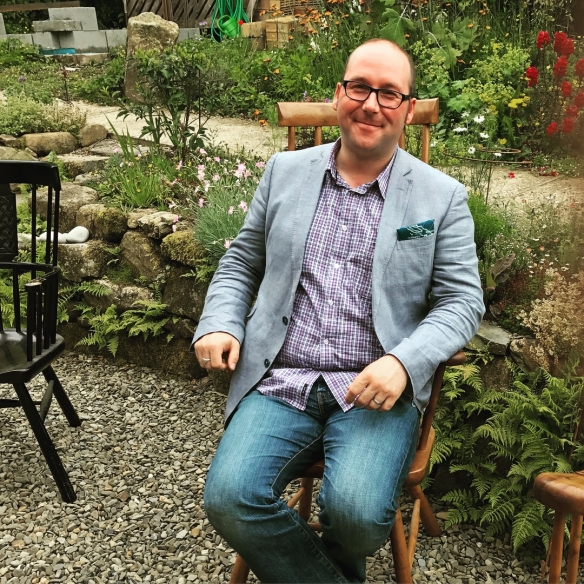
Of course, I had to sit in the chairs.

A Packing Box in the Wild

I’ve written before about how when a project leaves my workbench I tend not to write about it again. Maybe that is entirely natural – it is very satisfying to write about the process of making, and there is an easy narrative arc to writing up projects and the insights offered by standing at the bench. But I do think that seeing projects once they have been released from the workshop, into the wild, can give a new context to the build process, especially when someone else is using something I’ve made.

IMG_3573

The Packing Box loaded up and ready to go to Tom

When I made my first Packing Box from the Joiner & Cabinet Maker I did not have a particular use in mind for the box itself. It was a project I had wanted to build for three years, and I could see that there was a lot of lessons hidden within what was ostensibly a simple project. And so I approached it as a training exercise. But when I finished the build I discovered that the Packing Box itself was really quite charming, and instead of letting it languish unloved in a corner of the ‘shop I wanted to find a worthy use for it. After some weeks of pondering, I filled it with craft beer, mix cds, and an OtW tee, and sent it off to my good friend Tom Richards to say thank you for the outstanding work he had done on creating the branding for Over the Wireless.

OTW Box Shots 1

Occasionally since last summer I’ve wondered what Tom did with the Packing Box. And suddenly last week a series of photos popped up on Instagram, showing a familiar forest of clinched nails. It turns out that Tom has purposed the packing box as a memory box, holding several decades of gig tickets, cards, mix cds, and other precious ephemera he wants to keep safe. When I mentioned to Tom that I’d seen the Packing Box on Instagram he replied to me that he had thought “how perfect for the box of a ‘memories box’ be one of the memories itself”, which was incredibly touching! Tom kindly agreed to share a couple of photo of the Packing Box here on the blog.

OTW Box Shots 2

Tom is now using the packing box as a memory box holding gig tickets and other precious ephemera

I’m intending to make writing about projects that have escaped into the outside world more of a feature of the blog (all of which will be captured under the “In the wild” category on the right hand side of the screen). Hopefully we can get a conversation going about projects that have left the workbench and found their way to other people – something which Shaun’s excellent blog post already started several hours ago!

The Policeman’s Boot Bench… part 12

The third backboard for the boot bench is now fitted, while the fourth has been partially processed. At the end of last week’s blog post I was intending to fully process and finish the final two backboards before fitting them at the same time. However while working on them I decided that it might be better to fit the third board, and then tweak the fourth to fit the remaining space, as this will give me a further opportunity to fine tune the fit of the final board.

_DPP3514

Flattening the reference face of the oak backboards

Over the past year I’ve written plenty about processing stock from rough, so I won’t describe the steps yet again. But while I was planing the backboards down to final dimensions, I was struck by how much this process has become second nature in the 12 months since I started working through The Joiner & Cabinet Maker. The projects in The Joiner & Cabinet Maker were really my introduction to working from rough stock, as it is not something that happens much in my lutherie work! Processing material in the rough can be an intimidating process for beginners, but with a little practice, and an understanding of why the process works, it is a straight forward matter to flatten and dimension even large boards by hand. Processing stock by hand is also an excellent opportunity to become familiar with the core trio of bench planes, and with working wood. All of which means it is definitely something I would encourage beginners to have a go at, and not be intimidated – just grab a jack plane and start making some shavings.

_DPP3527

Shooting the ends square with the Quangsheng No.22 mitre plane

The one change I made when processing these two boards was when it came to shooting the ends square. Normally I use a Lie-Nielsen No.51 with an Evenfall Studios shooting board. However, I had a Quangsheng No.22 mitre plane sitting on my workbench waiting to be reviewed for Furniture & Cabinet Making. I like to use review tools on real life projects wherever possible, as this gives me the best insight into how they perform. So as a starter for ten I set the Quangsheng up on a smaller shooting board made by Derek Jones, and planed the ends of the backboards square on that set up.

_DPP3539

Using cut nails to space the expansion gap between the boards

Cut nails allow for seasonal expansion by bending slightly as the wood moves, which prevents splitting. To allow the nails to do their job it is necessary to leave some room for expansion in the tongue and groove joint. As we are in the middle of a very hot and dry spell (at least, for England) I left more expansion room than I would if I were assembling the backboards during the dead of winter (when the boards would be at their maximum expansion, and most likely to contract over the coming months). I separated the joint just enough to be able to stand the tip of a cut nail on the exposed tongue, and then lined up several nails along the joint to ensure a consistent gap. The backboard was then nailed to the shelves using two nails per shelf, on 3 1/2″ spacing from each edge of the board.

_DPP3540

To lay out the nails, I used a combination square and brad awl to mark the location, checking the alignment with the nails fixing the outermost backboards using a 50″ straight edge. A tapered drill bit then drilled pilot holes to a depth of 2/3 of the nail’s length. Once the board was secured to the carcase I removed the cut nails I had used as spacers along the expansion gap.

The final backboard will be finished and fixed in place when I’m next in the workshop. After that, I’ll be onto making the exterior pretty and applying the finish.

IMG_6111

Looking inside the casework shows the beading detail on the tongue and groove joint.

The Policeman’s Boot Bench… part 11

The first two backboards have now been fitted to the Policeman’s Boot Bench, which means that I have only two more backboards to go before the casework is completely assembled. The end is truly coming into sight now!

_DPP3504

Ignore the front knob and push the fence into the workpiece for a straight cut.

After my test cuts with the Lie-Nielsen No.49 last week, I was ready to cut the tongue and groove on the backboards. The No.49 is very easy to use and produces repeatable tongue and grooves in 1/2″ material, so I expect that it will see heavy use in my tool chest. Although it is a simple tool, there do seem to be a couple of key pointers to get the best out of it, and to my mind it behaves quite like a cross between a plough plane and a rabbet plane. Rather than take full length passes from the first push, I started at the far end of each piece with short passes that increased in length until I was planing the full edge, very much as you would with a plough plane. This helps establish the cut and prevents the plane from wandering off the line. The sole of the plane is not flat, rather it is shaped into a tongue and groove profile. This clever design means that once the cut is established, the sole of the plane will run in the emerging tongue and groove, and stop the plane wandering.

_DPP3507

The sole of the No.49 is profiled to match the tongue and groove it cuts. This pofile keeps the plane cutting straight and true.

Keeping the plane square to the workpiece is critical, and this requires correct body position. Firstly, I ignored the knob at the front of the plane, and instead kept my left hand on the fence, pushing the plane into the workpiece while my right (dominant) hand pushed the plane forwards. Secondly, I kept my head over the workpiece, just to the right hand side of the centre line – the same body position as I use with rabbet planes. I find this pushes the fence into the workpiece and counterbalances any tendency to tilt the plane to the left handside.

IMG_6053

Philly Planes 1/8″ beading plane, and the Sterling Tool Works plane hammer.

Finally, to avoid bruising the tongue and groove with the sole of the plane, I did not lift the plane out of the cut on the return stroke, but simply slid the plane backwards before pushing through another cut. The result was a crisp tongue and groove in only a matter of minutes.

_DPP3512

After so much stock processing and joinery recently, I decided to spend a couple of minutes adding some subtle decoration to the boot bench. To enhance the appearance of the backboards I beaded the edge of the grooved board using my 1/8″ beading plane from Philly Planes. This is one of the most fun tools I own, but more importantly the shadow line from the bead will give the joint between the backboards a nice visual flow, and stop the transitions from one board to the next from being too abrupt.

_DPP3510

The beading profile on the tongue half of the joint.

After beading, I gave the front and back of backboards two coats of blonde shallac, followed by a coat of Libern Black Wax to the front face (which will be visible inside the bootbench).


As I mentioned previously, the shelves were over-width when the boot bench was assembled. Fitting the backboards would require placing the bootbench face down, and while the shellac on the backboards was drying I trimmed the front edges of the shelves until they were flush with the sides and top of the carcase. This was a slightly awkward operation as the bootbench is too big for my workbench, and I don’t have enough saw benches to put one under every corner. The result was weilding a No.8 jointer while kneeling on a concrete floor. Not entirely comfortable, but the pay off was removing the excess material and dried glue to reveal tight and well fitting dados.

IMG_6064

Cut nails and my Black Bear Forge hammer – a dream combination. Angling the nails slightly increases their holding power.

Once the shelves were flushed up I was able to maneuver the boot bench face down on a pile of moving blankets, and fit the backboards. The first two backboards were fitted one at each end, as this means I can adjust the size of the remaining backboards to fit the precise space available. Each backboard was glued down their outermost long edge into the corresponding rabbet, and nailed to each of the shelves with decorative wrought head cut nails from Tools for Working Wood. As the backboards are 10 1/2″ wide I used two nails per shelf, on 3 1/2″ centres. Pilot holes were drilled using a tapered drill bit and my Grandfather’s egg beater drill, and the nails were knocked in using my 16oz hammer by Black Bear Forge. This combination of one glued edge and nails gives the carcase further rigidity but still allows for wood movement as the nails will bend under seasonal expansion and contraction. The nails are gorgeous, and even if they won’t be seen once the boot bench is installed it pleases me to know they are there. The inner two backboards will be nailed in, but not glued.

IMG_6068

One backboard fitted – the blue tape reminds me where the top edge of each shelf is.

The Policeman’s Boot Bench… part 10

IMG_5979

Shavings landing on the bottom shelf of the boot bench

Every build for me is an emotional journey as much as a series of physical processes. For the Policeman’s Boot Bench, that journey started with real enthusiasm about the build at hand, and excitement at the opportunity to provide the client with an heirloom piece of furniture. Yet as the project progressesed and I got closer to assembling the casework, a nagging doubt started to grow: that the project would not fit together properly, and that some small but critical detail had been missed. Now, this is in many ways entirely irrational – everything looked good on the full sized plans I had drawn, and I knew that the joinery should fit absolutely fine. Yet over the months of working on the casework I did started to wonder if I had missed something which would prevent everything a good clean fit. And that doubt grew the closer I got to gluing-up the casework. I’m sure other woodworkers have very much the same experience, although it is not something I’ve really talked about before. But who knows, maybe I’m just neurotic? If any readers get the same mid-build worries do let me know! In many ways I am sure it is a manifestation of the responsibility of working on a project for a client rather than for yourself, and also the fact that all of the time spent working on individual components is effectively at risk until such time as the components are safely assembled.

IMG_5976

Needless to say, the boot bench went together absolutely fine, first time, and with no extra fussing needed (as I wrote about in part 9). Which was a huge source of relief, and a certain amount of “I told you so” from Dr Moss. I guess it goes to show that sometimes you have to stop worrying and just trust in your skill set.

And there there the boot bench stood for several weeks – real life intervened as soon as I returned from Handworks, and I’ve had next to no opportunity to get back in the shop until today, when I finally managed to steal myself away for a day in the ‘shop and was pleased to see that all of my doubts about the boot bench were for nothing.

IMG_5988

There’s plenty of work left to do, but I see the sunlight catch on the figure of the shelves, and I think this one will turn out ok.

My first temptation was to clean up the dovetails as soon as I got back in the workshop, to see exactly how they fit and how the joinery will look under a finish of shellac and wax. I managed to resist though, and I shall have to wait a while longer before I plane them up. The reason for this is that I only want to pretty-up the exterior of the casework once, at the very end of the build before I apply finish, as that way I can be sure to catch all of the workshop-rash and minor scratches that occur when working on an assembled piece. I also had to resist the temptation to flush up the front edges of the shelves, for the same reason.

IMG_5971

Waiting to be turned into backboards

The next major stage of construction, and my focus right now, is to process and fit the tongue and groove backboards. As with the rest of the casework, these are oak, although this time the rough boards are 3/4″ rather than 6/4″. I had cut the back boards slightly oversized months ago, and they had been lying in stick to acclimatise. After cutting joinery and assembling casework, there is something quite refreshing about going back to basics and processing stock for the next round of components. The back will take four boards, which started as rough boards each 8″ long by 11″ wide, and brought them down to final dimensions of 26.25″ long, 10.75″ wide and 1/2″ thick. Processing the stock was very much the same as I’ve written about before – flattening the show face (in this instance the side that will face into the casework, and will be seen from the front) and then jointing a reference edge, before planing the other face and edge down to size, and finally shooting the ends square and to length. The same satisfying, predictable process. The main different here is that the boards need to be overwidth to allow for the tongue and groove to be planed along the edges.

IMG_5978

Before and after – transforming rough boards to smooth never gets old

To cut the tongue and groove I’m using a Lie Nielsen No.49 plane, which I bought specifically for the boot bench (although I’m sure it will see plenty of use on future projects, including the bookcase out of The Anarchist’s Design Book for my study), and it is a tremendous amount of fun. There are many ways to cut tongue and groove, including router bits and spindle moulders, but a dedicated plane like this cuts it swiftly, cleanly, and without the need for spinning finger munching machines, so it gets my vote!

IMG_5990

Testing the L-N No.49 on some scrap 1/2″ southern yellow pine, prior to cutting the tongue and groove on two backboards

Two of the boards are now processed and ready for finishing, and these will be fitted at each end of the boot bench, leaving the two inner boards to complete. The two outer boards will be glued to the carcase along their outermost long edge, and all of the boards will be nailed to the shelves. It is really good to be back in the ‘shop after a three week absence, and Handworks has left me feeling energised and inspired, so I am looking forward to taking the positive energy and directing into some good work over the coming months.

IMG_5989

The first backboard fits nicely