About overthewireless

One time historian turned construction lawyer, musician, martial artist, photographer, distance runner, builder of musical instruments. Hand tool user all the time, every time.

The Book Book: A Year On The Path

CodxAmiatinusFolio5rEzra

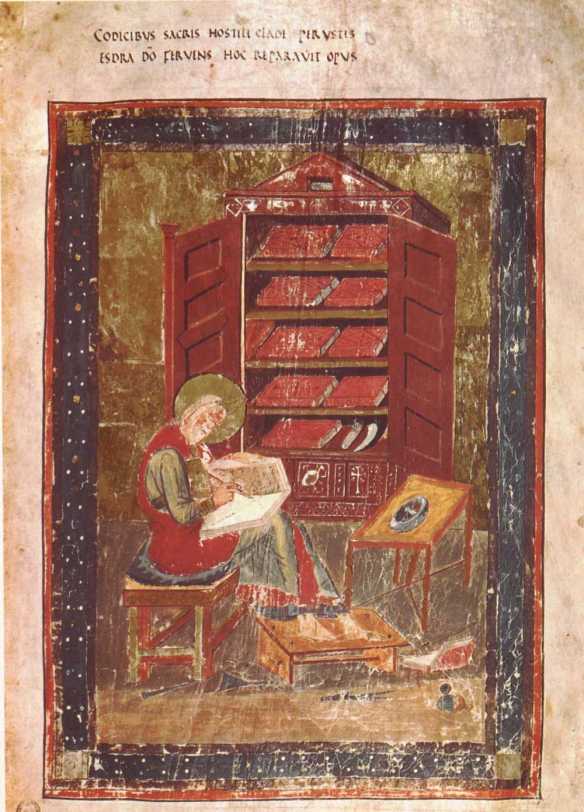
This portrait of Ezra from an 8th century bible may be one of the first illustrations of what we would recognise as a bookcase

I suppose it was inevitable that bookcases would eventually be the subject of my attention as a woodworker. I’ve always been a voracious reader and my book buying habit was only reinforced by studying history at undergraduate and graduate level, habits which were amplified by my wife’s profession (she is a lecturer in history at the University of Northampton) and appetite for reading. When Dr Moss and I moved in together, one of our first acts was to buy seven Billy bookcases to house our combined literature and history library. At that time, I was setting up my first workshop having studied lutherie at the Totnes School of Guitarmaking, and furniture building seemed like a different world to building guitars. So, a trip to IKEA and carrying seven flatpack bookcases up the torturous steps to our house it was. Six of those Billies survived two house moves and eight years of constant overloading, but their days are numbered and I now make more furniture than I do guitars. It is time to replace the Billies and to liberate the several boxes of books that have languished for years on my study floor.

Why should any of this matter? Well, because for as long as I can remember, I’ve viewed bookcases as a storage solution for the question of “where do I put all these books?” But I’ve not stopped to think about the bookcases themselves all that much. That’s how most folk think about bookcases; even the librarians in charge of historic collections tend to look at the contents of the shelves instead of the casework. Book storage is largely ignored until you don’t have enough of it.

But when you look beyond the books, and start to tease of the “why” and the “how” of book storage, things get interesting. Chris first talked to me about his idea for “The Book Book” in the autumn of 2017, and I was hooked. Not only was this a chance to replace those Billies, but also to piece together why bookcases developed into the form we now recognise. That is a path we’ve been on in earnest for a year now, and it is a fascinating opportunity to jump down many rabbit holes and to ask questions that might seem obvious, but for which no easy answers are available.

Oxford_Library_of_Christ_Church

Construction of the library at Christ Church, Oxford spanned a period of 63 years

One of the few books on this subject is “The Book on the Bookcase” by Henry Petroski – a fine book, but which focuses more on the “how” than the “why”. And the “why” is where the real action is. Book technology is a recognised field of historic research, but one that is concerned more with the making and use of books rather than how book storage developed, but it can tell inadvertently tell us plenty about the factors that shaped bookcase development. Bookcases have developed to house books, so understanding why books are the sizes and shapes they are, the customs of book usage, and value and importance placed on books, all tell us something about why bookcases developed how they did.

Oh, that’s easy” you might think. The development of the Gutenberg press encouraged standardised paper sizes which then determined shelf spacing. Well, possibly, but why those sizes and height-to-width ratios? Book storage pre-dates the printing press by hundreds of years – as soon as the first book was created, storage space was needed. And so, “The Book Book” becomes a wonderful opportunity to challenge preconceptions about book usage and production. It is a winding path from a monk fraudulently putting his name to a book in the 8th century, through court rolls, the medieval practices of producing books by scribes (both professional and amateur), the development of the printing press and early modern book production, the unchaining of libraries in the 16th century, 17th century diarist Samuel Pepys, campaign furniture, Thomas Jefferson, William Morris, to Danish minimalism and beyond. And breathe. Do you want to know what the earliest documented instance of adjustable shelving in bookcases occurred? So do we.

IMG_5386

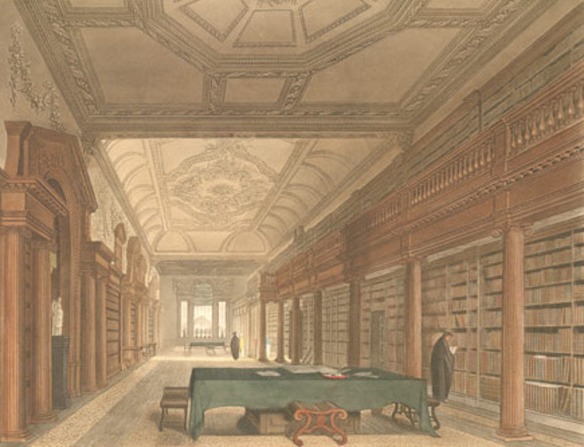
Lincoln College, Oxford houses striking 18th century bookcases

When woodworkers ask me what sort of book “The Book Book” will be, the closest example I can think of is “Ingenious Mechanicks.” Like that book, we will present a rigorously researched history (in this case of the development of the bookcase) alongside practical woodwork. As well as combing through texts on book technology, and scouring art history for examples of bookcases (the earliest example I can find dates from the 8th century), I’ve been researching the furniture record. In particular, historic bookcases still in use at Oxford University, some of which are over 500 years old, and the Pepys Library at Cambridge University. Historic bookcases give us key information on three key questions – what book storage was needed at the time of construction, how the bookcases were constructed, and then how they have been altered while in use due to changing needs.

DSC_2920

We will also be building notable historic bookcases, and covering techniques and practical considerations for designing and building bookcases. All you need to know to build your own book storage; the information I wished I’d had when I stood at that IKEA checkout with my mountain of Billy bookcases eight years ago.

I’ll be blogging about the research process and the breadcrumbs we have discovered, both here and on the Lost Art Press blog. I hope you will join us on this path.

Campaign Stools in Action

DSC_2929

The newly completed stool

Long time readers may remember that a few years ago I turned three sets of legs for folding campaign stools from Chris’ Campaign Furniture Book. At the time I had only ordered one leather seat from Texas Heritage, but I ordered a second seat a few months ago, which arrived recently.

DSC_2926

Maple with black leather, and sapele with burgandy leather

I fitted the seat to the stool legs the same day it arrived, and we’ve had several opportunities to use the pair of completed stools. This form is simple (it is an excellent introduction to spindle turning) and very functional – the stools fold up into a very small light bundle, yet they are strong enough to comfortably seat an adult. The Apprentice loves both seats, which is an added bonus.

F7E7AD72-A043-44C5-AB90-2E71AACD149A

When only the most elegant picnics will do

I’ll be ordering the third seat soon to complete my trio of campaign stools. Of course, no stool is complete without a matching Roorkee chair, so it looks like I’ll be making some Roorkee chairs in the near future too.

Dados for Days

DSC_2905

Marking the rebates with the Veritas mortise gauge

I like dados for fitting shelves to casework – its an easy joint to cut, and especially when paired with cut nails, makes for very solid joint. The boarded bookcase calls for three pairs of dados to house the shelves, and a rebate for the top rail. Because I use dados quite frequently I keep thinking about picking up a 3/4″ HNT Gordon rebate plane, but cutting dados the way I describe in this post is quick (each dados takes less than 20 minutes) and fun, so a dedicated plane feels like an extravagance, no matter how pretty they are.

DSC_2908

Setting a marking gauge from a chisel provides a quick and repeatable setting

I started by laying out the dados on both side pieces, ensuring that all layout was done from the reference edges. Once the shelf dados were layed out I placed the two sides against each other to check that each layout line was in precisely the same place on both pieces – this prevents layout errors and wonky shelves at a later date. The top rail is set 1/2″ in from the rear edge of the sides, and instead of using two marking gauges (one for each side of the rebate) I used the Veritas mortise gauge, with the two beams set to define the edges of the rebate at the appropriate distance from the edge of the side. The casework also features a kick underneath the lowest shelf. I don’t think Chris fixes this into a rebate when he builds the bookcase, but while I was in a grooving mood I decided to layout a rebate for this element too.

DSC_2909

Deepening the layout lines

Once I was happy with the layout on the inner faces of the sides, I transfered the dados onto the front and rear edges so that the depth could be marked out. Where possible I like to set my marking gauges by reference to an object of known thickness rather than trying to line up the cutter with graduations on a ruler – this can be a component of casework, or in this instance a chisel of the right width. This reduces the opportunity for error, and makes for a repeatable setting.

DSC_2910

Preparing the first class cut

To cut the dados I use my Bad Axe Bayonet saw, filed hybrid. This saw has been specifically designed for cutting joinery, and the 14″ saw plate and fine kerf make it ideal for dados and other fine joinery. You can read a more detailed review here. Reaching straight for the saw might work, but you may also find the saw plate wandering across the workpiece and marring the surface, which is less than ideal. In the Anarchist’s Design Book, Chris describes using a batten and push stick as a guide for dead nuts straight dados, which is a nice approach. I go about it slightly differently, which shouldn’t be a surprise as there’s at least 17 different and effective ways to undertake any single woodwork operation.

DSC_2913

Cutting the walls of the dado with the Bad Axe Bayonet

I use a typical approach for a “first class cut”. First I deepen the knife line with a gentle tap from a mallet on a wide chisel – I keep a 2″ butt chisel precisely for this sort of work and for paring tasks. With the line deepened, a long paring chisel can then cut a trench on the waste side of the line – the aim is to remove a small amount of waste with the layout line providing one wall of a “v” shaped trench. The trench guides the saw, keeping it running true. The first few strokes are gentle, and I keep two fingers of my off hand on the toe of the saw to prevent it from jumping out of the cut. Some lubrication on the saw plate helps too, particularly when the saw is cutting along the full width of the workpiece. A piece of blue tape on the saw plate helps to mark the full depth of the dado.

DSC_2917

The majority of the waste can be removed with the chisel bevel-up

Once the saw is cutting at full depth along the length of the dado it’s time to chisel out the waste. Start with the bevel facing up – this is more aggressive and will knock out the waste quickly. It is vital to work from each end of the dado to prevent spelching at the ends. If you watch the saw kerfs it is possible to gauge by eye how much material needs to be removed. As you get closer to the bototm, switch to a bevel-down chisel orientation. Once I am close to the bottom I then move to the router plane to clean up. The router plane is not a bulk removal tool, so it really does help to have removed as much material as possible with a chisel. Placing blue tape either side of the dado helps to avoid marking the surface with the router plane.

DSC_2920

Using the chisel bevel down is less aggressive, which is useful as you approach the bottom of the dado

I had limited shop time this weekend, so have a bit of work left to do on one side, but then the joinery will be cut and I can look at assembling the main structure of the bookcase.

DSC_2922

Cleaning up the dado with the router plane

The fun stuff draws closer

DSC_2887

Laying out the shelves to avoid bad knots and splits

I had a final push this weekend to finish dimensioning the main components for the boarded bookcase (the sides and shelves), ready for cutting joinery. This largely consisted of bringing the shelves down to the required width, and trimming all parts to final length. All straight forward stuff, although as with every step of this build I’ve found the hard maple means that every process takes longer and requires more frequent sharpening.

DSC_2889

Shooting the ends square

I chose to dimension the shelves to their final 12.5″ width before triming to length as this meant that I had less end grain to trim. When carrying out the same process on multiple components I prefer to undertake each  step for all of the parts before moving onto the next step. Here, that involved first planing a reference edge square and straight with the No8 jointer for all the shelves, and then marking the width with the Hamilton panel gauge, after which I ripped the excess width with my Disston D8 and then finished up with the No8 jointer plane. Batching up the steps across each board made for a very efficient process, instead of moving thorugh the full operation for the first board, and then starting again for the second and so on.

DSC_2894

Once the shelves were down to width I shot one end of each square using the new shooting board, and then using that end to then measure the final length and mark off the opposite end. I trimmed the excess waste using a hybrid filed tenon saw – the shooting board makes a very efficient bench hook for wide pieces which my standard bench hooks would struggle with, and then shot the end square with the Lie-Nielsen No51. The new shooting board worked very well – the track keeps the plane travelling true with minimal friction, and the fence mechanism is solid and reliable. Shooting end grain square is a critical step, but can feel like a real chore if your shooting board is fussy or unreliable, but after putting in an extended shooting session, I’m pleased to report that the Veritas hardware feels reliable and sturdy (this is not an ad – I paid full price for the hardware, etc). Having a 24″ square shooting board has also proved to be very useful for these larger pieces – yes it is overbuilt, but I doubt I’ll ever find myself complaining that the desk does not support the workpiece sufficiently.

DSC_2896

Dimensioned and ready for joinery

Once the shelves were dimensioned I then trimmed the sides to final length using the shooting board. These components are now lying in stick ready for the joinery to be cut. While that stack of boards doesn’t look like much, it has been a fair amount of work to glue up 6 panels and dimension them all by hand, especially in unforgiving hard maple. I’m looking forward to the fun stuff coming up (joinery!), and then gluing up the main structure of the bookcase.

Straight Shooting

IMG_7355

Everything you need for a rock solid shooting board.

Before I could finish dimensioning the shelves and sides of the boarded bookcase, I needed to build a new shooting board for squaring the component ends. I ordered the Veritas track and fence hardware earlier this year, and it has been sitting on the side in the workshop waiting for me to get round to it. I finally had an opportunity two weeks ago to go on a supply run to my local timber yard and pick up some plywood for the deck of the shooting board. Although I was after a half-sheet of 3/4″ baltic birch, there was limited stock to choose from – I believe due to Covid-19 disruption to their supply chain. Fortunately I managed to snag three pieces of 1/2″ ply, all 24″ square. This would do nicely.

IMG_7490

Laminating the cleat

The first stage of the the build was to laminate layers of ply to form the deck. While Veritas provide suggested dimensions and minimum thickness in their instructions, given the material I was able to pick up, I decided to overbuild this shooting board. Two layers of play were laminated together to provide the base of the shooting board, with the third square offset by the width of the track. I had some PU glue leftover from the express lathe stand build last year, and while it’s not an adhesive I would use for furniture building, it is perfect for jig building as it is water resistant and won’t degrade in my unheated workshop. PU is very slick and can encourage glued components to skate around, so I glued the laminations over a couple of days to make clamping sheets of ply which wanted to slide around more manageable.

DSC_2845

Preparing the maple fence with the Lie-Nielsen No62

Once the deck had been laminated, I rummaged through my scrap pile and found a length of 2″ wide 3/4″ ply which I cut into two 24″ lengths, which were then laminated to form a 6/4″ thick cleat on the underside of the rear edge of the shooting board deck. The cleat will allow me to hold the shooting board in place with the leg vise, or to simply brace it against the edge of the workbench. Shop jigs are a great way to use up scrap, and I also rescued a piece of maple for the sacrificial fence.

DSC_2843

Removing the foamed and hardened PU squeeze-out

PU might be convenient for ‘shop jigs, but the squeeze-out foams up and makes an awful mess. Fortunately, the Benchcrafted skraper is an excellent tool for removing stubborn dried glue, and cleaning up the squeeze-out horror show was a quick and easy job.

IMG_7499

Preparing finish with a magnetic stirer. No more endles shaking jars waiting for shellac flakes to dissolve for me

Before installing the hardware, I also applied a simple finish to the deck. In the spirit of useing scrap, I mixed some old shellac with a little pumice powder. Brushed on, this provides a slightly grippy surface (which is beneficial for jigs where a slick finish would make holding the workpiece tricky) which will provide protection from glue and moisture – a finish recipe I learned from Derek Jones. I’ve just picked up a cheap magnetic stirrer for mixing shellac, following Chris’ recent post, and it worked well mixing the pumice power into the shellac solution.

DSC_2844

Calibrating the fence with the Vesper 10″ square

Once the shellac dried, it was then a case of installing the hardware. Veritas provide very clear instructions, although it is a shame that there is no initial diagram specifying what each of the fence components is. Nonetheless, the instructions were easy to follow and I had the hardware installed pretty swiftly. The fence feels rock solid when locked down, but also offering a significant level of adjustability for different common angles as well as fine tuning the position to get the required angle bang-on. I calibrated the 90 degree setting with my Vesper 10″ square which functions as a master square in my shop.

DSC_2847

The finished shooting board and Lie-Nielsen No52, ready for action

Unfortunately, I ran out of time to test drive the shooting board, but my Lie-Nielsen No52 runs sweetly in the track, and the 24″ square plywood deck will facilitate working on boards upto 15″ wide, while providing plenty of support to the workpiece. I’m looking forward to testing out the new shooting board in earnest over the coming week.

Just Shelfin’


IMG_7244

This old girl is 120 years old and still cuts the line like she’s on rails

I’ve now got one shelf left to process and then I’ll be ready to cut the joinery for the boarded bookcase. Processing the shelves has been a lot quicker thanks to only smoothing the show face (the top surface of the shelf) and leaving the underside scalloped texture from traversing with the No5 plane. This approach is consistent with how the furniture record shows historic makers treating secondary surfaces, and the change in texture offers a pleasant change for those who explore the finished piece.

IMG_7241

Workhorses

Not that smoothing and achieving a perfect glassy surface is a chore, but it does take time. At the moment I’m putting a Holtey 985 through its paces in readiness for an article which will be in print later this year. Sadly the plane will then be returned to Karl, but it’s been a very interesting experience using a high-end handmade plane. If you want to know whether a plane that costs more than a family car is worthwhile, and the design process of one of the greatest plane makers in the world, then stay tuned for more details soon.

IMG_7246

Flawless finish on truculent maple courtesy of Karl Holtey

My process for the shelves has been to joint the boards oversized, and then once the glue has cured rip them to 1/2″ over-width using my Disston D8 (which turned 120 years old this year). The shelves will be orientated so that the widest board of each is at the front of the bookcase. The shelves are then flattened and surfaced on the show face, and then thicknessed from the underside by traversing with the jack plane. Working to the layout lines when thicknessing the shelves means that shelves will be flat and straight from traversing, so no other work is needed. Then it is a case of jointing the edges. I’ve not yet shot the ends of any of the components square yet, because I have the Veritas fence and track for a new shooting board waiting to be installed, but need to venture down to my local timber yard for some baltic ply. Shooting the sides and shelves to length should be quite a quick task once the shooting board is assembled, and then I can get on with the fun work of cutting joinery (six dados to fit the shelves to the sides). There’s not been much to write about with this build so far, which is why the blog has been a bit quieter than usual. But that should change once we get to the joinery.

A Rite of Passage

IMG_7158

Part 2 of my interview with the Modern Woodworkers Association is now live, and you can listen to it here. In Part II, Kyle and Sean subject me to that most ancient of rituals – the 5 Questions. So if you want to know (amongst oher things) what my favourite tool is, what my biggest stumbling block has been, and who my influences are, then tune in.

In other news, the boarded bookcase continues to progress, and I’m processing the shelves in good time. As expected, dimensioning the shelves is a faster process than the sides, as only the top -sode of each shelf has to be smoothed (compared to both faces of the sides), so the undersides can be traversed to final thickness and left as they are. This cuts the work involved by at least one third, so I’m rattling through this stage. Two shelves are left to go, then I’ll be ready to cut some joinery (finally).

Over the Wireless, Over the Air Waves

IMG_7094

A few weeks ago I was thrilled to be invited onto the Modern Woodworkers Association podcast. Episode 301 is now live and can be streamed through the podcatcher of your choice, or direct from this link. So, if you’d like to hear me talk with Kyle and Sean about The Book Book, parallel skills, history, and my journey into the woodcrafts, then do tune in. I hope you enjoy listening as much as I enjoyed being on the show.

If you have to ask the question…

… you already know the answer.

When I cleaned up the first panel for the boarded bookcase (which I’d glued up back in September 2018) I found a joint that was structurally sound but the glue-line for which was far mor visible than I would have liked. This panel was for one of the bookcase sides, and so would be one of the most pominent components of the finished piece.

IMG_6949

The bandsaw made removing the waste a precise and predictable exercise

What followed was hours of agonising:

  • Could I orientate the panel so that the glue line was in a less obtrusive place? Yes, but I’d still know it was there.
  • Would you even notice it in the context of the finished piece? Possibly not, but I’d still know it was there.
  • Would knowing it was there matter? The glue-line wasn’t going to have an impact on the longevity of the piece, but it sure was going to annoy me everytime I looked at the bookcase. Which will be every day, given that it is going to stand next to my staked desk.
  • Could I paint the exterior of the bookcase? That was definitely an option, but my original plan was to finish the bookcase with blonde shellac and Osmo to match the desk. And what happens if I redecorate my music room? Would I have to strip and re-paint the bookcase? Hiding the glue-line under milk paint feels an awful lot like cheating, and even if I can’t see it, it will still annoy me (see above).

In the end, I did what I should have done when I first cleaned up the panel and decided I wasn’t happy with the joint – I cut it down and re-jointed. Which all in all took a lot less time than the several weeks of obsessing over whether I could live with the original joint or not. If you have to ask the question, chances are you already know the answer.

IMG_6951

Preparing the new joint. The top-most component is over width, which makes flushing up after glue-up easier.

Having surfaced the panel and planed it to dimension, I wanted to ensure that breaking the panel down and preparing a more satisfactory joint did not result in any damage being inflicted on the finish surfaces. To remove the current joint, I ripped the panel on the bandsaw, cutting just to the waste side of the glue line. This ensured that I would preserve as much of the existing panel as possible. I then jointed both edges simultaneously with the No8 plane set to a fine cut, making sure that the entirety of the old glue was removed before test fitting the joint. The new piece being scabbed on was also left overwidth so that I didn’t have to worry about getting the faces of the panel coplanar during glue up. Once I was happy with the new joint I glued it using Titebond liquid hide glue, situating the new component so that the extra width created an overhang on both sides of the existing panel.

IMG_7080

Flattening the new section

Once the glue had cured, I flushed up the new piece using my No5 hand plane, with the heel of the plane on the existing panel to act as a reference surface. Once the panel was just a hair off final thickness I moved to the smoothing plane to remove any tool marks and tearout. The end result is a much more acceptable glue line, and the return of my ability to sleep at night (this week at least).

IMG_7081

Maple is unforgiving of glue lines, but this one I can ive with

Was I being neurotic over what was at the end of the day a relatively minor imperfection? Quite possibly, but I find that if a project starts off on the wrong foot it will haunt you for the rest of the build (and possibly beyond). And when it is something I know I can get right, I feel compelled to correcting the error before moving on with the project. For what was only a few hours work, I’m glad that I tackled this issue, and can now progress with the rest of the build with a clear mind. Next up is flattening the shelf panels and then cutting some joinery.